1
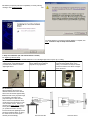
When the digital light sensor is positioned beyond 15° from the center line, it may result in increasingly uneven sensitivity due to the uneven
distances between the sensor and the screen.
5.2 Laser Pointer
The laser pointer was designed for two-button use as well as direct activation
by touching the screen. The yellow button emits low-intensity light. The red
button emits high-intensity light.
The low-intensity laser light (yellow button) is used as a guiding light allowing the user to aim at an icon, button or hyper link before
performing a mouse click. Once the object is within aim, the high-intensity laser light (red button) is pressed to activate the mouse click.
A black ring holder is included to keep the yellow button down by pushing it up, so you do not need to use one finger to control two buttons.
Do remember to pull down the ring to release yellow button after use.
Hold the laser pointer comfortably in whichever hand you wish to. During normal operation, the yellow button will be pressed down by the
ring holder to emit low-intensity light to aim at icons, buttons, hyper links, and so on. Once the low-intensity light is centered on the item you
wish to click, press the red button to activate the mouse click. Press it twice if you wish to perform double-click. Keep the red button
pressed to drag or draw.
Note: In order to make double click easier, please adjust your mouse double speed to the lowest.
The plastic activation tip can be used to touch the screen directly like a mouse pen. When the tip is touched to the
screen, a left mouse click occurs. For optimum accuracy, the buttons on the pointer should be pointed up (like you
were going to press them), otherwise the laser will not line up with the point where the tip touches. To drag, keep
the tip pressed to the screen and drag along the surface of the screen.
The tip is made of Teflon and should be very durable. Should it need replacing, grip the tip and unscrew it
(clockwise) from the housing. Two spare tips are included. Additional tips may be purchased separately.
This model also comes with extension rods, which screw into the back end of the pointer allowing use of the
plastic activation tip from a distance. Each rod measures 12”. Two rods are included. Additional rods can be
purchased separately. Again, the buttons on the pointer should be pointed up.
5.3 View Touch Setup
The View Touch icon was placed on desktop during installation.
Double-click to open the setup screen.
5.3.1 View Touch Setup Screen
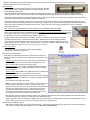
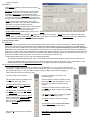
Each selection of the Setup screen helps to define how the View Touch
system is arranged. This setup screen is displayed each time View Touch
is started.
Display Type: Select whether your computer screen is projected onto a
screen/wall - specify front or rear projection; or displayed on a LCD,
CRT, or Plasma (PDP) monitor (see following notes).
Sensor Orientation: Select whether the digital light sensor is mounted
Upside down or Upside up. (ceiling mounting can result in an upside
down orientation).
Sensor Location: Select whether the digital light sensor is located in front
of the screen or behind it – if rear projection screen is used.
Startup Automatically: Select whether you want the View Touch software
starts automatically on computer start-up. (previous calibration data will
be loaded)
Once selections are made, press “Start!”
Note: If you use a flat-panel LCD, Plasma (PDP) or CRT monitor, shine
the laser pointer at the monitor’s screen. If you cannot see a clear,
bright red dot, then the View Touch will not be able to see the dot either
and will not be usable with the monitor. View Touch should work on
most PDP and CRT monitors due to their reflective glass surfaces.
Some flat-panel LCDs have a protective piece of glass in front of the
LCD element, which should be suitable for the View Touch.
Most projection screens should be suitable for View Touch, although screens that have been specially treated for anti-reflective surfaces
will absorb the laser light, rendering it undetectable by the digital light sensor.
While laser pointer cannot be viewed by the digital sensor, it is still possible to use a stylus with red LED to touch and activate the screen
directly. Make sure your arm and body is not blocking the sensor from seeing the LED.
5.3.2 View Touch Calibration Screen
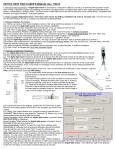
After clicking the ‘Start!’ button, you will see the screen below. The picture-in-picture window in the center of the screen shows what the
sensor sees. The image will appear pinkish-red in color. (See step 5.1.5 Positioning)