1
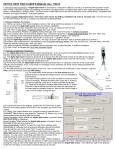
The laser pointer was designed for two-button use as well as
direct activation. The yellow button emits low-intensity light.
The red button emits high-intensity light. A ring holder is
included to keep the yellow button down by pushing it up, so
you do not need to use one finger to control two buttons. Do
not forget to pull down the ring to release yellow button after
use.
Hold the laser pointer comfortably in whichever hand you wish to. During normal operation, the yellow button will be
pressed down by the ring holder to emit low-intensity light to aim at icons, buttons, hyper links, and so on. Once
the low-intensity light is centered on the item you wish to click, press the red button to activate the mouse click.
Press it twice if you wish to perform double-click. Keep the red button pressed to drag or draw.
Note: In order to make double click easier, please adjust your mouse double speed to the lowest.
The flexible activation tip can be used to touch the screen directly like a mouse pen. When the tip is touched to the
screen, a left mouse click occurs. For optimum accuracy, the buttons on the pointer should be pointed up (like you
were going to press them), otherwise the laser will not line up with the point where the tip touches. To drag, keep
the tip pressed to the screen and drag along the surface of the screen.
The tip is made of Teflon and should be very durable. Should it need replacing,
grip the tip and unscrew it (clockwise) from the housing. Two spare tips are
included. Additional tips may be purchased separately.
This model also comes with extension rods, which screw into the backend of the
pointer allowing use of the flexible activation tip from a distance. Each rod
measures 12”. Two rods are included. Additional rods can be purchased
separately. Again, the buttons on the pointer should be pointed up.
5.3 View Touch Setup
The View Touch icon was placed on your desktop during installation. Double-click on it to open the
setup screen.
5.3.1 View Touch Setup Screen
Each section of the Setup screen helps to define how the View Touch system is arranged. This setup screen is
displayed each time View Touch is started.
8