1
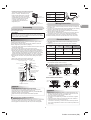
INSTALLATION DIAGRAM OF INDOOR AND OUTDOOR UNITS
Do not allow the drain hose to get
slack.
70 mm or more
1
Air filter
Installation plate
Cut the piping
hole sloped
slightly.
50 mm or more
50 mm or more
6 Filter
Make sure to run the drain hose
sloped downward.
5 Filter
The auxiliary piping can be
connected to the left, rear left, rear
right, right, bottom right or bottom
left.
3 Batteries
Shield pipe
Right
2
Wireless remote control
8
Pan head
wood screw
4 Remote control holder
Left
Rear right
Bottom right
Rear left
Bottom left
Vinyl tape
Apply after carrying
out a drainage test.
9 Insulation sheet
600 mm or more only
when unobstructed
to the front and both
sides.
Remark :
(D)
100
CAUTION
In case of right or left piping
mm
or
Extension
drain hose
(Not available,
provided by installer)
re
mo
(B)
Install in rooms that are 13 m3 or larger.
If a leak of refrigerator gas occurs
inside the room, an oxygen deficiency
can occur.
600
or
Cut dot-line area
mo
re
Fixing bolt arrangement of outdoor unit
RAS-10, 13, 18SAV Series
Parts name
Q’ty
A
Refrigerant piping
Liquid side : ∅6.35 mm
Gas side : ∅9.52 mm
(RAS-(B) 10, 13UFV Series)
: ∅12.7 mm
(RAS-(B) 18UFV Series)
One
each
• Secure the outdoor unit with fixing bolts and nuts if the unit is likely to be exposed
to a strong wind.
• Use ∅8 mm or ∅10 mm anchor bolts and nuts.
• If it is necessary to drain the defrost water, attach drain nipple and cap water proof
to the bottom plate of the outdoor unit before installing it.
108 mm
125 mm
28 mm
Air inlet
320 mm
25
mm
Part
code
Putty, PVC tapes
mm
(A)
Optional Installation Parts
C
8 mm thick heat resisting
polyethylene foam
Saddle
(C)
600
B
or m
100
mm
or
mo
re
• Detail of accessory and installation
parts can see in the accessory sheet.
Pipe insulating material
(polyethylene foam, 8 mm thick)
ore
mm
1
One
each
* Drain nipple and cap
water proof are packed
in outdoor unit.
102 mm
When installing the outdoor unit,
leave open in at least two of direction
(A), (B), (C) and (D) shown in the
figure on the right.
86 mm
7 Mounting screw
Insulate the refrigerant pipes
separately with insulation, not
together.
Air outlet
90 mm
600 mm
Drain outlet
X When using a multi-system outdoor unit is used, refer to the installation manual
provided with the model concerned.
3
Toshiba 1112150201 (EN)