1
Unpacking Your Fence Assembly
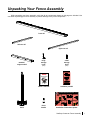
While unpacking your fence assembly verify that all the components shown on this page are included. Use
care when unpacking your fence assembly to prevent damage to any of the components.
front rail
left rear rail
right rear rail
material
support shelf
large
storage
hook
small
storage
hook
(two)
(two)
Hardware Pack
#3
Installing the Fence Rails Assembly
Hardware for Steps 1-11
SawStop
®
Sa
wS
to
p
Square Head Screws, M8 x 20
16
(10 + 1 extra)
Contractor Fence Assembly
OWNER’S MANUAL
Lock Washers, M8
(22 + 1 extra)
Hex Nuts, M8
(18 + 1 extra)
SawStop
Hex Screws, M8 x 16
(8 + 1 extra)
owner’s manual
17
18
Carriage Bolts,
20
M8 x 20 (4)
19
hardware pack #3
®
SawStop Service Department
503-682-6222
Installing Your SawStop Contractor Fence Assembly
www.sawstop.com
© SawStop, LLC
Installing the Fence Rails
Assembly
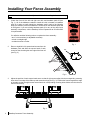
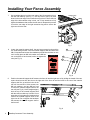
• Place an M8 lock washer 17 and thread an M8 hex nut 18 on
the back of each of the eight square head screws, but do not fully
tighten the nuts at this time. Position the front rail so that the left
end of the rail extends about 3 ⁄4 inch past the edge of the left
extension wing.
• Remove eight M8 x 20 square head screws 16 from the
hardware pack and slide the square head of each screw into the
slot along the rear edge of the front rail.
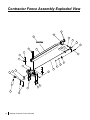
• Locate the front rail, the left and right rear rails, and hardware
pack #3. All of the hardware needed to install the rails is located
on hardware pack #3. In order to easily identify the hardware
used in each of the following steps, the different pieces of
hardware are numbered on the hardware pack and in the figures.
If you are missing hardware pack #3 or any of the other fence
assembly components, call the SawStop Service Department at
503-682-6222 for replacements.
Hardware Pack
Hardware for Steps 1-10
Lock Washers, M8
(22 + 1 extra)
1
Hex Nuts, M8
(18 + 1 extra)
Hex Screws, M8 x 16
(8 + 1 extra)
19
16
SawStop
Square Head Screws, M8 x 20
16
(10 + 1 extra)
1. two 13 mm wrenches
2. a level or straight-edge
3. a rubber hammer or mallet
17
#3
Installing the Fence Rails
You will also need the following tools
to complete the fence assembly:
19
17
18
Carriage Bolts,
20
M8 x 20 (4)
19
17
19
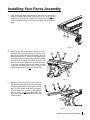
• Adjust the position of each square head screw so that all eight
screws align with the corresponding mounting holes in the front
edge of the table top and extension wings. Position the front rail
against the edge of the table with the eight screws
extending through their corresponding mounting holes.
Make sure the rulers on the front rail are facing up.
16
2
3
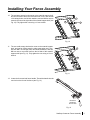
• Repeat the same procedure to mount the right rear rail (the
longer rail) to the rear of the table and to the right extension
wing. Again use three M8 x 16 hex screws 19 , three M8 lock
washers 17 , and one M8 hex nut 18 . Hand tighten the hex
screws; do not fully tighten them. The right rear rail should
extend beyond the right extension wing.
19
straight-edge
17
18
4
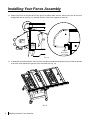
• Locate the material support shelf, the two large storage hooks,
the two small storage hooks, and hardware pack #3. All of the
hardware needed to assemble the material support shelf is
located on hardware pack #3. Take the material support shelf
and insert two M8 x 20 square head screws 16 into the holes on
one end. Place an M8 lock washer 17 and a M8 hex nut 18 on
the back of each screw, but do not tighten the nuts.
19
17
19
16
17
Hardware Pack
#3
Installing the Fence Rails
17
Hardware for Steps 1-10
17
SawStop
18
fence
fence
handle
• Mount the left rear rail (the shorter rail)
to the rear of the table and to the left extension
wing using three M8 x 16 hex screws 19 , three
M8 lock washers 17 , and one M8 hex nut 18 . Insert one hex
screw into the hole in the extension wing and then use a lock
washer and hex nut to hold the screw in place, as shown. The
other two hex screws thread into corresponding holes
in the cast iron table. Place a lock washer on each
screw before threading them into the holes. Hand
tighten the hex screws; do not fully tighten them.
5
Square Head Screws, M8 x 20
16
(10 + 1 extra)
Lock Washers, M8
(22 + 1 extra)
17 18
6
• Use a straight-edge to level the rear edge of the left extension
wing to the cast iron table top. You may have to pull up or push
down on the outer edge of the extension wing to level it. Once the
rear edge of the left extension wing is level, use 13 mm
wrenches to fully tighten the hardware that mounts the
left rear rail. Repeat this process to level the rear edge
of the right extension wing and secure the right rear rail.
7
Hex Nuts, M8
(18 + 1 extra)
8
Hex Screws, M8 x 16
(8 + 1 extra)
19
18
17
18
Carriage Bolts,
20
M8 x 20 (4)
installation instructions poster
SawStop Contractor Fence Assembly