1
Step3
Attach the brackets
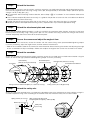
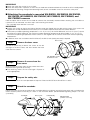
Make 5 holes in the wall, insert the anchors, and then secure the sunshade mount bracket and the base bracket (camera accessory) together to the wall using 4 fixing screws (M4, locally procured) as illustrated in Step 6. (Minimum pull-out
strength: 196 N {44 lbf} (per 1 pc.))
● For information about attaching the base bracket, refer to Step 2 {3} of "Installation" in the Installation Guide of the
camera.
● Use installation template B (camera accessory) as a guide for the position of screws for the sunshade mount bracket
and base bracket (camera accessory).
● Position the hole for securing the safety wire so that there is no slack in the safety wire when it is attached.
● Beside the above 5 holes opened for the fixing screws, separate holes may have to be opened for wiring.
Step4
Attach the attachment plate and camera
Secure (recommended tightening torque: 0.78 N·m {0.58 lbf·ft}) the attachment plate (camera accessory) to the base
bracket (camera accessory) using 4 fixing screws (M4 x 8 mm, camera accessory), connect the wiring to the camera,
and then temporarily attach the camera to the attachment plate.
Step5
Secure the camera and adjust the angle of view
Remove the camera's enclosure, secure the camera with the camera fixing screw (recommended tightening torque:
0.78 N·m {0.58 lbf·ft}), adjust the angle of view, and then reattach the enclosure.
* Refer to the Installation Guide of the camera for more information about attaching the camera and adjusting the angle
of view as referred to in Step 4 and Step 5. Make sure to adjust the angle of view so that the sunshade is not visible.
Step6
Attach the sunshade
Attach the sunshade to the top of the camera, and then secure the sunshade and sunshade mount bracket using the
screws on the left and right. (Recommended tightening torque: 0.78 N·m {0.58 lbf·ft})
Sunshade
Camera body
(with the enclosure attached)
Attachment plate
(camera accessory)
Sunshade mount bracket
Fixing screws for attachment plate (x4, camera accessory)
Step7
Base bracket (camera accessory)
Fixing screws (x4, locally procured)
Attach the safety wire
Attach the safety wire attached to the sunshade to the foundation area of the architecture or where sufficient strength is
assured. Prepare the fixing screw according to the material of the area where the safety wire is to be installed.
Spring washer (accessory)
1 M4 screw (locally procured)
* Required pull-out capacity: 196 N {44 lbf}
Washer (accessory)
Safety wire
(accessory)
Wall