1
Wireless Sensor System Installation and Operation Manual
3
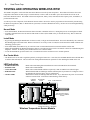
SEQUENCE OF OPERATION:
To start, you'll need to:
•Find the location of the WTM based on the mapping survey
•Set the WP (Wireless Programmer) System ID
•Set the WTM System ID using the WP (Wireless Programmer)
•Mount, power, and connect the sensor to the WTM.
Installation
Alert
Mounting
•Temperature sensors must be ordered separately.
•Mount the Base indoor where it will be away from excessive heat, cold, or humidity.
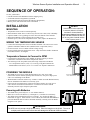
•Open the WTM Cover by pushing two of the tabs at the bottom of the enclosure
•Mount the WTM base on the wall using the provided screws.
•Install the power, and wire the temperature sensor. Then, replace the WTM cover.
If the WTM is to be connected
to a sensor where it will require
less than 5 minutes between
temperature measure intervals, DO
NOT USE BATTERIES as their life
will be very short. Instead use the
8 VAC input to power it.
Wiring the Temperature Sensor
3-in-1 Sensor
•Connect the Gold temperature sensor to the Blue terminals. The sensor wires can be
spliced to shielded 2 conductor cable (Belden #8760 or equivalent (#18/2)).
•Do not run sensor wires in conduit with line voltage wiring.
•Do not ground/connect the shield at the sensor. Only connect the shield to the WTM
lower Blue terminal. See diagram.
Temperature Sensors to Connect to WTM
•For the Wireless Temperature Sensor Module to function properly, it must be
connected to a Gold series Heat-Timer Temperature Sensor.
•The following are the acceptable sensors that can be connected to the WTM:
◦3-in-1 Temperature Sensor (-30°F/-1°C to 250°F/121°C) HTC# 904220-00.
◦Standard Brass Tube Sensor (-30°F/-1°C to 250°F/121°C) HTC# 904250-00.
C
B
Conduit
Shield
Not connected
Powering the Module
+
•The WTM can accept power either through batteries or 8 VAC power input
(transformer must be ordered separately HT# 210024-00). Only use a single power
source to avoid damage to the WTM.
•WTM defaults to transmit its data every 5 minutes. When used with Alkaline batteries,
this rate should allow the batteries to last many years.
•If the intervals of transmission is reduced to less than 5 minutes, an 8 VAC power
source must be used instead of the batteries. As batteries life will be reduced
drastically and will require frequent replacements.
Connect the Shield to the
bottom BLUE terminal
-
Wireless Tem
Powering with Batteries
-
+
Warning
+
-
•The WTM can be powered by two "C" size Alkaline batteries.
•Make sure to observe the Positive (+) and Negative (-) terminals for each battery.
•The default sensor transmission interval is 5 minutes. See "Setting the Wake Up /
Heart Beat" on page 5. If this interval is to be reduced, DO NOT USE BATTERIES to
power the WTM as their life will be shortened drastically. Instead, power the WTM
using the 8 VAC option.
The WTM can only accept a single power source. Either the batteries or the 8 VAC. The use of
multiple power sources at the same time will damage the WTM and VOID its warranty