1
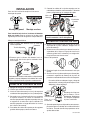
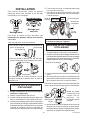
❒ Twist the junction box wires and fixture wires together
as shown. Secure with wire connectors.
INSTALLATION
For easy installation, select an existing light with a wall
switch for replacement.
Mounting
Strap
1234567890123456789
1234567890123456789
1234567890123456789
Wall Mount
Black to
Black
White to
White
Rubber
Plug
Eave Mount
Mounting
Bolt
For under eave installation, the sensor head must
be rotated as shown in the next two steps for proper
operation and to avoid the risk of electrical shock.
Gasket
For eave mount only:
Junction box ground wire to
green ground screw on fixture.
❒ Swing the sensor head towards the clamp screw
joint.
Controls
MOUNT THE LIGHT CONTROL.
Clamp Screw
❒ Align the Light Control cover plate and cover plate
gasket. Secure with the mounting bolt.
❒ Align the three slots in the decorative shell with the
lamp holder pins. Push the shell in and then twist
clockwise to lock. Repeat for other shell.
❒ Then rotate the sensor head clockwise 180° so the
controls face down.
Shell Slot
Controls
❒ Push the Rubber Plug firmly into place.
❒ If a wet location junction box was not used, caulk
the wall plate mounting surface with silicone
weather sealant.
Controls
If the sensor pops out of the ball joint, loosen the clamp
screw and push the sensor back into the ball joint.
Tighten the clamp screw when done.
To avoid water damage and
electrical shock, keep lamp
holders 30° below horizontal.
WIRE THE LIGHT CONTROL.
❒ Turn power off at the fuse or circuit breaker.
❒ Remove the existing light fixture.
❒ Install the mounting strap as shown using two screws
that fit your junction box.
❒ The plastic hanger can be used to hold the fixture
while wiring. The small end of the plastic hanger can
be threaded through the hole in the center of the
cover plate. The small end then goes into one of the
slots on the mounting strap.
❒ Route the Light Control’s wires through the large
gasket holes.
Lock Nut
Lens
Keep lamps at least
1" (2.5 cm) from the
sensor. Do not allow the lamps to
block the lens.
❒ Adjust the lamp holders by loosening the lock nuts
but do not rotate the lamp holders more than 180°
from the factory setting. When screwing in the
floodlamps, do not overtighten.
2
595-5545-06