1
INSTALLATION INSTRUCTIONS
SECTION 3
CAUTION: MAKE SURE POWER IS SWITCHED OFF AT
SERVICE PANEL BEFORE STARTING INSTALLATION.
SECTION 1
Preparing the Exhaust Fan
1. Unpack fan from the carton and confirm that all pieces are
present. In addition to the exhaust fan you should have:
1 - Grill
1 - Damper Assembly (attached)
1 - Instruction/Safety Sheet
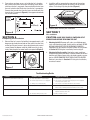
2. Remove the fan’s venturi assembly, which is secured in place
with one screw through the venturi (Figure 1). This is a captive
screw and will stay installed in the venturi. Keep the venturi
assembly and the grill in the carton until needed so they do
not get damaged or lost.
Existing Construction
1. Position housing against the joist or stud and trace an outline
of the housing onto the ceiling/wall material (Figure 4). Set
housing aside and cut opening, being careful not to cut or
damage any electrical or other hidden utilities. Place housing
next to the joist or stud and insure that it is flush with the
finished ceiling. Secure with four nails (not provided) to
ensure proper installation (Figure 3).
Figure 4
SECTION 4
Ducting
CAUTION: ALL DUCTING MUST COMPLY WITH LOCAL
AND NATIONAL BUILDING CODES.
Figure 1
3. Choose the location for your fan. To ensure the best air and
sound performance, it is recommended that the length of
ducting and the number of elbows
be kept to a minimum, and that
insulated hard ducting be used.
Larger duct sizes will reduce
noise and airflow restrictions.
4. Select the most convenient electrical
knockout and remove using a
straight-blade screw driver (Figure
2).
Figure 2
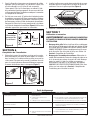
1. Connect the ducting to the fan’s duct collar (Figure 5). Secure
in place using tape or screw clamp. Always duct the fan to
the outside through a wall or roof cap.
Figure 5
NOTE: If damper detaches from unit, reattach by snapping the
collar back onto the unit. It is designed to only fit one way.
SECTION 2
New Construction
1. Using the gauge on the fan’s housing (Figure 3), line up
housing so that it will be flush with the finished ceiling or
wall. Position the fan so that the tabs rest flat against the
joist or stud and secure with four nails (not provided) to
ensure proper installation.
SECTION 5
Wiring
CAUTION: MAKE SURE POWER IS SWITCHED OFF AT
SERVICE PANEL BEFORE STARTING INSTALLATION.
CAUTION: ALL ELECTRICAL CONNECTIONS MUST BE
5/8"
1/2"
3/8"
1/4"
Figure 3
210572050 Rev. B 11-05
MADE IN ACCORDANCE WITH LOCAL CODES, ORDINANCES,
OR NATIONAL ELECTRICAL CODE. IF YOU ARE UNFAMILIAR
WITH METHODS OF INSTALLING ELECTRICAL WIRING, SECURE
THE SERVICES OF A QUALIFIED ELECTRICIAN.
1. Run wiring from an approved wall switch carrying the
appropriate rating. One neutral (white), one ground (green or
bare copper), and one hot (black lead connected to the switch).
Secure the electrical wires to the housing with an approved
electrical connector. Make sure you leave enough wiring in
the box to make the connection to the fan’s receptacle.
www.airkinglimited.com
2 of 8