1
55099
Revised
12.5.05
Special Notes:
♦
This kit will NOT fit right hand drive vehicles.
♦
This kit is for vehicles equipped with power steering only.
♦
A transfer case slip yoke conversion is required for this Pro Comp Suspension system. Correct rear drive
shaft angles can only be obtained by elimination the slip yoke and replacing it with a CV joint. The
following Pro Comp kits are recommended. More detailed information is available on the next page:
◊ 4007
Tail shaft conversion kit. (NP231 transfer case only)
◊ 4040
CV Style drive shaft.
◊ 4041
CV Style drive shaft.
♦ Installation of this suspension conversion allows for the use of larger tires. This along with the
increase in ground clearance raises the center of gravity and will greatly affect the stability and
handling of your vehicle both on and off highway. It is very important that you familiarize yourself
with the new handling characteristics of your vehicle before driving at speeds above 25 mph either
off road or on the highway. In addition, the vehicle will have moderate torque steer. (This means
that it will pull slightly from side to side under acceleration and deceleration). This is a natural side
effect of lifted coil
spring vehicles.
Recommended Tires and Wheels
Due to
differences in
manufacturing,
dimensions and
inflated measurements, tire and wheel combinations should be test fit prior to installation. Tire and
wheel choice is crucial in assuring proper fit, performance, and the safety of your Pro Comp equipped
vehicle. For this application, we recommend a wheel not to exceed 8” in width with a minimum
backspacing of 4” must be used, additionally, a quality tire of radial design, not exceeding 35” tall X
12.5” wide is also recommended. Please note that the use of a 35” X 12.5” tire may require fender
modification. Violation of these recommendations will not be endorsed as acceptable by Pro Comp
Suspension and will void any and all warranties either written or implied.
Introduction:
♦
♦
♦
♦
♦
♦
♦
♦
♦
♦
This installation requires a professional mechanic!
We recommend that you have access to a Jeep YJ service manual for your vehicle to assist in the
disassembly and reassembly of your vehicle. It contains a wealth of detailed information.
Prior to installation, carefully inspect the vehicle’s steering and driveline systems paying close attention to
the tie rod ends, ball joints, wheel bearing preload, pitman and idler arm. Additionally, check steering-toframe and suspension-to-frame attaching points for stress cracks. The overall vehicle must be in excellent
working condition. Repair or replace all worn or damaged parts! Additionally, very close attention must be
given to the condition of the rear axle spring pads. Spring pads that are not perfectly flat must be repaired
or replaced. Use only a factory replacement pad. Pro Comp kits use the spring pad as a mounting surface.
Read the instructions carefully and study the illustrations before attempting installation! The more familiar
you are with the procedures, the easier and quicker your installation will be.
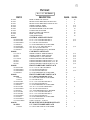
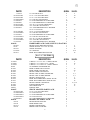
Check the parts and hardware against the parts list to assure that your kit is complete. Separating parts
according to the areas where they will be used and placing the hardware with the brackets before you
begin will save installation time.
Secure and properly block vehicle prior to beginning installation.
ALWAYS wear safety glasses when using power tools or working under the vehicle!
NEVER work under or around an unsupported vehicle.
Use caution when cutting is required under the vehicle. The factory undercoating is flammable. Take
appropriate precautions. Have a fire extinguisher close at hand.
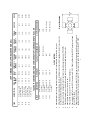
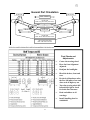
Foot pound torque readings are listed on the Torque2 Specifications chart at the end of the instructions.
These are to be used unless specifically directed otherwise.