1
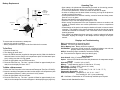
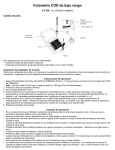
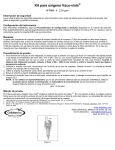
Battery Replacement
Operating Tips
Battery
Compartment
Cover (B)
Seal Ring (A)
Instrument
Back
Screws
Batteries
Notch
To ensure that the instrument is waterproof:
• seal ring (A) must be in position
• battery compartment cover (B) must be fixed with the four screws
To Set Zero
1. Press the Power key.
2. The display will show “det”.
3. Insert the ZERO test tube (supplied in detergents test kit) filled with distilled or
deionized water into the sample cell compartment (with mild downward pressure), making sure that it is fully seated.
4. Place the light shield over the ZERO test tube.
5. Press the Zero/Test key. The “det” symbol will flash for approximately 8 seconds, then the display will show “0.0.0”.
To Make a Measurement
1. Follow the Test Procedure in the Instrumental Detergents Test (Cat. # R-9423).
2. Insert the resulting Detergents test tube into the sample cell compartment (with
mild downward pressure), making sure that it is fully seated.
3. Place the light shield over the test tube.
4. Press the Zero/Test key. The “det” symbol will flash for approximately 3 seconds, then the sample test results will appear in the display as ppm (mg/Liter).
• Upon startup, the photometer automatically proceeds to the zeroing process.
Every time the photometer powers on, it must be re-zeroed.
• To re-zero the photometer, it must be turned off and back on again.
• A series of readings can be taken without re-zeroing, as long as the photometer stays on during the series.
• Protect photometer from extreme humidity, corrosive fumes and dusty areas.
Store in a cool, dry place.
• Remove the batteries when photometer is not in use.
• Press the ! key to turn the display back light on or off.
• When moving the photometer from one temperature extreme to another, wait
at least 10 minutes before use to allow photometer to come to temperature
equilibrium.
• Contamination of the optics in the sample chamber will result in incorrect measurements. The windows in the sample chamber should be checked at regular
intervals and cleaned as necessary. Use a soft moist cloth or cotton swab for
cleaning purposes.
• If the sample cell adapter has been removed, it must be replaced with proper
orientation, aligning the triangle on the adapter with the triangle on the photometer.
Displays and Troubleshooting
E01: Light absorption too great (dirty optics)
E20/E21: Too much light reaching detector
E22 or Battery Icon: Battery should be replaced
E27/E28/E29: Instrument zeroed incorrectly, misaligned adapter, test tube not
properly seated, dirty optics or failing light source.
Hi/E03: Measuring range exceeded or excessive turbidity
Lo: Test result has a negative value (less than 0 ppm)
Specifications
Auto Shutoff: After 15 minutes of non-use
Optics: 660 nm LED/interference filter and photosensor in transparent sample
chamber
Operating Temp.: 5 to 40°C (41 to 104°F)
Battery: 4 AAA batteries (approx. 5,000 tests or 17 hours)
Waterproof: Floating, IP68 (1 hour at 0.1 meter)
Wavelength Accuracy: ± 1 nm
Photometric Accuracy*: 3% full scale (T = 20 - 25° C / 68 - 77° F)
Photometric Resolution: 0.01 A
Ambient Conditions: Temperature 5 - 40° C / 41 - 104° F
Rel. humidity 30 - 90 % (non-condensing)
CE: Certificate of Declaration of CE-Conformity available upon request.
* Measured with Standard Solutions