1
TELEDATA
TED-TX / TED-RX
English
TED-TX / RX
Page 2
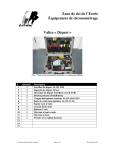
TED TX
1 ......
2 ......
3 ......
4 ......
5 ......
6 ......
7 ......
8 ......
9 ......
10 ....
11 ....
12 ....
13 ....
14 ....
15 ....
Antenna
Green holder with velcro tape
LED
Banana socket yellow: data input
Banana socket green: signal input
Banana socket black: common ground
DIN-socket: data- and signal input, ext. supply input
3/8 inch socket for tripod fastening
Code-switch (16 positions)
Device-key
Device-switch
Code-switch (10 positions)
Fastening screw for battery holder
Battery cover
Device sticker with device number
TED TX
TED RX
1 ......
2 ......
3 ......
4 ......
5 ......
6 ......
7 ......
8 ......
9 ......
10 ....
11 ....
12 ....
13 ....
14 ....
15 ....
Antenna
Red holder with velcro tape
LED
Banana socket yellow: data output
Banana socket green: signal output
Banana socket black: common ground
DIN-socket: data- and signal output, ext. supply input
3/8 inch socket for tripod fastening
Code-switch (16 positions)
Device-key
Device-switch
Code-switch (10 positions)
Fastening screw for battery holder
Battery cover
Device sticker with device number
TED RX
TED TX /RX from the bottom
TED-TX / RX
Page 3
Table of Contents
1. GENERAL ................................................................................................................................. 4
2. POWER SUPPLY ........................................................................................................................ 5
2.1. Changing Batteries .............................................................................................................. 5
2.2. Using Alkaline Batteries ....................................................................................................... 6
2.3. Using NiCad Batteries ......................................................................................................... 7
2.4. External Supply ................................................................................................................... 8
2.4.1. Direct Power Supply ................................................................................................. 8
2.4.2. Power Supply through the Timer .............................................................................. 8
3. OPERATION ............................................................................................................................. 10
3.1. Setup ............................................................................................................................... 11
3.2. Switching on ...................................................................................................................... 12
3.3. Choosing the Operation Modes ......................................................................................... 12
3.4. Address ............................................................................................................................. 13
3.5. Signal Strength Test to find the ideal setup position .......................................................... 14
3.6. Interference Test ............................................................................................................... 15
4. IMPULSE TRANSMISSION....................................................................................................... 16
4.1. Impulse Transmission from a Startgate ............................................................................. 17
4.2. Impulse Transmission from a Start-Photocell .................................................................... 18
4.3. Impulse Transmission from a Finish-Photocell .................................................................. 18
4.4. Impulse Transmission from a Photocell used for Start and Finish ..................................... 18
4.5. Impulse Transmission with two Photocells for Start and Finish ......................................... 19
4.6. Impulse Transmission with one Photocell for Start and Finish .......................................... 19
4.7. Impulse Transmission for more than two Timing Channels with RX-C10 .......................... 20
5. DATA TRANSMISSION ............................................................................................................. 22
5.1. Data Transmission 1 Second ............................................................................................ 22
5.1.1. Data Transmission from a Timer S4 to a Timer S4 ................................................. 23
5.1.2. Data Transmission from a ALGE Timer to a Printer P4A ........................................ 24
5.2. Data Transmission 0.1 Seconds ........................................................................................ 25
5.2.1. Data Transmission from an ALGE Timer to an ALGE Display Board ..................... 25
5.2.2. Data Transmission from a Comet to an ALGE Football Score Board ..................... 26
5.2.3. Data Transmission from an ALGE Timer to a Comet Parallel Display .................... 26
5.2.4. Data Transmission from an ALGE Timer to a PC ................................................... 26
5.3. Data Transmission 2400 Baud .......................................................................................... 27
5.4. Data Transmission 4800 Baud .......................................................................................... 27
5.5. Data Transmission Direct .................................................................................................. 28
6. TECHNICAL DATA .................................................................................................................... 30
TED manual copyright by: ALGE-TIMING
AUSTRIA
Version: E-2000-03-02
Page 3
TED-TX / RX
Page 4
1. GENERAL
Use:
Wireless transmission of timing impulses and data
Radio Frequency:
70 cm band (standard frequency= 433,500 MHz)
TED-Types:
TED-TX10:
TED-TX400:
TED-RX:
Minimum configuration:
Additions:
Teledata Transmitter with a RF output power of 10 mW,
about 1.5 km reach, built in l/4 antenna
Teledata Transmitter with a RF output power of 10 mW,
about 1.5 km reach, antenna connection through BNC
socket
Teledata receiver (for TED-TX10 and TED-TX400
identical), built in l/4 antenna
1 TED-TX and 1 TED-RX
additional TED-TX for impulse- or data transmission
additional TED-RX for data transmission
RX-C10: impulse transmission for two and more timing channels
Identification for TED-TX:
device sticker (15) and green holder (2)
Identification for TED-RX:
device sticker (15) and red holder (2)
Information on the device sticker:
Impulse transmission:
- device type
- device number
- device frequency
- power output (only on TED-TX)
The impulse transmission works direct from any ALGE impulse
device to any ALGE timing device.
Data transmission ALGE 1 Sec.: The TED-TX sends each data string 10 times. It sends per
second one different data string.
Data transmission ALGE 0.1 Sec.:The TED-TX sends each data string 1 time. It sends per 0.1
second one data string.
Data transmission 2400 Baud:
Data transmission with 2400 Baud, where it needs a code at
the beginning and end of each data package.
Data transmission 4800 Baud:
Data transmission with 4800 Baud, where it needs a code at
the beginning and end of each data package.
Data transmission Direct:
Transmits all data, the transmitter is always turned on.
System test:
signal strength test
interference test
Power supply:
6 batteries (type AA) or
6 NiCd batteries (type AA)
external supply
TED-TX / RX
Page 5
2. POWER SUPPLY
There are two ways to supply the TED:
-
internal supply:
external supply:
with six batteries or NiCad (type AA)
with a ALGE charger or from a ALGE timing device or 12 Volt Battery
2.1. Changing Batteries:
Version: E-2000-03-02
-
You will reach the battery compartment from the bottom.
-
Screw the fastening screw counter-clockwise.
-
Remove the battery cover.
-
Remove the batteries (hold the TED upright, so the batteries fall
out of the battery compartment).
-
Insert new (or loaded) batteries (six batteries). Be aware of
polarity - see picture in the battery compartment.
-
Put battery cover on and screw fastening screw clockwise. You
must turn the screw until the stop (the last turns are harder,
because of the force of the spring).
Page 5
TED-TX / RX
Page 6
2.2. Using Alkaline Batteries:
Each TED needs 6 Alkaline batteries (type AA). The LED (3) shows the battery capacity during
normal operation.
Blinking of LED (3):
The LED has in the signal
strength test a different
function (see point 3.5).
Color of LED (3)
green
border between green and orange
orange
border between orange and red
red
off
Battery Capacity
35 to 100 %
about 35 %
20 to 35 %
about 20 %
less than 20 %
empty
The TED switches automatically off, as soon as the battery voltage is lower than 5 Volt!
Attention: If you buy replacement batteries for a event, be aware that you need for each TED
(receiver and transmitter) six batteries.
Empty Battery Warning:
TED-TX: When the LED (3) switches to red on the TX, it sends along with the next impulse or data
string a message to the TED-RX. The TED-RX then turns on an alternating high and low
sound to indicate that the TED-TX needs new batteries.
TED-RX: When the LED (3) switches to red an alternating high and low sound indicates that the
TED-RX needs new batteries. Make sure you check both units every time you hear teh
alternating sound.
Working duration of batteries:
The measurements shown bellow are made with Alkaline batteries (type Energizer) at room temperature (25°C, 77 F). Please notice that the capacity of batteries drops fast at low temperatures (at
-20°C (-4F) about 20 % capacity).
TED-TX10
TED-TX10
TED-TX10
TED-TX10
TED-TX400
TED-TX400
TED-TX400
TED-TX400
TED-RX
without photcell
with photocell
----without photcell
with photocell
-------
1 impulse per minute
1 impulse per minute
1 data transmission per minute
continues data transmission
1 impulse per minute
1 impulse per minute
1 data transmission per minute
continues data transmission
in all equal
about 300 hours
about 66 hours
about 270 hours
about 54 hours
about 270 hours
about 60 hours
about 54 hours
about 6 hours
about 54 hours
TED-TX / RX
Page 7
2.3. Using NiCd Rechargeable Batteries:
Each TED needs 6 NiCad rechargeable. You cannot charge the batteries inside the device. To load
the batteries you need a separate charger. The LED (3) shows the battery capacity during the
normal operation.
Color of LED (3)
green
The LED has in the signal strength
border between green and orange
test a different function (see point 3.5).
orange
border between orange and red
red
off
Blinking of LED (3):
Battery Capacity
15 to 100%
about 15 %
5 to 15 %
about 5 %
less than 5 %
empty
The TED switches automatically off, as soon as the battery voltage is lower than 5 Volt!
Empty Battery Warning:
TED-TX: TED-TX:
When the LED (3) switches to red on the TX, it sends along with the next
impulse or data string a message to the TED-RX. The TED-RX then turns on an alternating high and low sound to indicate that the TED-TX needs new batteries.
TED-RX: When the LED (3) switches to red an alternating high and low sound indicates that the
TED-RX needs new batteries. Make sure you check both units every time you hear teh
alternating sound.
Working duration of batteries:
The measurements shown bellow are made with NiCad batteries (type Panasonic 700 mAh) at
room temperature (25°C, 77 F). Please notice that the capacity of batteries drops fast at low temperatures (at -20°C (-4F) only about 80 % capacity).
TED-TX10 without photcell
1 impulse per minute
TED-TX10
with photocell
1 impulse per minute
TED-TX10
--1 data transmission per minute
TED-TX10
--continues data transmission
TED-TX400 without photcell
1 impulse per minute
TED-TX400 with photocell
1 impulse per minute
TED-TX400
--1 data transmission per minute
TED-TX400
--continues data transmission
TED-RX
--in all equal
Version: E-2000-03-02
about 100 hours
about 22 hours
about 90 hours
about 18 hours
about 90 hours
about 20 hours
about 18 hours
about 2 hours
about 18 hours
Page 7
TED-TX / RX
Page 8
2.4. External Supply:
You can supply the TED from a power supply.
Voltage for Power Supply:
TED-TX10:
TED-TX400:
TED-RX:
+6,5 to 28 VDC
+9 to 15 VDC
+6,5 to 28 VDC
2.4.1. Direct Power Supply:
You can supply the TED from the following ALGE chargers:
-
Power Supply NLG8
Power Supply NLG4
Power Supply LG-Comet (do not use for TED-TX400)
Net-Battery-Device NBG
Plug the charger at the mains and TED (DIN socket 7)
Attention: Depending on the voltage of you county you need a ALGE power supply for 230 V / 50
Hz or 115 V /60 Hz. On voltage will be written on the ALGE power supply.
2.4.2. Power Supply through the Timer:
When using the mode "Impulse Transmission" it is possible to supply the TED-RX from the power
supply of the ALGE Timing device. Use cable 004-05 between TED-RX and timer.
Attention:
You can supply the TED-RX only if the timer is external supplied. From the internal batteries of the
timer you cannot supply the TED-RX.
You cannot supply a Comet and TED-RX with the LG-Comet.
-
Plug power supply at mains
and timer
-
Connect TED-RX and timer
with cable 004-05
TED-TX / RX
Version: E-2000-03-02
Page 9
Page 9
TED-TX / RX
Page 10
3. OPERATION
There are three different types of Teledata TED. Each TED shows the type on the area, where you
have the antenna.
TED-TX10:
l/4-antenna screwed on TED
TED-TX400:
l/2-antenna with BNC-connection
TED-RX:
l/4-antenna screwed on TED
BNC-Antenna-Connection for TED-TX400:
Fasten the Antenna:
-
put antenna on BNC-plug of TED-TX400
-
rotate the antenna until it falls into the plug
-
hold the antenna on the lower section and
turn it clockwise until the antenna clicks into
position
Remove the Antenna:
-
hold the antenna on the lower
section and turn until the
antenna clicks out or place
-
remove antenna
TED-TX / RX
Page 11
3.1. Set up:
The useful distance of the TED system depends on signal strength. You have to spend a reasonable effort to properly mount both the TX and RX units.
the position of the TED-TX and TED-RX. Mostly you improve the receiver signal strength by moving
the TED-TX and TED-RX to the right position (high signal strength = high impulse or data safety).
There are more possibilities to set up the TED:
Wrong:
The antenna must always point upwards.
Wrong:
The TED-TX and RX should never stand direct on
the floor. This decreases the reach.
Wrong:
Parts next to the antenna are not allowed.
Good:
Use the velcro to tape the TED to a post.
Good:
Fasten the TED on a tripod (3/8 inch)
Good for small an medium distances:
Use the TED-Holder with the photocell
holder (or a tripod) to fasten the TED-TX
and a photocell.
Version: E-2000-03-02
Page 11
TED-TX / RX
Page 12
3.2. Switching on:
Normal Mode:
- switch device-switch (11) on
- TED works in the impulse transmission mode
Test-Mode:
-
press device-key (10)
device-switch (11) to position ON, LED (3) must blink
release device-key (10)
test mode switches automatically off after one minute,
manually you can switch it off with device-key (10).
Impulse Transmission:
device-switch (11) to position ON, LED (3) must blink
Data Transmission ALGE 1 Sec.:
-
device-switch (11) to position ON, LED (3) must blink
when a data string with the right format arrives at the
TED-TX it switches to this mode.
Data Transmission ALGE 0.1 Sec.: - set code switch (12) from TED-TX and RX on position 1
- device-switch (11) to position ON, LED (3) must blink
Data Transmission 2400 Baud:
-
set code switch (12) from TED-TX and RX on position 3
device-switch (11) to position ON, LED (3) must blink
transmission of each data string with 2400 Baud
each data string needs a code at the start and end
Data Transmission 4800 Baud:
-
set code switch (12) from TED-TX and RX on position 4
device-switch (11) to position ON, LED (3) must blink
transmission of each data string with 4800 Baud
each data string needs a code at the start and end
Data Transmission "Direct":
- set code switch (12) from TED-TX and RX on position 6
- device-switch (11) to position ON, LED (3) must blink
- transmission of each data string (with 2400 or 4800 Baud)
3.3. Choosing the Operation Modes:
Switch
Signale Mode
Data Mode
position 0: data transmission ALGE 1 sec.
position 1: data transmission ALGE 0.1 sec.
position 0 to 9
position 2: no function
to select the
position 3: data transmission 2400 Baud
code switch (12)
timing channel position 4: data transmission 4800 Baud
position 6: data transmission direct
position 7 to 9: no function
for address
for address
code switch (9)
device key (10) field strength on/off transmit last data string again
You get as well into the signal strength test by making three short cuts between the green (5) and
black (6) banana socket within a short time..
TED-TX / RX
Page 13
3.4. Address:
The code-switch (9) to address the TED is located in the
bottom and has 16 switch positions. Within a system all
TED-TX and TED-RX need the same address.
Together with the TED you will receive a
small screwdriver. It is used to operate
the code-switch (9) and (12). The arrow
of the switch shows always the switch
position. The factory adjustment is 0.
Code-Switch (9)
switch position = 0
switch position = 1
switch position = 2
switch position = 3
switch position = 4
switch position = 5
switch position = 6
switch position = 7
switch position = 8
switch position = 9
switch position = A
switch position = B
switch position = C
switch position = D
switch position = E
switch position = F
Address
address = 0
address = 1
address = 2
address = 3
address = 4
address = 5
address = 6
address = 7
address = 8
address = 9
address = A
address = B
address = C
address = D
address = E
address = F
If different ALGE TED-systems are used in the same area, it is important that every system works
on a different address. The address protects from wrong impulses or data, but other impulse or data
strings can block the receiver.
There is the possibility that you could lose an impulse, if there is another system in use that has a
stronger signal. The only guaranteed way to prevent interferance is by using a totally separate
frequency. This can be ordered by your ALGE dealer.
e.g. Impulse transmission of the start signal::
You must set the same address for TED-TX and TED-RX.
Version: E-2000-03-02
Page 13
TED-TX / RX
Page 14
3.5. Signal Strength Test to find the ideal Position:
Trouble free operation of the TED-system depends on spending time to properly install the TX and
RX.
Attention: You can only test the signal strength in the impulse transmission mode.
How do you start the signal strength test:
-
Turn the TED-TX with device-switch (11) on.
-
Press the device-key (10) of the TED-TX .
-
Fasten the TED-TX in a good position (see page 11).
-
Turn the TED-RX with device-switch (11) on.
-
The loudspeaker of the TED-RX has now a sound and the LED blinks.
> As higher the sound, as higher (better) the signal strength.
> If the LED (3) blinks green:
high signal strength from the TED-TX.
> If the LED (3) blinks orange: low signal strength from the TED-TX.
> If the LED (3) blinks red:
very low or no signal strength from the TED-TX.
> If you hear voices in the speaker it means, that this frequency is being used for talking. This
might cause trouble, you might lose data or impulses.
-
The signal strength test ends automatically through a signal of the TED-TX after 1 minute (or
when you press device key (10) of the TED-TX).
Always try moving the TED-RX first. If you cannot find a proper signal strength, then try moving the
TED-TX. If it still fails then you have to reduce the distance or modify your application. Remember
that you can connect the TED-RX to any existing wiring.
You can only judge the signal strength at the TED-RX!
Attention - please notice if you have a short distance between TED-TX and TED-RX:
In order to work without troubles make sure that the distance between TED-TX and TED-RX is more
than 5 Meters. Otherwise it could overmodulate the receiver. For the TED-TX400 you should have a
minimum distance of 10 m.
TED-TX / RX
Page 15
3.6. Interference Test:
This mode is designed to allow you to test for interferance from other radios or to determine if data
is being transmitted. This can be a handy way to check for problems during an event. The impulses
are still being recived as normal.
If you press the device-key (10) of the TED-RX for about half a second, it switches the speaker on.
You can now listen for speech or data.
The LED shows the signal strength of the received signal. The naturally red LED turns green with
good data reception and orange with questionable data. A single impulse will not register fast
enough to see it.
To turn the interference test off press again device-key (10).
Attention: The TED-RX has double power consumption during this mode.
Version: E-2000-03-02
Page 15
TED-TX / RX
Page 16
4. IMPULSE TRANSMISSION
The impulse transmission works direct from any ALGE-impulse trigger to ALGE timer by radio.
Each impulse transmission through the TED
has a constant delay of 0.100 seconds.
Minimum error: 0.001 second
-
If you transmit only the start impulse with the TED you must add to each run time 0.1 seconds.
If you transmit only the finish impulse with the TED you must subtract from each run time 0.1
seconds.
If you transmit the start- and finish impulse you get the exact run time.
Attention:
For time trail events such as cycling, sking, etc the delay is constant for every competitor. Therefore
you can use a single transmitter without compromising the results. It is only important where you are
trying to measure a record time or speed. Be aware of the limitations of a single transmitter prior to
your event.
The TED-TX and TED-RX is blocked after the beginning of the impulse for 0.1 seconds. This means
each further impulse transmitted with TED-TX is lost during this time.
Double impulse protection:
The TED-TX has a built in
double impulse protection. This
prevents double impulses made
by a bad switch. The double
impulse protection time is 0.05
seconds.
a Contact triggering at the beginning
of the impulse
b Contact triggering at the end of the
impulse
c Duration of impulse plus contact
triggering
d Double impulse protection time (50 ms)
e Double impulse protection time stops, because the 0.05 seconds are not finished
Checking the impulse transmission:
TED-TX:
During the transmission of a timing impulse the LED (3) blinks longer as normal.
TED-RX:
When it receives an timing impulse the LED (3) blinks longer as normal.
Safety of an Impulse Transmission:
When you use the impulse transmission the TED replaces the cable between the impulse trigger
and the timer. You must know, that radio (TED) is easy to disturb. This means that you do not
receive at the timer the signal in case of a disturbance. When you use the TED to transmit the
impulses you will never have the same safety as with wires.
TED-TX / RX
Page 17
The following ALGE devices you can use as impulse trigger:
- Startgate
- Startmicrophone SM7
- Photocell
- Startbeep STB1
- Tapeswitch TS
- Startclock ASC1
- Touchpad TP24 or TP18
- Handswitch 023-02 or 023-10
The following ALGE timers you can use as impulse receiver:
TdC 8000:
Normally use the socket A or A´ to connect cable 004-05. In special cases see the
TdC 8000 manual for help.
TdC 4000: Plug cable 004-05 at one of the four sockets that say "ext. supply / lightbeam".
Timer S4: Normally use the socket A or A´ to connect cable 004-05. In special cases see the
Timer S4 manual for help.
Timer S3: Plug cable 004-05 at one of the two sockets that say "ext. supply / lightbeam".
Comet:
Plug cable 004-05 at one of the photocell sockets.
Videotimer VT2:
Plug cable 004-05 at one of the two sockets that say
"ext. supply / lightbeam".
OPTI 1sw: Plug cable 004-05 at one of the four sockets that say "photocell". For the OPTI you
have to know that you can transmit only start impulses. You cannot transmit the
finish impulse, because the photocell does control the recording. With the TED you
would only record a small part of the finish arrival.
Selection of the Impulse Transmission:
With the TED-TX you can transmit two impulse channels. Normally this will be the start- C0 and
finish impulse C1 (use cable 004-05).
If you use additional with the TED the RX-C10, than you can receive up to 10 different impulse
channels with the TdC 8000 and Timer S4 (see page 20).
Attention:
The TED-system will work with any normally open modern timing devices. Although we recommend
always using ALGE devices, feel free to contact your local ALGE dealer.
4.1. Impulse Transmission from a Startgate:
-
Connect Startgate and TED-TX with cable 000-05 (2-wire cable with banana plugs)
Connect TED-RX and timer with cable 004-05 (use socket A or A´ for Timer S4 or TdC 8000).
Version: E-2000-03-02
Page 17
TED-TX / RX
Page 18
4.2. Impulse Transmission from a Start-Photocell:
-
Connect photocell and TED-TX with cable 002-10
Connect TED-RX and ALGE timer with cable 004-05 (use socket A or A´ for Timer S4 or TdC
8000)
4.3. Impulse Transmission from a Finish-Photocell:
-
Connect photocell and TED-TX with cable 001-10
Connect TED-RX and ALGE timer with cable 004-05 (use socket A or A´ for Timer S4 or TdC
8000)
4.4. Impulse Transmission from a Photocell used for Start and Finish:
Connect photocell and TED-TX with cable 002-10
Connect adapter 129-06 at the timer (use socket A or A´ for Timer S4 or TdC 8000)
Connect adapter 129-06 at the TED-RX and set the switch on position bridge
START and FINISH
cable 001-10
-
cable
004-05
Photocell RLSc
TED-TX
TED-RX
cable
129-06
set switch
on bridge
ALGE Timer
TED-TX / RX
Page 19
4.5. Impulse Transmission with two Photocells for Start and Finish:
-
Connect adapter 018--5 at the TED-TX
Connect cable 002-10 at the start-photocell and at adapter 018--5
Connect cable 001-10 at the finish-photocell and at adapter 018--5
Connect adapter 129-06 at the timer (use socket A or A´ for Timer S4 or TdC 8000)
Connect adapter 129-06 at the TED-RX and set the switch on position bridge
cable
002-10
START
Photocell RLS1c
FINISH
cable
004-05
cable
001-10
cable
018--5
TED-TX
cable
129-06
set switch
on bridge
TED-RX
ALGE Timing
Photocell RLS1c
4.6. Impulse Transmission with one Photocell for Start and Finish:
-
You need two TED-TX and one TED-RX
Connect cable 002-10 at the start-photocell and the first TED-TX
Connect cable 001-10 at the finish-photocell and the second TED-TX
Connect adapter 129-06 at the timer (use socket A or A´ for Timer S4 or TdC 8000)
Connect adapter 129-06 at the TED-RX and set the switch on position separate
cable 002-10
START
Photocell RLSc
TED-TX
cable 001-10
FINISH
cable
004-05
Photocell RLSc
Version: E-2000-03-02
TED-TX
TED-RX
cable
129-06
set switch
on separate
ALGE Timer
Page 19
TED-TX / RX
Page 20
4.7. Impulse Transmission for more than two Timing Channels with RX-C10:
With the TdC 8000 and Timer S4 you can receive together with the RX-C10 from the TED-RX up to
10 different timing channels. Therefore you need different TED-TX. You can transmit a maximum of
two timing channels per TED-TX. At each TED-TX you need to adjust the timing channels with
code-switch (12).
You must notice, that each timing impulse blocks the transmitter and receiver for 0.1 seconds. A
further impulse from another transmitter will be ignored during this time.
Timing Channel selection with Code-Switch (12) at the TED-TX:
You need to adjust the timing channel only at the TED-TX (transmitter). You need to adjust the
timing channels with code-switch (12). Each switch position has two timing channels.
Set the switch with the small screw driver delivered together with the TED.
The switch position is shown with the arrow. The ALGE setup is always
on position 0 (e.g. picture to the left).
TED-TX
Code-Schalter (12)
switch position = 0
switch position = 1
switch position = 2
switch position = 3
switch position = 4
switch position = 5
switch position = 6
switch position = 7
switch position = 8
switch position = 9
TED-TX timing channel
banana socket
green (5) and black (6)
0
1
2
3
4
5
6
7
8
0
TED-TX DIN-socket
timing channel
on pin 1
0
1
2
3
4
5
6
7
8
0
TED-TX DIN-Stecker
timing channel
on pin 2
1
2
3
4
5
6
7
8
9
2
TED-TX / RX
Page 21
e.g.: Timing with 10 timing channels on test slope for skiing:
A separate TED-TX is used for each timing channel (all together 10 TED-TX).
A Startgate is used for the start.
A photocell is used for the intermediate times and the finish.
A TdC 8000 is used as timer
Connect the RX-C10 at the TdC 8000 (connection "Multi Channel") and TED-RX.
The code-switch (12) of the TED-RX has no function (switch position does not matter).
Timing
Channel
C0
C2
C3
C4
C5
C6
C7
C8
C9
C1
Function
Start
Intermediate Time 1
Intermediate Time 2
Intermediate Time 3
Intermediate Time 4
Intermediate Time 5
Intermediate Time 6
Intermediate Time 7
Intermediate Time 8
Finish
Version: E-2000-03-02
Impulse
Trigger
Startgate
Photocell
Photocell
Photocell
Photocell
Photocell
Photocell
Photocell
Photocell
Photocell
Switch Position
Code-Switch (12)
0
1
2
3
4
5
6
7
8
0
Cable
Type
000-10
001-10
001-10
001-10
001-10
001-10
001-10
001-10
001-10
001-10
Socket
of TED-TX
Banana Socket 5 + 6
DIN-Socket (7)
DIN-Socket (7)
DIN-Socket (7)
DIN-Socket (7)
DIN-Socket (7)
DIN-Socket (7)
DIN-Socket (7)
DIN-Socket (7)
DIN-Socket (7)
Page 21
TED-TX / RX
Page 22
5. DATA TRANSMISSION
For what can you use the data transmission:
-
data transmission from a ALGE timer to a ALGE display board
data transmission from a Timer S4 to another Timer S4 (Program 0)
data transmission from a ALGE timer to a Printer P4A
data transmission from a ALGE timer to a Comet Parallel Display
data transmission from a Comet Terminal to control a football (soccer) score board
data transmission from a ALGE timer to a PC
data transmission from a PC to a PC
Data Transmission Modes:
-
Data Transmission ALGE 1 Sec.: one data string per second
Data Transmission ALGE 0.1 Sec.: one data string per 0.1 seconds
Data Transmission 2400 Baud:
data transmission with control characters and 2400 Baud
Data Transmission 4800 Baud:
data transmission with control characters and 4800 Baud
Data Transmission Direct:
data transmission without protocol with 2400 or 4800 Baud
Repeat Data Transmission:
If you did not receive the last data string at the receiver, it is possible to repeat the data. The last
data string is always stored at the TED-TX.
-
press device-key (10) on TED-TX
or
-
or press a hand switch connected at TED-TX.
(connected between green (5) and black (6) banana socket on TED-TX)
5.1. Data Transmission 1 Second:
Adjustment:
set code-switch (12) of TED-TX on position 0
If the TED-TX receives a data string with ALGE protocol it switches automatically into mode data
transmission 1 second. This mode sends each data string ten times with a check code. If the TEDRX receives the data string only once correct it sends it.
This mode is used if you need a high data safety between transmitter and receiver. You can only
use this mode if data are not sent continuously. If you send continuously data (e.g. for display board
with running time), it will miss some data.
TED-TX / RX
Page 23
5.1.1. Data Transmission from Timer S4 to Timer S4:
You can supply the TED-TX and TED-RX through the serial interface from the Timer S4
- TED-TX is supplied by the
Timer S4 with cable 107-10
- TED-TX is supplied by the
Timer S4 with cable 109-10
You can supply the TED-TX and TED-RX only through the internal batteries with the following
cables:
- TED-TX and Timer S4 are
connected with cable 010-10
- TED-TX and Timer S4 are
connected with cable 101-10
Data transmission of a start time from a synchronized Timer S4 to another Timer S4.
- Use Program 3 for the Timer S4 at the start. You must input the timer of day:
> press yellow and red bottom at the same time
> the display shows "HP 0:00:00"
> Input the hours with the red button
> Input the minutes with the yellow button
- Use program 0 for the Timer S4 at the finish: You must input the time of day:
> press yellow and red bottom at the same time
> press again yellow and red bottom at the same time
> the display shows "SY 0:00:00"
> Input the hours with the red button
> Input the minutes with the yellow button
- Synchronize both Timer S4 with a start cable (channel 0)
- The display of the finish Timer shows the time of day
- Press yellow and red bottom at the same time to clear the display
- Program 0 works now as described in the S4 manual
- Carry the start Timer S4 to the start.
Repeat Data Transmission:
If you do not receive the start time at the finish timer, you can repeat the data transmission:
- press device-key (10) at TED-TX
- or press a connected hand switch (banana socket 5 and 6 of TED-TX)
Version: E-2000-03-02
Page 23
TED-TX / RX
Page 24
5.1.2. Data Transmission from a ALGE TIMER to Printer P4A:
The data transmission from the timer to the printer can be made by radio. Therefore you can
e.g. connect a second printer for the speaker.
If you use socket "display board" you need to use cable 010-10 between the timing device
and TED-TX.
Attention: You must not transmit the running time. Rotate the DIN-plug 180° at the timer if
incorrect.
If you use the socket "RS 232" of the timer, you need to use cable 060-10 between the timing
device and TED-TX.
TED-TX / RX
Page 25
5.2. Data Transmission 0.1 Seconds:
Adjustment:
Set code-switch (12) on position 1
Each data transmission of a data string from the TED-TX to the TED-RX happens once. Each data
string has a check sum. If the TED-RX receives the data with the correct check sum it output the
data. This mode allows to transmit ten data string per second.
This Mode is used to have the transmitted data immediately present (delay of 0.1 seconds) or when
you need to transmit a running time. The transmission safety is not as high as with the "data transmission 1 second".
5.2.1. Data Transmission from an ALGE Timer to an ALGE Display Board:
The timer controls the display board by radio.
With cable 010-10 the TED-TX will not be powered by the ALGE Timer.
With cable 000-10 the TED-RX will not be powered by the ALGE Display Board.
With cable 107-10 the TED-TX will be powered by the ALGE Timer.
With cable 103-10 the TED-RX will be powered by the ALGE Display Board.
Version: E-2000-03-02
Page 25
TED-TX / RX
Page 26
5.2.2. Data Transmission from a Comet to an ALGE Football Score Board:
The Comet controls the football (soccer) score board by radio.
:
5.2.3. Data Transmission from an ALGE Timer to a Comet Parallel Display:
The Timer can send the timing data from the interface "display board" by radio to a Comet
Parallel Slalom.
5.2.4. Data Transmission from an ALGE Timer to a PC:
The ALGE timer can send the data by radio to a PC.
Attention:
The data transmission by radio is not as safe as by cable. If you transmit the data
for the evaluation, you should check always if you received all data.
TED-TX / RX
Page 27
5.3. Data Transmission 2400 Baud:
Adjustment:
Code-switch (12) from TED-TX and TED-RX on position 3.
Each data string must be sent with control characters at the begin and at the end. The control
character at the begin turns the transmitter on, the control character at the end turns it off. If you do
not send a control character at the end, the transmitter will turn off automatically 10 sec. after the
last data was sent.
Start Control Character:
End Control Character:
Advantage:
01 Hex. (minimum 10 times)
04 Hex.
This mode does save the battery of the transmitter (TED-TX), since the transmitter
is only on when you send data. The data string between the start and end control
character can have any protocol.
Disadvantage: Each data string needs a control character at the begin and end to turn the TEDTX on or off.
Operation:
Wireless data transmission from one device to another (e.g. PC to PC).
5.4. Data Transmission 4800 Baud:
Adjustment:
Code-switch (12) from TED-TX and TED-RX on position 4.
Each data string must be sent with control characters at the begin and at the end. The control
character at the begin turns the transmitter on, the control character at the end turns it off. If you do
not send a control character at the end, the transmitter will turn off automatically 10 sec. after the
last data was sent.
Start Control Character:
End Control Character:
Advantage:
01 Hex. (minimum 10 times)
04 Hex.
This mode does save the battery of the transmitter (TED-TX), since the transmitter
is only on when you send data. The data string between the start and end control
character can have any protocol.
Disadvantage: Each data string needs a control character at the begin and end to turn the TEDTX on or off.
Operation:
Wireless data transmission from one device to another (e.g. PC to PC).
Version: E-2000-03-02
Page 27
TED-TX / RX
Page 28
5.5. Data Transmission Direct:
Adjustment:
Code-switch (12) from TED-TX and TED-RX on position 6.
Adapter 119--1 must be connected to TED-TX (short-cut between pin 2 and 3 at
DIN socket (7)).
Each data string must be sent with 2400 or 4800 Baud. You do not need any control characters.
The transmitter (TED-TX) is always on, this means a net device (NLG8) is recommended.
Data will not be checked by the receiver (TED-RX), but as they are received forwarded to the
plugged device. The device that receives the data should check the data (e.g. PC).
Advantage:
Each data string will be sent, you must not keep a certain format. You do not need
control characters.
Disadvantage: The TED-TX has a high power consumption, since it is always on. Since the data
are not sent with a protocol it is not possible to check them at the TED-RX.
Operation:
Wireless data transmission without data protocol from one device to another
(e.g. PC to PC).
ALGE TdC 8000 transmits data to a PC through the RS 232 interface
PC transmits data to another PC
Attention: You must use adapter 119--1 in this mode!
TED-TX / RX
Version: E-2000-03-02
Page 29
Page 29
TED-TX / RX
Page 30
6. TECHNICAL DATA
Frequency:
Standard:
Optional:
RF Output Power:
TED-TX10 ................. 10 mW
TED-TX400 ............... 400 mW
Reach:
TED-TX10 ................. about 1,5 km
TED-TX400 ............... about. 5 km
Impulse Input TED-TX:
active low, min. 10 ms, double impulse protection time about 50 ms
Impulse Output TED-RX:
active low, 100 ms
Power Supply:
TED-TX10 and TED-RX: +6,5 to 28 Volt DC
TED-TX400:
+9 to 15 Volt DC
6 x Alkaline Batteries 1,5 V (type AA) or
6 x NiCd Rechargeable Batteries 1,2 V (type AA)
external:
internal:
Power Consumption:
Working Time:
TED-TX10:
433,500 MHz
from 433,050 to 434,790 MHz (in the 70 cm Band)
in Transmission Mode:
in Stand-by Mode:
TED-TX400: in Transmission Mode:
in Stand-by Mode:
TED-RX:
Normal Mode:
Test Mode:
about 35 mA
about 3 mA
about 300 mA
about 3 mA
about 35 mA
about 70 mA
Table for use with Alkaline Batteries (Type Energizer) at 25°C (77F):
TED-TX10 without photcell
1 impulse per minute
TED-TX10 with photocell
1 impulse per minute
TED-TX10
--1 data transmission per minute
TED-TX10
--continues data transmission
TED-TX400 without photcell
1 impulse per minute
TED-TX400 with photocell
1 impulse per minute
TED-TX400
--1 data transmission per minute
TED-TX400
--continues data transmission
TED-RX
--in all equal
about 300 hours
about 66 hours
about 270 hours
about 54 hours
about 270 hours
about 60 hours
about 54 hours
about 6 hours
about 54 hours
Table for use with NiCd batteries (Type Panasonic 700m Ah) at 25°C (77F):
TED-TX10 without photcell
1 impulse per minute
TED-TX10
with photocell
1 impulse per minute
TED-TX10
--1 data transmission per minute
TED-TX10
--continues data transmission
TED-TX400 without photcell
1 impulse per minute
TED-TX400 with photocell
1 impulse per minute
TED-TX400
--1 data transmission per minute
TED-TX400
--continues data transmission
TED-RX
--in all equal
about 100 hours
about 22 hours
about 90 hours
about 18 hours
about 90 hours
about 20 hours
about 18 hours
about 2 hours
about 18 hours
TED-TX / RX
Page 31
RS-232c Interface (for TED-TX and TED-RX):
Input-/Output format:
1 Start Bit, 8 ASCII Bit, no Parity-Bit, 1 Stop Bit
Transfer Speed:
2400 Baud
Pin Connection:
see below
Connections:
TED-TX DIN socket:
1 ....... Impulse input (Start)
2 ....... Impulse input (Stop)
3 ....... Ground
4 ....... Input , external supply
5 ....... Output +5 Volt stabilized
6 ....... Data input
TED-RX DIN socket:
1 ...... Impulse output (Start)
2 ...... Impulse output (Stop)
3 ...... Ground
4 ...... Input, external supply
5 ...... empty
6 ...... Data output
Banana Sockets:
with yellow mark (4) ........... Data (same as DIN-socket PIN 6)
with green mark (5) ........... Impulse (same as DIN-socket PIN 1)
with black mark (6) ............ Ground (same as DIN-socket PIN 3)
Antenna:
TED-TX10:
TED-TX400:
TED-RX:
l/4 antenna, about 165 mm
BNC socket for antenna
l/4 antenna, about 165 mm
Working Temperature range:
Weight:
TED-TX10:
TED-TX400:
TED-RX:
-20 to +50°C (-4 to 122 F)
without batteries:
about 600 g
about 600 g
about 600 g
with batteries:
about 750 g
about 750 g
about 750 g
Measurements:
Version: E-2000-03-02
Page 31