1
However, this won’t get them very far, as they currently only have one VoIP phone connected to the default extension, which
in their case happened to be 3289. To share the workload, they plan to set up sales and support extensions, and then a
voice menu to guide callers.
Mapping the extensions to handsets
Each real person needs to have a real telephone handset (and line!) to answer. This can be a VoIP phone in the same or
another location, or a diversion to an external number (mobile or landline or VoIP).
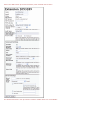
To get at the settings, click the extension number link to see the details; the screen starts with a number of general settings,
of which these are the ones you might want to set up:
•
•
•
•
•
SIP Password: only needs to be set when buying phones from other suppliers, or if you need to change it for
security reasons.
PSTN Access: allow or disallow calls outside the VoIP network.
PSTN caller ID: select the caller ID (only possible if you have more than one line). When you make a call, your
user name is also transmitted, and will be displayed on handsets that can accept it.
Message before ringing: choose a personalised message to play before ringing.
Hold Music/Play Hold Music while ringing: choose a music track to play if the caller is put on hold.
The next part of the screen allows various Voicemail Settings to be made:
•
•
•
•
•
•
•
Enabled: turn voicemail on or off, and set the Message Waiting Indication on or off (this depends on the handset
supporting it: for example, you may hear an interrupted dial tone when any messages are waiting).
In Delay, you can specify how many seconds the phone should ring before the voicemail recording service picks up
the line.
You can usually leave the PIN at the default created for you.
You can specify an SMS Notify Number to get text alerts.
You can usually leave the Voicemail Account at the default value.
You can opt to have WAV Emails to get a recording of the message attached to notification emails.
The final two fields work together. Outgoing Message and Intro Skip allow you to upload a recorded message and
turn off the standard message.
Note: since you can set both voicemail and diversion on the same extension, you need to set the respective delays carefully:
having both the same can result in unpredictable behaviour.
The last part of the screen allows various Divert Settings to be made:
•
•
•
Specify, in Divert Time, a number of seconds after which the diversion should occur to turn it on, or blank the field
to turn it off.
Choose a Divert Mode. There is a full explanation of these available via the help link on the page, but to
summarise:
o Sequential: the phone rings, and if the call fails (offline, busy, etc) or is not answered within the divert
time, the call is cancelled and the divert number is called instead.
o Delayed parallel: the phone rings, and after the specified delay, the divert number is called, but the phone
keeps ringing.
o Sequential with repeat: a mixture of the above.
We recommend you experiment to find the one that suits you best.
Then select an option to specify where to divert to: this can be an external (PSTN or VoIP) number, another
extension, or a SIP URL. When you are done, click Save to confirm the changes and return to the summary page.