1
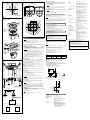
ø130 (5 1/8) 3-Screw hole How to remove the camera 1 Loosen and remove the two screws on both sides of the camera unit. 2 Rotate the camera unit in a counterclockwise direction, and remove it Camera (When installing the ceiling bracket) from the ceiling bracket. 3 Disconnect the cables. Unit: mm (inches) Although you can disconnect the cables while the camera unit is hanging from the ceiling bracket with the help of the rope, be sure not to put additional pressure on the unit. 4 Unhook the built-in wire rope from the ceiling bracket, and dismount the camera unit. Note Install the camera with its head facing upward How to install 85.7 (3 3/8) 83.5 (3 9/32) 1 Connection Hook Connect the LAN port of the camera unit to a router or hub in the network using the network cable (straight, not supplied). To connect to a computer Built-in wire rope Connect the LAN port of the camera unit to the network connector of a computer using the network cable (cross, not supplied). To connect to a network using a coaxial cable (SNC-ZP550/ZR550) (3 / 2 9 3 (3 83 .5 .5 0° 12 83 /93 2 ) Align the triangular mark with the front side of the camera when using a junction box. ) 0° 12 Unit: mm (inches) Note The high-frequency characteristics of coaxial cables may differ, even if the cables are of the same classification. Use a high-quality, high-frequency coaxial cable with this unit. For details, refer to the instruction manual of the connecting SLOC device. For further details, please consult an authorized Sony dealer. Notes 2 Ceiling bracket Ceiling Do not grasp the camera head when carrying the camera. Do not turn the camera head manually. Doing so will likely result in the camera malfunctioning. Turn off the power of the camera before installing it. Screw (supplied) Use the supplied ceiling bracket to install the camera. The ceiling bracket is attached to the camera unit. Remove it before installing. Warning If you attach the camera in a high location such as wall or ceiling, etc., entrust the installation to an experienced contractor or installer. If you install the camera in a high location, ensure that the ceiling is strong enough to withstand the weight of the camera plus mounting brackets and screws, and then install the camera securely. If the ceiling is not strong enough, the camera may fall and cause serious injury. To prevent the camera from falling, make sure to attach the built-in wire rope. If you attach the camera to the ceiling, check periodically, at least once a year, to ensure that the connection has not loosened. If conditions warrant, make this periodic check more frequently. Align the triangular mark on the camera with the diamondshaped mark on the ceiling bracket. Before installation Decide the direction in which the camera will shoot, before making holes for wiring and screw holes. Push down the perforated tab to bundle the cables from the side of the camera. (For details, see “ Cable cover” in “Location and Function of Part.”) Note If you use this camera by feeding power to the LAN port, use the HPoE power feeding device. Connecting to a 24 V AC power source supply Connect the 24 V AC power supply system to the power input terminal of the camera. Use a 24 V AC power source isolated commercial power supply. The usable voltage range is as follows: 24 V AC: 21.6 to 26.4 V Use a UL cable (VW-1 style 10368) for 24 V AC connection. Recommended power cable 24 V AC Using the supplied template, make a hole for the wiring (ø40 mm (1 5/8 inches)). Determine the location of the three screw holes for attaching the ceiling bracket. () Using the existing junction box Cable(AWG) #24 #22 #20 Maximum cable length (m (feet)) 11 (36.1) 19 (62.3) 28 (91.9) Connecting to the power supply equipment pursuant to IEEE802.3at The power supply equipment pursuant to IEEE802.3at supplies the power through the LAN cable. For details, refer to the Instruction Manual of the equipment. Connecting the I/O Cable Installing directly on a ceiling Wiring diagram for sensor input Mechanical switch/open collector output device Attach the ceiling bracket to the junction box. Screws for this operation are not supplied. Attach the ceiling bracket in a manner that the triangular mark faces the front side of the camera. 3.3 V I/O cable SD Coaxial Mic Audio memory cable Input Output card 2.2 kohms Required screws (not supplied) vary in accordance with the location or material of the installation. For steel: Fix with M4 screws and nuts. For wood: Fix with tapping screws (nominal diameter 4). A material thickness of 15 mm (19/32 inches) or more is necessary. For a concrete wall: Fix with dry bit or plug bolts. For a junction box: Fix with screws that accommodate the screw holes in the junction box. Warning Use the appropriate screws in accordance with the condition and material of the location site. Otherwise, the ceiling unit may fall and cause serious injury. Camera inside 10 kohms 3 or 1 pin (Alarm Input 1 or 2) Mechanical switch 10 kohms GND GND GND 2 or 4 pin GND or Open collector output device Wiring diagram for alarm output Camera inside How to install 1 Put the built-in wire rope on the hook in the ceiling bracket. (-1) 2 Connect the cables. 10BASE-T/ 100BASE-TX Outside 10 kohms Fixing screws 24 V AC Connecting the Power Source The following two methods are available for connecting to a power source. 24 V AC HPoE Install the camera to a horizontal place. If you have to install the camera to an incline, make sure the incline is within ±15° to the horizontal level to ensure the turning performance of the camera. Installing the Camera on a Ceiling When the network connection change switch is set to SLOC, connect to a network via a coaxial cable. The maximum coaxial cable length is 3C-2V 300 m. Installation LAN Connecting to the Network 3 85.7 (3 /8) 45° 45° Ceiling bracket Ceiling By default, the images from the camera are displayed normally when the camera is installed on the ceiling. To display the images from the camera in correct way when you place the camera on the desk top, use the E.flip function. For the setting of the E.flip function, see the User’s Guide stored in the supplied CD-ROM. Hole 13-ø4.5 (3/16) 1 / 8) 5 ( 30 ø1 Outside 24 V DC Note Network cable (straight, not supplied) Coaxial cable maximum length: 3C-2V 300 meters 3 4 5 Hub 6 Network Install a hub compatible with HPoE when using an HPoE system. Although you can connect the cables while the camera unit is hanging from the ceiling bracket with the help of the rope, be sure not to put additional pressure on the unit. Align the triangular mark on the camera with the diamond-shaped mark on the ceiling bracket, and then attach the camera unit into the bracket. (-2) Rotate the camera unit in a clockwise direction. Attach the camera unit to the ceiling bracket by fixing two screws at both sides of the unit. Attach the cable cover. 5 pin (Alarm Output +) Magnet relay 24 V AC 24 V DC, 1 A or less GND Use the supplied screws to install the unit. Using other screws may cause damage inside the unit. Specifications Compression Video compression format Audio compression format Maximum frame rate Camera Image device SLOC connector SLOC-compatible device Video output terminal Coaxial cable Video monitor (etc.) Synchronising Minimum illumination LAN port (RJ-45) Network cable 10BASE-T/ 100BASE-TX Network device Circuit example 6 pin (Alarm Output –) Note Maximum relative aperture Minimum object distance Mechanism Pan Follow the same steps as in “Installing the Camera on a Ceiling” when installing or removing the camera. Be sure to place the camera securely to prevent it from falling. Note Celing bracket Focus length Tilt Always hold the camera when you dismount the camera unit. This will prevent any risk of the camera falling. Unit: mm (inches) Lens Note 132 (5 1/4) (When installing the bracket) 190 (7 1/2) (Camera unit only) ø40 (1 5/8) Cable hole 190.9 (7 5/8) (When installing the bracket) 0° 120 12 ° ø147.4 (5 7/8) Video S/N JPEG/MPEG4/H.264 G.711/G.726 (40,32,24,16 kbps) 30 fps SNC-EP580/ER580: 1/2.8 type Exmor CMOS SNC-EP550/ER550/ZP550/ZR550: 1/4 type Exmor CMOS SNC-EP521/EP520/ER521/ER520: 1/4 type interline transfer CCD Internal SNC-EP580/ER580: 1.7 lx (Shutter speed: 1/30 sec, Exposure: Full auto, 50IRE [IP]) SNC-EP550/ER550/ZP550/ZR550: 1.0 lx (Shutter speed: 1/60 sec, Exposure: Full auto, 50IRE [IP]) SNC- EP521/ER521: 1.4 lx (Shutter speed: 1/50 sec, Exposure: Full auto, 50IRE [IP]) SNC- EP520/ER520: 1.4 lx (Shutter speed: 1/60 sec, Exposure: Full auto, 50IRE [IP]) 50 dB (Gain 0 dB) SNC-EP580/ER580: f=4.7 to 94.0 mm SNC-EP550/ER550/ZP550/ZR550: f=3.5 to 98.0 mm SNC-EP521/EP520/ER521/ER520: f=3.4 to 122.4 mm SNC-EP580/ER580: F1.6 to F3.5 SNC-EP550/ER550/ZP550/ZR550: F1.35 to F3.7 SNC-EP521/EP520/ER521/ER520: F1.6 to F4.5 320 mm SNC-EP580/EP550/EP521/EP520/ZP550: 340° SNC-ER580/ER550/ER521/ER520/ZR550: 360°, endless rotation Maximum speed: 300°/s SNC-EP580/EP550/EP521/EP520/ZP550: 105° SNC-ER580/ER550/ER521/ER520/ZR550: 210° (with auto invert function) Maximum speed: 300°/s Interface Network port 10BASE-T/100BASE-TX, auto negotiation (RJ-45) I/O port Sensor input: × 2, make contact Alarm output: × 1, 24 V AC/DC, 1 A (mechanical relay outputs electrically isolated from the camera) SD memory card slot Microphone input Minijack (monaural) Plug-in-power supported (rated voltage: 2.5 V DC) Recommended load impedance 2.2 kohms Line output Minijack (monaural), Maximum output level: 1 Vrms SLOC port/Monitor output (SNC-ZP550/ZR550) 1.0 Vp-p, 75 ohms, unbalanced, sync negative (during video output) Others Power supply Power consumption Operating temperature 24 V AC ± 10%, 50 Hz/60 Hz IEEE802.3at compliant (HPoE system) Max. 25 W –5°C to +50°C (23°F to 122°F) (activation temperature range: 0°C to 50°C (32°F to 122°F)) Storage temperature –20°C to +60°C (–4°F to +140°F) Operating humidity 20% to 80% Storage humidity 20% to 95% Dimensions (Diameter/Height) ø147.4 mm × 190.9 mm (ø5 7/8 inches × 7 5/8 inches) (When installing the ceiling bracket, not including the projecting parts) Mass Approx. 1.7 kg (3 lb 12 oz) (including ceiling bracket) Supplied accessories Ceiling bracket (1) Screws (2) Installation manual (1 set) CD-ROM (User’s Guide, supplied programs) (1) Template (1) 24 V AC connector (1) I/O connector (1) Design and specifications are subject to change without notice. Recommendation of Periodic Inspections In case using this device over an extended period of time, please have it inspected periodically for safe use. It may appear flawless, but the components may have deteriorated over time, which may cause a malfunction or accident. For details, please consult the store of purchase or an authorized Sony dealer. Adobe and Acrobat Reader are trademarks of Adobe Systems Incorporated in the United States and/or other countries. sloc™ is a trademark owned by the Intersil Corporation family of companies.