1
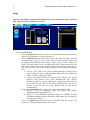
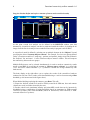
2 Functional connectivity toolbox manual v1.0 Usage Step one: Setup (Defines experiment information, file sources for functional data, structural data, regions of interest, and other covariates) - Click on the SETUP tab o Click on the Basic button on the left side, enter experiment information (Number of subjects, TR, and number of sessions per subject) o Click on Functional button on the left side, from the right side panel, select the functional images (*img, or *nii, or 4d nii). This will take a second to load, check the middle panel (Functional data setup) to make sure the correct volumes are loaded. The brain display in the “Functional data setup” window shows the first (left) and last (right) scan for the selected subject/session (as in the figure above). The current version of the toolbox assumes analyses are performed in normalized space. GUI tip 1: The “Find” in the “Select functional data files” window can be used to search for all files within the target folder recursively. Change the “Filter” window to narrow the search. GUI tip 2: If multiple subjects are selected in the “Subjects” list, and the number of files selected in the “Select functional data files” window matches the number of subjects, each subject is assigned one single file from the list (this is useful when one has 4-dimensional .nii files –one file per session- in order to enter all of the functional files for each session simultaneously) o Click on the Structural button on the left side to load the structural images Option 1: load raw anatomical image, the toolbox will perform normalization and segmentation on it. Option 2: If the normalized/segmented images are available, load the normalized anatomical image (and load the white matter and CSF masks in the next step, see below). o Click on the ROIs button on the left side to load ROI mask files (.img or .nii volumes) or Talairach coordinate files (.tal text files).