1
General Notes – Read this before installing the system
•
•
•
•
•
Do not cut any wiring: the wiring supplied with the kit is plug and play.
Please be careful not to damage the on-board connectors when plugging / unplugging
them. In the following pages is described how to correctly manage them.
Do not install the system when the engine is hot. The on-board connectors are quite
near to the engine and you can burn yourself.
The space under the gas tank is quite confined: be careful not to hurt yourself when
plugging and unplugging the connectors.
Be careful not to loose screws and washers nor to damage the fairing when installing /
uninstalling it.
INSTALLATION STEP # 1 –Removing the front transparent fairing and the
lateral mirrors.
The first installation step consists in
removing the bike front transparent fairing
and the lateral mirrors.
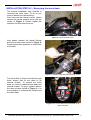
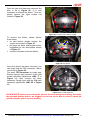
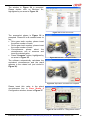
The front transparent fairing is fixed to the
bike chassis through 6 screws circled in
Figure 1. Please unscrew them and
remove the front transparent fairing.
Figure 1: front transparent fairing – screws location
It is now necessary to remove both lateral
mirrors.
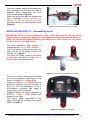
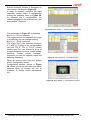
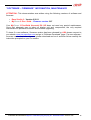
First of all, please remove the two internal
screws (one of them is circled in Figure 2
while the other is nearby) and remove the
lateral mirror. Please repeat this operation
for both mirrors.
Figure 2: .internal screw to remove.
Installation documentation: MyChron 3 Plus/Gold plug and play kit – Kawasaki ZX10R – Version 1.00
2