1
1
,
Locale lhe baliery compa(meits
and load 2
]
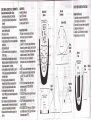
COMPONENTS:
Handheld Unit (Receiver)
Base unit (Transmitter)
Stainless Steel Meat Probe
and Head-resistant Probe Wire
USER'S MANUAL REMOTE GRILL THERMOMETER:
General Use lnstructions (Grill 0r Oven):
AM baiteies
(notincluded) inlo boh Handheld unil (Receiver) and Base Unit
[Iransmitler).
Base Unit
(Transmitter)
Place Hanoheld unitin Base Unitcradle (unih shoud be in close
prcximity for e$ablishing dala link),
Receiver Button Profiles:
Place meaton gdll orin oven.
1. HR Button: ln timer mode, press to set hour, in
lnsen stainless-sleel meat pmbe inlo
he lhickesl
part 0flhe meat.
Carefully, replacejclose grill lid or oven d00r on heat resistant b{aided
steel pmbe wire.
6. Pluo
7. Tufi
Drcbewire inlo Base Unit.
bN the Handheld Unitand Base Unilby localing bolh small
"0N/0FF'
8.
s'ditches.
Handheld Unil and Bas€ Unit vJill establish data link automatically.
Registalion is complete,,rtren he Handheld Unil beeps and lhe prcbe
lemperaturc appeaE where lhe
9.
1-'
tvas
fl
a$ing.
once link iseshblished, enleriype 0fmeal{Beef, Veal, Lamb, Pod(,
Chicken, Turtey) by pressing meal bl]tton 0n Handheld Unit unlil
desired meat is selected.
10,0nce meal type is selected, set desired lasle level (Rare,
Itledium-Rare, Medium, Well-Done) by pressing tasle bl]lton on
Handheld Unlil untl desired lasle/doneness level is selecled.
1LTo sel lhe desircd intemal meat temperature
Press HR
ff
manually.
ltllN button lo mise or lol,/er lhe lempemlure value after
meat seleclion is made,
12.Gdll or Cook unlil
alam
sounds
indiatng lhal lhe
desired tastei
doneness level is reached. For tre besl esdb sel munl down/muni
up timerand cieck meal peiodically 6ee limer inslrudions).
13,Remove mealfrom gdll oloven andallowl0 md (appmx.5 min.)
and s€nie.
I
thermometer mode, press to increase the
temperature value.
CLEARi F"iC": ln timer mode. when the timer count
down/count up process is stopped, press to clear the
timer reading. ln thermometer mode, press to solect
temperature readings in Celsius or Fahrenheit.
3. l\4lN: ln timer mode; press to set minutes. ln
thermometer mode, press to decrease temporature
value.
4, MODE: Press to select thermometer or timer mode.
5. IVIEAT: ln thermometer mode press to solect meat
type (BEEE VEAL, LAMB, PORK, CHICKEN,
TURKEY),
6. TASTE: lh thermometer mode press to solect
taste-doneness level (W DONE, MEDIUM,
M. RARE or RARE).
7. START/STOP: Press to start or stop tho timer count
down or count up.
8. ON/oFF: Switch on backside above cllp - turns
receiver on and ofi,
9. SILVER SIDE BUTToN: Press to tum LEo light on
and offwhile receiver is 0N (LED light will not work
while receiver power is 0FF).
BEEF
.ffi'160,,,r,
arrrrnv ReruceMENT
TNSTRUCTIoNS:
] Handheld Unit (Receive4:
I 1. Locate battery compartment undemeath belt clip
on the backside of the Handheld Unit.
2. Remove belt clip to access battery compartment
I 3. Carefullv. remove batterv covet
' 4. Carefulli, load 2 AAA baiteries {not included).
5. Replace battery cover and belt clip.
l,-.{[k
2
' Battery
Cover
fr -ll
tll \l
o
tf
-o
Belt Cllp
L_t