1
Chapter 2: Installing Server Software
Novell 4.x and IntranetWare servers include NetWare Directory Service (NDS) support. NDS is a
naming scheme and database that allows organizing all servers and services in one large, hierarchical
database.
NDS and the Splash server software can create a single print server object and assign virtual printers
to that print server. Virtual printers can have one or more print queues associated with them. To
change the printers or queues, change the Print Server assignment in the NDS database. Splash
Enterprise Networking reads the NDS database for the print server information and services the
specified queues. This allows controlling print queues associated with the Splash server without
making adjustments at the Splash server.
Configuring an NDS Print Queue
To create an NDS print queue:
1.
From Microsoft Windows, run NWAdmin.
2.
In the directory tree, find the container for creating printing objects.
3.
Highlight that container and select Print Services Quick Setup from the Tools menu.
4.
In the Print Services Quick Setup dialog box, enter a new print server name or browse the
directory tree to select an existing print server. This name, with its full path (Fully
Distinguished) is the name that will be used in the Novell NDS setup window in Enterprise
Networking.
5.
Enter a name for the printer you wish to create and the associated configuration information.
6.
Enter a Print Queue name.
7.
Click the Browse button to the right of the volume field to browse the directory tree for the
volume where this print queue will be created.
8.
Click Create to create the objects and make all necessary assignments (Printer to print server,
Queue to printer).
NetWare NDS Direct can now be set up at the Splash server.
Configuring NetWare NDS Direct at the Splash Server
To configure NetWare NDS Direct:
1.
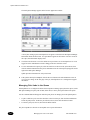
Choose Enterprise Networking from the Server menu in the Splash server application.
An untitled Novell document appears.
2.
In the Print Server text box, type the Fully Distinguished name of the Novell print server you
created for the Splash server. Type the password for the print server if one was assigned.
Click the Browse button next to the Print Server text box, and Enterprise Networking displays a
list of print servers.
3.
Select a print server then click OK.
4.
Click the Connect button to enable NetWare NDS Direct. A list of printers appears at the
bottom of the Novell document window.
PN: 0016964-0101
Configuring an NDS Print Queue
23