1
NR330A-IP4
GbE iSCSI to SATA II/III Chassis
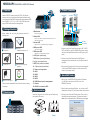
1. Overview
5. Product Connection
8
6 7
Management
PC
iSNS server
Host / Server (Optional)
RS-232
2. Package Checklist
Before installing this unit, verify that package contains the
following items.
17
18
Netstor’s GbE iSCSI enclosure uses Intel IOP 341, 64-bit Xscale
processor as the core engine that delivers highest performance while
running with quad Gigabit iSCSI channels and supports hardware RAID
levels of RAID 0, 1, 0+1, 3, 5, 6, 10, 30, 50, 60 & JBOD with a wide
range of RAID function selection for data protection.
9
10
1. Mute button
11
Switch
16 12 14
13 15
Gigabit switch
。Reset for buzzer beeping
2. Status LED
。Normal – green; failure – red (Fan fails, over-temperature occurs, or
HDD/power supply failure)
3. Access LED
RS-232
。HDD no access – no light; HDD accessing – flashing green
A
B
Enclosure x 1
HDD tray
(installed on enclosure) x 16
4. HDD power LED
1. Connect one end of the Gigabit Ethernet cable to GbE 1, GbE 2,
GbE 3, and GbE 4 on rear of the NR330A-IP4 enclosure, and the
other end of the Gigabit Ethernet cable to the GbE ports on GbE
switch.
。white - power on indicator
5. HDD status LED
。flashing blue – busy (HDD accessing) indicator
6. LCD (liquid crystal display)
7. ESC (Escape) (control panel button)
2. Connect one end of the Ethernet cable to RJ45 Ethernet
management port and, and the other end of the Ethernet cable to
the switch.
8. ▲ (Up) (control panel button)
C
Power cord x 2
D
Hard drive mounting screw
package x 1
Green IT makes
Green Earth
NetStor Technology Co. Ltd.
www.netstor.com.tw
E
F
Key for HDD tray x 2
CD user’s manual x 1
Notify your sales representative if any of the above items is missing
or damaged.
Install each hard drive into the drive trays and fasten using
the supplied HDD screws.
1 2 3
HDD1
HDD5
HDD9
HDD13
▼ (Down) (control panel button)
Power cord receptacles
GbE 1
GbE 2
GbE 3
GbE 4
RJ45 Ethernet port for management
Console
RS-232 for connection UPS
4. Disk Installation
3. Panel Layout
4
5
9. ENT (Enter) (control panel button)
10.
11.
12.
13.
14.
15.
16.
17.
18.
HDD2
HDD6
HDD10
HDD14
HDD3
HDD7
HDD11
HDD15
HDD4
HDD8
HDD12
HDD16
Step 1
Net cable
RS-232 cable
Step 2
3. Plug one end of the power cord to the two power cord receptacles
on rear of the NR330A-IP4 enclosure, and the other end of the
power cord to the power outlets.
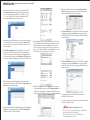
6. Quick RAID Setting
1. After you turn on the NR330A-IP4, there will be an IP address
(e.g. 192.168.xxx.xxx) shown in the LCD on rear of the
NR330A-IP4 enclosure.
2. Open the web browser (Internet Explorer…etc.), and key in the IP
address shown from the LCD into the web browser, and press enter.
3. The entry screen of the web GUI will be shown. Then you key in
the default user name and password. The default user name is:
admin, and the default password is: 1234, and then press Login.