1
The Skirt, Part 3, Panels...
Sitting down...
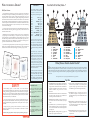
Skirt panels should be made from thin wooden
sheet, 4mm MDF is ideal, though hardboard or
other materials could be used. Try to avoid wood
that has a grain as this will be difficult to hide
when painting the skirt later on. If your plans
give individual panel dimensions, use these but
double check before cutting. If you don’t have
a set of pre-defined panel shapes, don’t panic,
proceed as follows...
Some would say that the whole point of
having a Dalek is to get inside it and threaten
lesser mortals with imminent extermination.
This is best done from a seated position, so
you must add a seat to the inside of the skirt.
Working one panel at a time, cut out a
slightly over size rectangle then lie it
against the skirt frame so that it covers the
whole area that the final panel will cover.
Clamp it into place, then, using a pencil and
ruler, draw lines on the back of the rectangle starting at the top corners of the
frame and ending at the lower corners. Repeat this for the horizontal lines so the
final shape of the panel is marked out on it’s rear. Cut the panel and test fit it.
Remember the sides of each panel will need to be cut with, or sanded to, an
angle or cut in order for the next panel to butt up to it snugly. It is recommended
that you only fit a panel when you can offer up each adjacent panel to check the
way they fit together. The front two panels have a distinct twist according to most
plans, including those available from Project Dalek - don’t panic, this is normal.
Depending on the plans you are following, other panels may have a slight twist
too.
Secure the panels with wood glue and panel pins (punch in the heads so they
can be hidden with filler). When all the panels are fitted, run strips of fibreglass up
the inside panel joints and around the top and bottom where the panels meet the
frame. This will stop the panels moving around and add great strength. Fill up
any exterior imperfections with car body filler.
If you are fitting the hemispheres from inside you must mark out and cut the
holes (see plans for positioning). Use a drill with a hole cutting attachment and
remember that the lower shoulder collar fits over the skirt by approximately half
an inch so take this into account when positioning the top row of holes. If you are
fitting the hemispheres from the outside (a must for 2005 Series Daleks which
include a black ring around the base of each hemisphere), you must mark out the
centre positions and drill the holes through which the fixing bolts will be fitted
later on. Prime the finished skirt with at least three coats of primer and then sand
using the methods detailed under shoulder construction (Section 3).
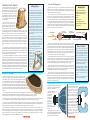
Four vertical timber struts should be run from
the top of the frame to the bottom and be
firmly secured. These are positioned near the
rear of the Dalek, leaving enough clear space
to insert hemispheres if needed. Now work
out the height that you want the seat to come
to. Sit on an adjustable office type chair and
move it up and down until your feet can
wheel it around the room (we’ve all done that
before, haven’t we).
This is the height that your seat should be set
to. Cut four further timber struts to this length
and drill/bolt them to the sides of the other
struts you just fitted so that a seat base can be
slid in on top of them (round edged kitchen
worktop is ideal). Secure the seat base to the
long uprights with right angled brackets.
If you are adding a separate base section,
it may be worth
considering the
attachment of the
seat to this, rather
than the skirt. Be
sure to take the
additional height
of the base into
account when
setting the
seat height.
Section 5: The Base...
The 2005 series
Dalek base
As mentioned in the previous section, you have a choice of how to make
the base. You can either make it as a separate unit or build the skirt up onto
it. If you intend to do this you may wish to consider splitting the base/skirt
for ease of transportation. In either case, the base should first be made up as
one section and then cut, if necessary, once completed. A cut base can be
joined back together and the two skirt halves built on top in the usual way (refer
to Section 4). The large fender bases used on Movie Daleks/MK2 Daleks and the
base section on the 2005 series design are not suitable for splitting. These bases
should be constructed as complete units, bolted to the skirt once both sections are
complete.
For a standard Dalek base you will need a large piece of 18mm MDF for the main base structure.
The perimeter should be marked out and cut using a jigsaw. Remember, measure twice, cut once. You will also
need an ‘inner’ hole cutting, through which your feet can go in order to propel the Dalek into unsuspecting crowds.
When deciding on the size of the inner hole, consider the positioning of the wheels and the seat frame - you need enough board left
over to accommodate these essentials. If in doubt, leave the inner hole until last, when the wheels and skirt are in place.
Using further strips of 18mm MDF, double up the depth of the base edge by attaching a layer of strips to its underside. This will
give you 36mm which should be enough to attach the rubber to. If you wish to build a Dalek with a further, rebated underside, like
the imperial kind, add a second layer of wood to the desired thickness, stepped in from the previous layer.
Movie fender bases are more difficult to construct due to their curved edges. The top of the fender should be made first from
MDF/ply using a jigsaw to cut out the basic shape. The curved edges can be made by building up layers of wood underneath the top
section. These should be glued and screwed together. Once the basic shape has been achieved, the curved edges can be made by
sanding back the built up areas using an electric sander. The sides of the fender can then be made from either wood or rubber
sheeting, depending on which style of Movie Dalek you are making.
16
PREVIEW VERSION
2. Locate: The Plunger Arm...
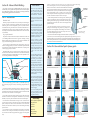
The plunger arm is made from two or three lengths of aluminium tube. The quantity
depends on which era of Dalek you are building, do your research and refer to your
chosen set of plans. The tubes are different diameters and are therefore able to slide
together creating the desired telescopic effect.
First of all cut the tubes to the correct lengths and then tidy up the cut surfaces.
You now need to ‘bush’ the tubes so that they don’t rattle or fall apart when extended.
This is done by adding layers of PVC insulating tape to either the inner, or outer
surfaces, depending on the tube (see illustration). When the tubes are assembled a plastic
‘cap’ should be added to the end of the large tube (cut a hole in it’s centre for the pole to
pass through). Any suitably sized bottle cap will do (a good tight fit is desirable). This
stops the inner tubes from pulling out backwards. Further bushing may be required
where the tubes connect, depending on the style of Dalek. Small ‘washer’ shaped disks
made from wood, plastic or metal are ideal for this.
Bush, outer
edge of 2nd tube.
Inner wooden pole.
Bush, inner
edge of 2nd tube.
Shopping list...
3x (2x on some Daleks) different
thicknesses of aluminium tube - see
your plans for exact specification.
Wooden pole.
PVC tape.
P40 car body filler.
Can of expanding foam filler.
A plunger (preferably a hemisphere,
not ‘bell’ shaped).
Plunger screwed to inner pole.
P40
ball joint
Plastic end cap.
Bush, outer edge of 3rd tube.
Bush, inner edge of 3rd tube.
The inner most tube needs a wooden dowel threading through it, which extends a
little further than the back of the outer tube when the arm is fully extended - enough to
provide a control handle. The outer end of the wooden pole provides a good surface on
to which the plunger can be screwed. This also prohibits the inner tube from being fully
pulled through the outer tube when the arm is retracted. If available, a longer length of
aluminium tube may also be used. In this case, take care with the measurements when
cutting the thinnest tube. The end of the tube can be plugged with a wooden insert or a
nut can be glued into position, ready to attach the plunger.
To make the ball joint, follow the instructions in Section 4 on building a hemisphere
from P40 car body filler. You will need two of these to make the ball joint. Glue them
together using epoxy resin and then fill and sand to a fine finish. Drill a small pilot hole
all the way through the ball from front to back and then increase the size until the outer
arm tube can be threaded through. Position and fix into place with epoxy resin.
Drill a small hole in the back half of the ball joint and use it to fill the ball with
expanding foam filler. Once dry, seal the hole with car body filler or epoxy putty
(Milliput). Prime and paint the ball joint with the appropriate colour. Thread the arm
into the Dalek from the inside and attach the plunger to the end.
If you are lucky, you may be able to track down some 4” (hollow) steel or aluminium
spheres. These are ideal as ball joints but drilling the holes for the tubes can be tricky.
Wrap the sphere in masking tape to protect it, then clamp it firmly in a drill press before
attempting to cut the holes. Run the drill on a slow speed using a metal cutting hole saw.
Cool the surface with oil as you gradually cut through. Make sure you get both holes
lined up or your arm will be wonky!
The 2005 series plunger is a far more
complicated assembly. In order to create it you
will have to use a hemisphere made from a
stiffer material (not rubber).
The various detail parts can be
cut from flexible plastic or
card, glued on to
the inside and
outside surfaces.
The disks to the
rear of the
plunger (and the
plungers rim) can
be made from
wood or plastic, glued into
position.
The completed ‘sucker’ should then be
filled, sanded and painted black. Note that this
style of plunger has detailing on both the
inside and outside of the suction cup.
Wave it about...
What you put on the end of your
Dalek’s arm will depend on which style
of Dalek you are building. Most Daleks
have a standard plunger attachment
while some Movie Daleks have a claw.
Other ‘specialist’ arms have also been
used from time to time, including a
cutting torch and cutting claw. Do your
Dalek homework to find out more
about these custom attachments.
Although the plunger is the simplest
solution, modern plungers are often the
wrong shape (bell shaped). You may
have to hunt around the shops to find
one with a reasonable shape and
diameter.
If you have an original plunger from
the 1960s or 1970s, let me know!
The Movie Dalek claw can be made
quite easily from MDF. Cut the two
basic sections out with a jigsaw
and then sand them to a smooth
finish. In order to make both
sections identical, clamp them
together, one over the top of the
other, when sanding the edges.
The rest of the mechanism
can be made from off-cuts of
steel or aluminium fixed with
couple of pivot bolts. A working
claw can be produced with a
little extra effort by adding two
flat springs to the rear of the
central pivots. these push the
claw into the open position.
Pulling back a central rod (inside the
arm) closes the claw.
20 PREVIEW VERSION