1
Scanning
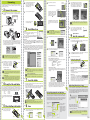
Place medium-format film in the holder.
b
b
Place the film with the reflective
base up and the matte emulsion
surface down. Make sure the film
is flush with the stops.
This side of the guide describes how to connect the scanner to the computer and
scan images using Nikon Scan. Be sure to complete the steps on the other side of
this guide before proceeding.
Select the frames to be scanned.
Click the Scan button to scan the image. When
scanning is complete, the image will be opened
in an image window. The image in the image
window will reflect any rotations, flips, and
other modifications made in the scan window.
e
Thumbnail
drawer tab
Click the thumbnail drawer tab.
Stops
Step
3
a
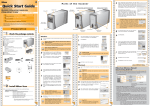
After confirming that the power switch is in the off position, connect the
power cable as shown and plug the scanner into a general-purpose household outlet.
Connect the scanner
The thumbnail drawer will open.
The frames in the film are identified by frame number. To view
each frame as a small “thumbnail”
preview, click the button.
Press the covers down until they latch.
c
Shape of plug varies with
country or region of purchase
Click to display
thumbnails
Thumbnail area
Click to hide thumbnails
Selected thumbnail
The frames will be scanned in
the order shown at right.
Connect the IEEE 1394 (Firewire) cable as shown.
b
1
Arrow
Step
6
2
Note
IEEE 1394 cable
connector
(cross-section)
Start Nikon Scan
Note
c
Note
Important
Step
• Rotate or flip the image in the preview area
If the preview image is not in the desired orientation, rotate or flip the image by clicking the , , or button.
Rotate image 90°
counter-clockwise
Flip image horizontally
Status LED
FH-869S holder for medium-format
film strips
a
Place the film in the holder
Depressions
Latches
Remove the holder from the scanner.
To remove the holder, either press the eject button on the front of the scanner or click the Eject button ( ) in the scan window.
Eject button
Step
Continued
above at
Depressions
right
Rotate image 90°
clockwise
Flip image vertically
7
The borders of the crop are indicated by a dotted line. The size of the crop
can be changed by dragging its borders. To change the position of the crop,
place the cursor inside the selected area and drag it to a new location.
Continued
above at
right
a
When an image is displayed in the preview area, the “Crop” palette in Tool Palette 1
can be used to specify the size and resolution at which the image will be scanned
(for details, see pages 36–40 of the Nikon Scan Reference Manual on the Nikon Scan
Reference Manual / Easy Scanning Guide CD). For example, to scan an image so that
it can be printed within the margins of A4 (29.7 × 21.0 cm) or letter-sized (11˝ × 8.5˝)
paper using a typical inkjet printer, adjust settings as follows:printing:
• Do not use force. Failure to observe this precaution could result in
damage to the holder or scanner.
• Attempting to remove the holder during loading or otherwise interfering with the loading mechanism could cause scanning errors.
8
Click to open the “Crop”
palette.
Scan
Choose Keep this crop.
Select 6 × 7
Enter a value for either Height
or Width that will fit on A4 or
letter-sized paper. The other
value will automatically be
adjusted to maintain the current crop.
The explanation that follows assumes that 6 × 7 negatives have been inserted
in the holder. Click the film-type menu and select Neg (Color), then click the
frame size menu and select 6 × 7.
Continued
above at
right
is selected in the resolutions units menu and enter an output resolution
of 360.
If Nikon View is installed on the computer, selecting Show Nikon Browser from
the Nikon Scan Tools menu will start the Nikon Browser component of Nikon View.
Nikon View can be used to view scanned images either as thumbnails or at full size
and to edit and print images after scanning. For more information, see the Nikon
View Reference Manual (available in pdf format on the Nikon View Reference
manual CD) or Nikon View’s on-line help.
Select Show Nikon Browser
from the Nikon Scan Tools
menu
Choose cm or inches from
the output units menu.
Select Neg
(Color)
Power switch
Nikon View (Nikon View 6 or later)
For information on the other image enhancement tools in Tool Palette 1,
see pages 30–76 of the Nikon Scan Reference Manual (on CD).
Tip: Specifying Output Size and Resolution
Step
Turning the Scanner Off
Mac OS / Windows XP / Windows 2000 Professional
After checking that the status LED is not blinking, turn the scanner off by
pressing the power switch.
Windows Me
Shut down the computer. Once the computer has turned off, press the power switch to turn the scanner off.
Windows 98 SE
Click the “Unplug or Eject Hardware” icon
in the task bar and select Stop Nikon SUPER
COOLSCAN 9000 ED from the menu that appears. A message will be displayed stating that the scanner can be safely removed from the system; click
OK and follow the on-screen instructions to terminate communication with
the scanner. Press the power switch to turn the scanner off.
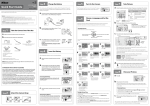
Insert the holder
Check that the status LED has stopped blinking.
Keeping the holder straight, slide it slowly into the holder slot with the arrow
up and facing toward the scanner.
Once the holder has been inserted as far as the insertion guides, the automatic
loading mechanism will activate. Remove your hands from the holder when
loading starts. The holder is in scanning position when loading stops.
Important
Turn off the scanner as described below.
Status LED
Temporary Storage (Windows Only)
A message may be displayed stating that the folder selected for temporary storage is not available. Click OK to use the default folder.
Note
c
The procedure for turning the scanner off
depends on the computer operating system. Follow the steps below to turn the
scanner off.
• Select the area to be scanned
To select the portion of the image that will be scanned (called the “crop”),
click the Crop Tool ( ) in the “Layout Tools” palette and drag the mouse over
the image.
Mac OS 9
Before using Nikon Scan under Mac OS 9, be sure to read the section
on recommended memory allocations on page 139 of the Nikon Scan
Reference Manual (on CD).
Important
b
Select Exit (Windows) or Quit (Mac OS 9) from the File menu. In Mac OS X,
select Quit Nikon Scan 4 from the Nikon Scan 4 menu.
Tool Palette 1
Confirm that pixels/inch
Latches
a
turn the scanner off
Click the triangle next to the “Layout Tools” palette in Tool Palette 1. The
“Layout Tools” palette will be displayed.
The “Layout Tools” palette can be used to:
Progress window
Scan window
Ready the film and holder
Insert a finger into the depressions in the holder, release the
latches, and open the holder.
d
Power switch
Windows 98 SE
Users of Windows 98 SE may be prompted to insert the Windows 98
Second Edition CD when the scanner is connected and turned on for
the first time following installation of Nikon Scan. Register the scanner with Windows as described on page 65 of the User’s Manual.
5
9
Click the Preview button to preview the selected frame in the preview area.
The scan window will open.
The next step is to insert film in the holder. The type of film that can be scanned depends on the holder used. This guide describes how to 6 × 7 medium-format negatives in the supplied FH-869S holder for medium-format (also known as 120/220, 2¼
or Brownie) film strips and 59 mm × 82 mm electron microscope film. The length of
the film strip that can be inserted in the holder depends on the type of film:
•6 × 4.5
1–4 frames
•6 × 6
1–3 frames
•6 × 7–6 × 9
1–2 frames
Medium-format film strip
See the User’s Manual for information on scanning other types of film, including 35mm film
strips.
Step
Eject the film and
Step
Eject button
Nikon Scan can also be started by locating the folder in which Nikon Scan was
installed and opening the Nikon Software : Nikon Scan 4 folder. Double-click the
Nikon Scan 4 icon ( ). Under Mac OS X, the “Nikon Software” folder will be in the
“Applications” folder on the start-up disk. Under Mac OS 9, the default install location is in the “Applications (Mac OS 9)” folder on the start-up disk.
Windows 2000 Professional
A “Digital Signature Not Found” dialog will be displayed the first time
the scanner is connected and turned on. Click Yes to register the scanner with Windows.
4
c
The Progress Window
The “Progress” window shows the progress of
preview and scan operations. Click Stop to cancel the current operation.
Macintosh
Nikon Scan can be started by clicking the Nikon Scan icon ( ) in the Dock (Mac OS
X) or double-clicking the Nikon Scan alias ( ) on the desktop (Mac OS 9). Note
that these options are only available if Nikon Scan was added to the Dock or an alias
was created during installation.
The supplied IEEE 1394 cable can not be connected to computers with
a four-pin DV connector. Use a cable with one six-pin and one fourpin connector or a six-to-four pin adapter (sold separately).
After making sure that the computer
is running, press the power switch to
turn the scanner on. The status LED
will blink for about two minutes while
the scanner initializes. Wait until the
status LED glows steadily.
The scan window may remain open “on top” of the image window.
Drag the scan window to move it out of the way of the image window.
To save the image, select Save from the File
menu. A “Save As” dialog will be displayed;
navigate to the desired location, choose a name
and file type, and click Save.
f
Drag to enlarge
thumbnail area
Nikon Scan can also be started by clicking the Start
button and selecting Nikon Scan 4 > Nikon Scan 4 from
the Programs menu.
Computer or scanner
interface terminal
(cross-section)
Note
Macintosh
Direction of insertion
Windows
If a shortcut was created at installation, double-click
the shortcut ( ) created on the desktop.
When connecting the cable, align the rounded edge of the connector with
the matching curve on the scanner or computer IEEE 1394 (Firewire) interface
connector (see illustration below). Using the wrong connector or attempting
to insert the connectors in another orientation could not only damage the
connector, but also the scanner or computer.
Windows
A thumbnail will be created for each frame.
Click a frame to select it for preview at a
larger size in the scan window preview
area.
Nikon View can be installed from the
Nikon View 6 CD. Before you can install Nikon View 6, you must uninstall
any earlier versions of Nikon View.
Note
Nikon View
To register your copy of Nikon View, open the “Product Registration”
panel in the “Install Center” window and click the Product Registration button (Internet connection required)*.
* Not available in some areas.
Printed in Japan
SB5I00300201(11)
6MRA0911--