1
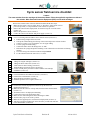
Cycle sensor field service checklist
Caution:
The waste solution from the cartridges is Hazardous Waste. Follow the applicable regulations to discard
the solution. Wear Personal Protective Equipment (PPE) to work with cartridges.
Refer to the sections below in the user manual for details about these steps.
Make sure the sensor is not on. Select “Stop” or “Stop Now” if the sensor is in low
power (sleep) mode, or “Stop and Flush” if the sensor is in operation.
2. Remove the sensor from its deployment: be careful to keep air out of the sensor
(section 3.4).
3. Remove the protective sleeve (section 5).
4. Connect the sensor to the host PC and power supply (section 2.1).
1.
5.
Use a 2% cleaning solution of Micro-90 to clean the sensor (section 6.1):
a. Pull the tubing straight off the hose barb.
b. Unwrap the exhaust tubing from the top of the sensor and put one end into a beaker.
c. Connect a syringe to a 25 cm length of 1/8” ID Tygon tubing.
d. Use the syringe to fill the tubing.
e. Connect the other end of the tubing to the “S” barb.
f. Disconnect the syringe and put the old tubing it was connected to into the bottle of cleaning
solution.
g. Go to the Settings tab of the host software and push Flush.
h. Let the solution soak in the sensor for ½ to 1 hour.
6.
7.
8.
9.
10.
Change the reagent cartridges (section 6.2).
Change the filters and screens (section 6.3).
Clean sensor of macro-fouling (section 6.4).
Flush the Micro-90 from the sensor (section 6.5).
Use the vacuum prime procedure to reduce bubbles from cartridge
installation (section 6.6).
11.
13.
14.
15.
Clean and lubricate the bulkhead connectors (section 6.7).
Fill the filters with DI water (section 2.7).
Wrap the tubing around the eye hooks.
Install the protective sleeve again (section 6.5).
15. Use the host software deployment wizard to set up the sensor for
deployment (section 2.7)
16. Make sure that the sensor is in sleep mode, then disconnect the host cable
(section 3.3).
17. Attach the sensor to its deployment mounting.
18. Connect the sensor to the deployment cable.
19. Make sure the outlet tubing flows has no blockages or kinks.
20. Attach a safety rope to one of the eye bolts.
21. Make sure the supplied power is sufficient for deployment (section 3.2).
22. Take the red reagent cartridge back to the laboratory to flush and send back
to the manufacturer (section 6.8).
Cycle Field Service Checklist
Revision B
20 Jan. 2014