1
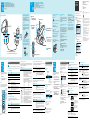
Connecting Connecting to your TV
Playing
Discs
You can enjoy standard quality picture and sound using this
connection. Before connecting, make sure that your TV is turned off.
To enjoy better picture and sound, refer to the Brown Side of this
manual. Refer also to the instruction manuals of the components to
be connected.
the Player
Basic steps and tips on playback
To display the next or previous page in an
album or track list
Press b or B.
Playing MP3
audio tracks
from a list
You can play DVDs, VIDEO CDs, music CDs, as well as MP3 audio
tracks recorded on a DATA CD*.
Buttons on the player that share the same symbol with buttons on
the remote also share the same function.
To return to the previous screen
Press O.
To turn off the menu
Press MENU once.
*A CD-R/CD-RW/CD-ROM with MP3 audio tracks recorded on the disc is called a “DATA CD” in
this manual.
You can select and play MP3 audio tracks from
the list displayed on the menu.
Notes on connecting to your TV
Basic connection
• Do not connect this player directly to a
component such as a VCR. If you do, noise
may appear in the picture.
• When connecting this player to a monaural
TV, use a stereo-mono conversion cord (not
supplied).
On your TV :
Turn your TV on and
select the video input.
. (previous)
(remote sensor)
Turn on the player
by pressing ?/1
(on/standby).
White
> (next)
Press ZPUSH, and gently
lift the lid until it clicks.
Red
White
Lights up when
turned on.
Attach the Euro AV Adaptor (supplied) to your
TV. Then, connect the audio/video cord to the
corresponding jacks of the Euro AV Adaptor.
SUR
SHUFFLE
AUDIO
?/1
SUBTITLE
ANGLE
PREV
NEXT
.
>
• Point the remote at the remote sensor .
When it does not work, operate closer to the
remote sensor .
• Do not expose the remote sensor to direct
sunlight or lighting apparatuses. Doing so
may cause a malfunction.
To play the next or previous
chapter or track
If a menu display appears when
you press H
If the aspect ratio of the picture
does not match your TV type
Press > or . during playback.
In some DVDs and VIDEO CDs, a menu may
appear when you press H. The menu usually
enables you to select items such as a title
(movie or album), audio language, or subtitles
by using B/V/v/b and ENTER. In VIDEO
CDs, this function is called PBC (Playback
Control).
For Asian models only:
The PBC functions of Super VCDs do not work
with this player.
In “TV TYPE” of the screen setup setting,
select the setting that matches your TV. (See
“Settings and Adjustments” for details.)
To stop playback
Press x.
The next time you press H, playback starts
from the same place. (Resume Play)
m
Hold the edges of the disc and pull while
pressing the center.
−
H
PAUSE
X
TV VOL (volume) +/–
TOP MENU
STOP
x
Close the lid until it
clicks.
x
MENU
RETURN
O
ENTER
O
Using the
Remote
Note
Some playback features of DVDs and VIDEO CDs described in the following may be prohibited
by the software producers. Refer to the instructions supplied with the DVDs and VIDEO CDs.
Basic operations (A)
✎
✎
To change the playing mode, sound
effect, and display, or to use the DVD’s
menu.
To
c
stop
x
pause
X
go to the next or
previous title* or
track*
> NEXT or .PREV during playback.
scan forward or
backward
My or m y during playback.
“Functions”
To read disc information on the screen.
c “Reading the screen”
Remote
The letters below correspond to the letters in
“Functions.” Use the letters to quickly find the
buttons needed for each operation.
Press to
turn the
player on.
C
B
=/1
REPEAT
SUR
SHUFFLE
AUDIO
SUBTITLE
ANGLE
TV VOL
+
D
PREV
NEXT
.
>
CLEAR
SCAN/SLOW
m
A
−
REPLAY
M
PLAY
H
PAUSE
X
TOP MENU
Press to
adjust the
volume of
Sony TVs.
Press to
cancel the
current
mode.
STOP
x
MENU
DISPLAY
RETURN
play
Press
H
Press the button repeatedly to change the speed.
To return to normal playback, press H.
play forward or
backward in
slow motion
My or m y during pause. (DVD/VIDEO CD only.
Functions only in the forward direction for VIDEO CDs.)
Press the button repeatedly to change the playback speed.
To return to normal playback, press H.
replay
REPLAY during playback. (DVD only)
* See “Understanding disc structures” in “Playable discs and special words” on the Brown
Side of this manual for details.
Selecting the playing mode (B)
You can play a selected title or track randomly or repeatedly.
To cancel the operation, press the following button repeatedly to select “OFF” or
press CLEAR.
To
Press
shuffle
SHUFFLE repeatedly during playback. (DVD/VIDEO CD/CD
only)
You can change the audio language for DVDs recorded with multilingual tracks.
When listening to a Karaoke VIDEO CD, you can turn off the vocals. You can also
enjoy this player’s surround effect mode.
You can select picture angles if there are multiple pictures (angles) recorded on the
disc, or change subtitle languages in multilingual DVDs.
AUDIO repeatedly during playback to select from the options.
In DVDs: Select a language from the options on the screen.
(When a 4-digit number is displayed, check the number in the
“Language Code List” on the Brown Side of this manual.)
In VIDEO CDs/CDs/DATA CDs:
• STEREO: To hear standard stereo sound.
• 1/L: To hear the sound of the left channel from both speakers.
• 2/R: To hear the sound of the right channel from both speakers.
In Super VCDs (For Asian models only):
(The number before the colon shows the number of the audio
track being played. For the meaning after the colon, see above.)
• 1: STEREO
• 2: STEREO
• 1: 1/L
• 2: 1/L
• 1: 2/R
• 2: 2/R
SUR repeatedly during playback to select from the following.
TV Virtual
Surround settings (DVD only)
To cancel the surround setting, press SUR repeatedly to select
Notes
“OFF.”
• The surround mode
•TVS DYNAMIC: To enjoy the surround effect with your TV’s
signals are only
speakers. The distinct sound imaging effect is as if you have a
output when the
player is connected
set of additional speakers next to you.
via the AUDIO OUT
•
TVS WIDE: To enjoy the surround effect with your TV’s
L/R jack.
speakers. The sound imaging effect is as if you have five sets
• Set the surround
settings of the
of virtual speakers filling the area surrounding you.
connected
• TVS NIGHT: To enjoy the surround mode at a lower volume.
components (such as
(Dolby Digital audio DVD only)
TV) to off.
• Surround does not
• TVS STANDARD: To enjoy the surround effect with a set of
function when a disc
front speakers connected to the player. The imaging effect is as
has no rear signal.
if you have three sets of additional speakers around you.
To
Press
change angles
ANGLE repeatedly during playback to select the number of the
angle you want to play. (DVD only)
display or
change subtitles
There is a tactile dot on H and the “+” button of
TV VOL.
REPEAT repeatedly during playback.
When you select Repeat Play during Shuffle Play, Shuffle Play is
repeated.
Reading the screen
You can display the time or audio format in the
upper area of the TV screen during playback.
Time display
1( 30)
album
list
Select an album using V/v, and press
ENTER.
<TV screen>
To return to the menu display while playing
a disc with PBC function
Press O.
Selected track number
Number of playable tracks in the
album
On the display method
• Only the alphabet and numbers can be displayed.
Other characters appear as an “*” (asterisk).
• This player cannot display ID3 tags.
JAZZ
1( 90)
0
0
0
0
0
0
0
To return to PBC Playback
Press x twice, and press H.
To display
Press
DVD’s menu
TOP MENU or MENU. Select an item using B/V/v/b, and
press ENTER. (DVD only)
TOP MENU: Displays a menu of available movie and music
titles.
MENU: Displays a menu of subtitles and audio languages.
Displaying information on your screen (F)
You can display information such as the playing time or the disc text on the TV
screen.
To return to the normal screen, press DISPLAY repeatedly.
To display
time/text
Current album/title
number
• T: title, A: album
T11 — 8
Current chapter/
track/index number
current audio
format
DISPLAY twice during playback. (DVD only)
(For details, see “Audio display” in the next section.)
T 1:01:57
Time display
• D: disc, T: title or track,
C: chapter
• No mark: Playing time
With – : Remaining time
*Here, the disc is playing chapter 8 of the 11th title, which has
been played for 1 hour 1 minute and 57 seconds.
Audio display
Current audio format (Dolby
Digital, DTS, PCM,etc.)
Number of rear
component
DOLBY DIGITAL 3 /2 .1
Language/Screen/Audio Setup
1
2
3
4
5
6
7
SHE IS SPECIAL
ALL YOU NEED IS ...
SPICY LIFE
HAPPY HOUR
RIVER SIDE
5
TAKE TIME,TAKE TIME
track list
Select a track using V/v, and press
ENTER.
You can change the languages for the OSD (onscreen display) and sound, and adjust the
video and audio output to match the
components (such as TV) your player is
connected to.
✎
✎
✎
✎
The numbers correspond to the steps in the procedure given
below.
2
3
LANGUAGE SETUP
OSD:
MENU:
AUDIO:
SUBTITLE:
To change the languages used in
subtitles, sound, or on-screen displays.
c “Language/Screen/Audio Setup”
c
“Language/Screen/Audio Setup”
To select the setting of the audio when
connected to an amplifier.
2
c “Language/Screen/Audio Setup”
LANGUAGE SETUP: To change the
language setting.
CUSTOM SETUP: To change settings other
than the language.
To set playback limitation levels (such as
to limit violent scenes).
c “Limiting Playback” (See the
Press DISPLAY repeatedly in stop mode to
show Setup Display.
Select the setup item using V/v, and press
ENTER.
3
Brown Side of this manual.)
Select an item (e.g., “OSD”) using V/v,
and press ENTER.
Number of LFE
(Low Frequency Effect)
component
*Here, the indicated disc’s audio format is Dolby Digital
5.1channel (ch).
5.1ch: 3 (Front Left/Right/Center) +
2 (Rear Left/Right) +
0.1 (LFE)
4
Select a setting (e.g., “ENGLISH”) using
V/v, and press ENTER.
• OFF: Standard setting.
• ON: When the playback sound is distorted.
OSD
The language you want for the player’s menu and the
Setup Display.
DIGITAL OUT
MENU*
(DVD only)
SUBTITLE*
The language you want for the menu recorded on the
disc.
The language you want for the sound.
(ORIGINAL: The language prioritized in the disc is
automatically chosen.)
The subtitle language.
(AUDIO FOLLOW: The subtitle language changes
according to the audio language.)
(Adjust only when
using a coaxial
digital cord.)
DOLBY DIGITAL
(See “Connecting Other Components” on the Brown
• DOLBY DIGITAL: When connecting to an amplifier
with a built-in Dolby Digital decoder.
MPEG
❢ Hint
(For European/Asian
models only)
When you select “OTHERS,” enter the language code from the list on the Brown
Side of this manual using V/v/b.
(See “Connecting Other Components” on the Brown
Side of this manual for instructions on this
connection.)
• OFF: When connecting a TV or an amplifier to
AUDIO OUT L/R.
• ON: When connecting an amplifier with a digital
input jack, etc., to DIGITAL OUT (COAXIAL).
(Adjust only when
Side for instructions on this connection.)
“DIGITAL OUT” is set
• D-PCM: Standard setting.
to “ON.”)
* If the language you select here is not recorded on the disc, another language will
be automatically selected from the disc.
(See “Connecting Other Components” on the Brown
Side for instructions on this connection.)
• PCM: Standard setting.
(Adjust only when
“DIGITAL OUT” is set • MPEG: When connecting to an amplifier with a
built-in MPEG audio decoder.
to “ON.”)
Selecting the screen setup
DTS
Item
Select
TV TYPE*
• 16:9
(Change this to fit
the picture to your
TV.)
Refer to the list on the right for details.
For a wide-screen TV or a TV
with wide mode function.
(See “Connecting Other Components” on the Brown
(Adjust only when
Side for instructions on this connection.)
“DIGITAL OUT” is set
• OFF: Standard setting.
to “ON.”)
• ON: When connecting to an amplifier with a
built-in DTS decoder.
❢ Hint
• 4:3 LETTER BOX
To turn off Setup Display:
Press DISPLAY repeatedly until the display
disappears.
• 4:3 PAN SCAN
Note
When “DTS” is set to “OFF” in the audio setup
setting, the DTS display will not appear even if the
disc has a DTS signal. (See “Settings and
Adjustments” for details.)
AUDIO ATT
(Audio attenuation)
(DVD only)
1
Select
Select
4
To adjust the aspect ratio of the picture
to fit your TV.
Item
Item
(DVD only)
ENGLISH
ENGLISH
ORIGINAL
AUDIO FOLLOW
Selecting the audio setup
For the following items, select the language from the Language List
displayed on the screen.
AUDIO*
Refer to the list on the right for details.
Number of front and
center component
Selecting the language setup
Setup Display
You can select and change the settings of this
player to meet your needs and to suit your
playing environment.
<Example*>
Press
DISPLAY during playback. Then press ENTER repeatedly to
switch the display from total playing time to remaining time,
and vice versa. (For details, see “Time display” in the next
section.)
DVD/CD TEXT or MP3 track name will be displayed following
the time display if it is recorded on the disc. (Only the letters of
the alphabet are shown.)
Settings
and
Adjustments
<Example*>
When a menu is recorded on the DVD, you can usually select items such as the
title, audio language, or subtitles.
ENTER
repeat
Number of playable albums in
the disc
Playback starts.
SUBTITLE repeatedly to select the subtitle language. (DVD only)
(When a 4-digit number is displayed, check the number in the
“Language Code List” on the Brown Side of this manual.)
To cancel the subtitle, press SUBTITLE repeatedly to select
“OFF.”
Using the DVD’s menu (E)
O
EF
Selected album number
The MP3 audio tracks contained in the album
appears.
See “Using the remote” at the bottom half of this
page for more details on the remote.
Changing the viewing angle and subtitles (D)
language/sound
<TV screen>
On playback
• Only the MP3 audio tracks displayed in the list can
be played on this player (maximum 100 albums or
200 tracks).
• MP3 audio tracks are played in the order displayed
in the list. This may not coincide with the recorded
order.
• The following audio format files cannot be played.
– MP3 audio tracks not created according to
ISO9660 Level1/Level2/Joliet.
– MP3 audio tracks that do not have the file name
extension “.MP3.”
– Files with the file name extension “.MP3,” but
are not MP3 audio tracks.
– Audio tracks recorded in MP3PRO format.
– MP3 audio tracks recorded in Packet Write
format.
– Data that are not MPEG1 Audio Layer 3.
B/V/v/b/ENTER
Changing the sound (C)
Press
Press MENU.
ROCK BEST HIT
KARAOKE
JAZZ
R&B
MY FAVORITE SONGS
CLASSICAL
SALSA OF CUBA
BOSSANOVA
The album or track currently being played is shaded
in the list.
Notes
Albums containing MP3 audio tracks appear.
3
Audio input (R)
Audio input (L)
To change
1
2
Video input
Functions
Selecting an MP3 audio track
To play a disc without using the PBC
function
Press > or . during stop to select a track
(picture or music) that you want to play, and
press H or ENTER.
TV VOL
REPLAY
DISPLAY
Connect the audio/video cord (supplied).
To remove the disc
M
PLAY
H
Press x twice, then press H.
CLEAR
SCAN/SLOW
Then, connect the player and the TV to an AC power source (mains).
Place it label-side up (the recorded
side facing down), and press its
center until it clicks into place.
=/1
REPEAT
+
./ >
TV
Place a disc on the tray.
?/1 indicator
Connecting the EURO AV Adaptor
(For European models only)
Yellow
Red
This function may not be available depending on the
connected TV.
Press ?/1.
If no buttons are pressed for 15 minutes, the
screensaver turns on. To return to the normal
screen, press H.
The player automatically turns off in another
45 minutes.
To play from the beginning
Connect using the
EURO AV Adaptor
(supplied).
To audio input
Operating the remote
Note
For European
models only:
To video input
To AUDIO OUT R
Yellow
Press H (play).
AC power
source (mains)
To AUDIO OUT L
To VIDEO OUT
Slide open the cover. Insert two AA (R6) size
batteries by matching the + and – ends with
the markings inside the compartment, and
close the cover.
TV
To turn off the player
Press TV VOL +/–.
x (stop)
To insert batteries in the remote
AC power
source (mains)
To adjust the TV volume (for Sony
products only)
❢ Hint
COLOR SYSTEM
The underlined settings are the default settings.
For a standard TV. Displays a
wide picture to fit the width of
the screen while keeping the same
aspect ratio.
For a standard TV. Cuts off
portions of a wide picture in
order to fit the width of the
screen.
•AUTO: For a DUAL color system TV. (Default
setting)
(Select when playing a • PAL: For a PAL color system TV.
VIDEO CD.)
•NTSC: For an NTSC color system TV.
(For Asian models only)
* The setting recorded on the disc has priority.