1
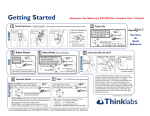
Getting Started
START
1
Install batteries.
Slide open
as shown
ATTENTION: Go to http://www.thinklabsmedical.com/ds32a
for a detailed User’s Manual and other information.
+
Insert AAA
battery.
(a) Push cover DOWN into
grooves to slide easily.
a
Insert AAA
battery.
Click POWER
Rhythm :ds32a
key
AMPLIFY
BELL / DIAPHRA
+
POWER OFF
Auto - turns off automatically after 2 minutes.
Manual - HOLD POWER key > 2 secs, release.
closing, check step (a).
AMPLIFY
4
Click to switch between
Bell and Diaphragm Mode.
Green LEDs show Mode.
BELL / DIAPHRA
Bell
Bell
Acoustic, Amplify, Mute Modes
Click AMPLIFY key to switch between:
Acoustic - Pre-set Vol., Blue LED OFF.
Amplify - Adjustable Vol. Blue LED ON.
Mute - Hold AMPLIFY key
AMPLIFY
BELL / DIAPHRAGM
POWER
POWER
Recommended starting level 5-7
5
Select Mode - Bell or Diaphragm
AMPLIFY
BELL / DIAPHRA
POWER
VOLUME CONTROL
active when Blue LED ON
Acoustic Mode utilizes electronic signal processing to provide
pre-set sound characteristics similar to a conventional acoustic
stethoscope, but with enhanced signal quality.
Amplify Mode provides signal processing augmentation with
power boost and Adjustable Volume.
Diaphragm
7
Symbol Mnemonic:
a Bell Curve
looks like a Diaphragm
LISTENING
Click to Turn AMPLIFY On
(Blue LED On)
6
a
Do NOT Force. If not
Adjust Volume ( )
VOLUME
CONTROL
behind keys
POWER
b
Daniel Smith
3
USE
Power On
b
(b) Slide closed.
FEATURES
2
NOTE POLARITY. Push springs to seat batteries properly. Align cover & close.
Listening with the ds32
Eartips
face
FORWARD
Ambient Noise Rejection
Push & Hold Bell/Diaphragm
key for > 2 seconds to switch
noise rejection On/Off.
See Over
for
Quick
Reference
AMPLIFY
BELL / DIAPHRAGM
POWER
The EmD Diaphragm intrinsically reduces susceptibility to
ambient noise. In typical office environments with good
diaphragm-skin contact, the noise rejection function will have
little effect, and can be turned off to obtain the fullest possible
dynamic sound from your ds32a.
In the following cases, turn Noise Rejection on to optimize sound:
- High ambient noise environments
- Listening through clothing or thick chest hair where good
diaphragm-skin contact is not possible.
www.thinklabsmedical.com Call (303)521-5023 or service@thinklabsmedical.com for assistance.
Suggested key control
Forefinger
for Keys
Apply light but firm
pressure.
Left hand
Thumb
for Volume
Hold Probe steady
to reduce artifact.
The EmD Diaphragm responds to adjustments in applied
pressure, affecting both sensitivity (loudness) and
frequency characteristics. This is a very powerful, tactile
way to control sound. In most cases, simply apply a light
but consistent pressure. Do not push too hard. Gradually
increasing pressure will increase sensitivity and loudness.
At significant pressure, low frequencies are cut, making
breath sounds more audible than heart sounds.
It is sometimes helpful to hold the Probe so that the
fingers also touch the patient chest wall (such as the left
edge of the thumb and the fingertips in the above figure.)
The Probe and chest wall then move in unison, for a
consistent, light diaphragm pressure.
© 2005-2006 Thinklabs inc.
Thinklabs
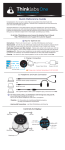
Quick Reference
Rhythm :ds32a
See Over for Getting Started guide
Amplify - Amplification On/Off
Display
Amplify Mode (Blue)
LED On - Amplified - Volume is Adjustable
LED Off - Acoustic - Volume is Pre-Set
Bell Mode
(Green)
Diaphragm Mode
(Green)
Click to alternate between volume-adjustable Amplified mode
and pre-set Acoustic mode similar to an acoustic stethoscope.
Bell or Diaphragm Select
Mute
Click to alternate Bell/Diaphragm
Push & Hold key down to temporarily Mute sound - useful
if patients speak when listening to carotid, pediatric use, etc.
Noise Rejection On/Off
Push & Hold for >2 secs, Release
to turn Noise Rejection On/Off.
Adjusts for high ambient noise
or regular office environments.
Low Battery (Red)
Change Batteries
Tips and Troubleshooting
Tips for Best Sound Quality
•Apply Probe with light, steady contact, not excessive pressure. (Step 5, See Over).
•The ds32a works best with direct skin contact. Avoid using through clothing.
•Experiment to find a preferred Volume level that optimizes clarity.
•Go to the website and READ the detailed User’s Manual and other information.
The Manual contain USEFUL TIPS for obtaining best results.
Troubleshooting
• No Power: (a) Check batteries are inserted correctly. (Step 1, See Over).
(b) Batteries need replacing.
• No Sound: (a) Increase Volume setting.
(b) Check headphone fit (See Over).
• Unexpected interference sounds:
(a) Radio station or electromagnetic pickup: Change position/location.
(b) Continuous Buzzing: Diaphragm loose - tighten Diaphragm Ring.
(c) Other noises: Possible dust, lint or moisture inside Probe Turn off device. In dust-free environment, unscrew Diaphragm ring.
Wipe inside surface of diaphragm and sensor with an alcohol swab.
Do not touch brass sensor plate or diaphragm with fingers.
Allow to dry/evaporate naturally, then close unit.
• Problem unsolved? Contact Thinklabs. See Over for contact information.
© 2005-2006 Thinklabs inc. ds32aumqr v2.1
Control Panel
AMPLIFY
Rhythm :ds32a
BELL / DIAPHRAGM
Volume Control
behind Control Panel
(active when Blue LED
POWER
DIGITAL STETHOSCOPE
is On)
Power On Click to turn on
Power Off (auto or manual)
Shuts off automatically after 2 minutes*
OR Push & Hold until all LEDs light, Release
* time is programmable up to 5 minutes
Advanced Use - Preset and Save all your power-on Mode preferences
Program the ds32a to power up in most recent Modes, or in your preset configuration.
Recent Mode wakeup - Push+Hold Power key 5 secs, Red LED flashes slowly, Release.
Preset Modes - (1) Set ds32a in your preferred modes. (ALL Modes are memorized).
(2) Set auto shutoff time - Click the Power key the number of minutes
ds32a should stay on before auto shutoff (2, 3, 4, or 5 minutes).
(3) Push+Hold Power key >10 secs, Red LED flashes faster, Release.
http://www.thinklabsmedical.com/ds32a for detailed User’s Manual
and other information.
Thinklabs