1
GOCATOR OVERVIEW
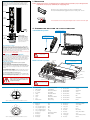
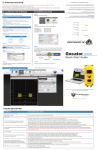
Each Gocator 3100 model is designed with a unique Clearance
Distance (CD), Measurement Range (MR) and Field of View
(FOV). Refer to your User Manual for more information about
your model.
1. MOUNTING
NOTE: Mounting the Gocator is recommended prior to applying power. Ensure that a proper earth ground and
heat sink have been properly established prior to applying power.
Mount the sensor using four M5 x 0.8 screws of suitable length.
The recommended thread engagement into the housing is 8 - 10 mm.
Camera
Light
Emitter
Do not install the sensor near objects that might occlude a camera’s view of the light
Camera
Mounting
Holes
M5X0.8 10
Power/LAN
2. CONNECTING GOCATOR TO A HOST COMPUTER
Standalone System
Indicators Lights
When starting the Gocator,
the Power and the LED (if
safety is enabled) indicator
lights should be illuminated
if they are not, please refer
to the trouble shooting table
or your User Manual.
I/O
Connector
POWER: 24-48VDC @ 13W
SAFETY: +24-48VDC TO ENABLE
WIRE RICH I/O
AS REQUIRED BY APPLICATION
IN - ENCODER / TRIGGER
OUT - SERIAL / ANALOG / DIGITAL
GROUNDING GOCATOR
Gocator housings should be grounded to the earth and the
grounding shield of the Gocator I/O cordsets. Gocator
sensors have been designed to provide adequate grounding
through the use of M5 x 0.8 screws. Always check grounding
with a multi-meter to ensure electrical continuity between the
mounting frame and the Gocator connectors.
The frame or electrical cabinet that the Gocator is mounted to
must be connected to earth ground.
Always power down sensor
before removing cables
from the sensor
GROUNDING CORDSET (RECOMMENDED)
To minimize interference with other equipment, the Power &
Ethernet or the Power & Ethernet to Master cordset (depending on cordset used in system) can be grounded by terminating the cordset shield before the split. The most effective
grounding method is to use a 360-degree clamp. See User
Manual for instructions.
ELECTRICAL SAFETY
Multi-Sensor System
Power, Laser Safety, Trigger inputs,
and Encoder
GOCATOR
Minimize voltage potential between system ground
and sensor ground
Care should be taken to minimize the voltage potential
between system ground (ground reference for I/O signals)
and sensor ground. Use shielded cables with shield grounded
at both ends. Sensor housing should be connected to earth
ground.
Use a suitable power supply
The +24-48V power supply used with Gocator 3100 sensors
should be an isolated supply with inrush current protection.
MASTER 2400
Use care when handling powered devices
Wires connecting to the sensor should not be handled while
the sensor is powered. Doing so may cause electrical shock to
the user or damage to the equipment.
USER PC
Failure to adhere to the guidelines described
in this section may result in electrical shock
or equipment damage.
CAT5E ETHERNET CABLE
GOCATOR I/O CORDSET
Leave protective caps on any
connectors that are not used.
GIGABIT ETHERNET
SWITCH
GOCATOR POWER AND ETHERNET
TO MASTER CORDSET
Connector Pin Details
Gocator Power/LAN (to standalone and to Master)
10
12
5
Function
Cable Conductor Color
1
GND_24-48V
White/Orange & Black
1
GND_24-48V
Orange/Black
2
DC_24-48V
White/Green & Black
2
DC_24-48V
Green/Black
4
3
Safety-
White/Blue & Black
13
4
Safety+
Blue/Black
5
Sync+
White/Brown & Black
6
Sync-
Brown/Black
7
Ethernet MX1+
White/Orange
3
11
9
6
8
1
2
7
14
View: Looking into the connector on the sensor.
16
2
15
5
9
6
10
12
8
7
11
Function
Cable Conductor Color
8
Ethernet MX1-
Orange
9
Ethernet MX2+
White/Green
10
Ethernet MX2-
Green
11
Ethernet MX3-
White/Blue
12
Ethernet MX3+
Blue
13
Ethernet MX4+
White/Brown
14
Ethernet MX4-
Brown
Function
Cable Conductor Color
Function
Cable Conductor Color
1
Trigger_in+
Grey
11
Encoder_Z+
White/Green & Black
2
Trigger_in-
Pink
12
Encoder_Z-
Green / Black
3
Out_1+ (Digital Output 0)
Red
13
Serial_out+
White
4
Out_1- (Digital Output 0)
Blue
4
5
Out_2+ (Digital Output 1)
Tan
14
Serial_out-
Brown
14
6
Out_2- (Digital Output 1)
Orange
15
Reserved
Blue / Black
3
7
Encoder_A+
White/Brown & Black
16
Reserved
White / Blue & Black
13
8
Encoder_A-
Brown / Black
17
Analog_out+
Green
9
Encoder_B+
Black
18
Analog_out-
Yellow & Maroon/White
10
Encoder_B-
Violet
19
Reserved
Maroon
18
17
Pin
Pin
Gocator I/O
19
Pin
1
View: Looking into the connector on the sensor.
Pin