1
...............................................................................................................................................................
Smartbot Video Operation Guide
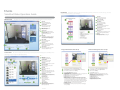
Rule Editor
The Rule Editor defines a specific type of event to find in previously recorded video, or to take action (e.g., save, notify
or play a sound) if events like it are seen in the future.
You can also refer to video tutorials on the supplied CD for more setup instruction.
Monitor View
1 Rule name
The name for this search will
appear in the Rule Search list
The Monitor view is where you see what is on your cameras, and manage what is recorded at what times.
2 Video source block
Click to select a camera
1 View icons
3 Object block
Click to select the object(s)
you want camera to scan for
Click to switch between the
monitor view and search view.
4 Movement block
2 Arm/Off buttons
Click to select locations and direction
of Event you want to scan for
Click to turn on or off multiple
cameras. ( Basic & Pro only.)
5 Response block
3 Main camera pane
Click to select options for response actions
if the rule is triggered
Displays a live camera view.
4 Camera power
6 Video pane
A green circle means the camera
is on or enable.
A gray circle means the camera is off
Click the circle to turn on/off.
A still frame of the selected camera, where
you can draw regions and boundaries.
7 Settings
When you click a block, the settings for
that block appear here
5 Rule Editor
Create filters for recording or searching
video clips. Click the magnifying glass
to see those clips in the Search view
6 Rule schedule
Click to select the date and
time to run your rule
7 Rule status
icons appear if the rule is set to send
email, record or play a sound. uncheck
the box to turn off the rule.
8 Other cameras
Click to display the camera in the main
camera pane. (Basic & Pro only)
Image notification email set up
Search View
Video recording FTP server set up
3
The Search view displays the video taken by your camera(s) that contain moving objects. You can filter by camera
3
and/or object, or you can create more sophisticated searches.
1 View icons
Click to switch between the
monitor view and search view.
2
2
2 Arm/Off buttons
Click to turn on or off multiple
cameras. ( Basic & Pro only.)
3 Camera list
1
1
Select which camera’s video clips to show
4 Quick search filters
Click to show only clips of a specific
object type or rule.
5 Search list
Displays a day’s video clips
6 Video pane
View the video of the selected video clip.
Yellow boxes are drawn over people, and
green boxes over other objects.
7 Playback bar
Icons appear if the rule is set to send email,
record or play a sound. uncheck the box
to turn off the rule.
8 Playback buttons
-Previous and next clip
-Jump +/-2 seconds
-Previous and next frame
-Play/pause
-Playback speed
9 Video clip timeline
Blue bar represent clips in the search list.
green represents all other clips and
temporary recent video.
1
On Rule Editor, click “If seen, save and take action ” button
1
On Rule Editor, click “If seen, save and take action” button
2
Click “Take actions” tag, and enable “Send an email to” and entering
your email address and then click on “Setting”
2
Click “Save clips” tag, and enable “My FTP Server”
and then click on “Setting”
3
On “Set up Email Notification” dialog page
1. Send email from – the camera location
2. Outgoing SMTP server – your email outgoing server ( ex, smtp.gmail.com)
3. Login user ID – your email login ID (ex. john@gamil.com)
4. Login password – your email login password
5. Verify password – password again
6. SMTP port number – for outgoing SMTP server, SMTP port number
and security settings: if you don't know what to enter here, try entering
your email provider (e.g., "comcast" or "yahoo") and "outgoing smtp server"
in a search engine. You should find a number of matches that include all
email settings (and if others are having problems connecting to email with
other applications, you will often find people offering solutions for your
configuration as well).
7. Security – please refer to your email server requirement.
8. Send Test Message – allows you to test if you can receive event trigger
email by SmartBot.
3
On “Set up FTP” dialog page
1. Host: either IP address or URL (ftp.asante.com) ftp server
2. Directory: stores captured video clip(ex, /root/event-alert)
3. Login user ID: user name of the ftp server
4. Login password: password for the account
5. Verify password: again
6. Ftp port number: default 21
7. Use passive mode: default unmark.
8. Test: test the ftp function if works.