1
III. Assembling the Installation Tool
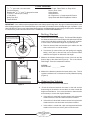
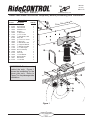
1. The tool provided with this kit will assist in proper setup and
alignment of the air spring and will also position the upper bracket
for drilling the bolt holes. The tool attaches to the upper and lower
bracket and is rigid so that it will self-align the upper bracket.
The threaded section of the upper part of the tool ensures that
the air spring can only be mounted at the correct height. The
air spring will work throughout the entire threaded range on the
tool. This kit will mount behind the axle.
Nylon Nut
Nylon Nut,
Flange Down
Installation
Tool
Lower
Bracket
1/2" Flat Washer
1/2" HHCS
2. Secure the upper bracket (B) to the installation tool (D) using
the provided nylon nut (F) (Figure 4).
3. Loosely attach the tool to the lower bracket (C) using 1/2” flat
washer (H) and 1/2” bolt (G). Refer to Figure 4. Leave loose for
adjustment.
Figure 4
IV. Attaching the Lower Bracket
1. Set the assembly on the leaf spring behind the axle.
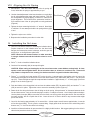
2. With the hook end of the lower bracket placed over the edge of
the spring retaining plate (Figure 5), secure the lower bracket
to the leaf spring with the provided U-bolt (J), clamp bar (I), flat
washers (L), and lock nuts (K). Torque to 16 ft-lbs.
NOTE: The bracket will pull down flat to the leaf spring when
the lock nuts are tightened.
Figure 5
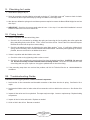
3. The air spring will expand to 5.1” in diameter at maximum inflation
pressure. Check horizontally along the shaft of the installation
tool for sufficient clearance of 2.50” all around the tool (Figure
6).
5.1"
V. Positioning the Upper Bracket
1. Using the slot in the lower bracket, push the upper bracket against
the frame rail.
2. Use the two nylon nuts on the threaded portion of the tool to
adjust the upper bracket so that the legs are flat against the
frame rail and all four holes are in the middle section of the
frame. The mounting holes must not fall on the rounded edges
of the frame rail and at least 1.5” must be left above the top of
the upper bracket for air fitting clearance.
Technical Support
1-800-248-0892
Ext. 2
Figure 6