1
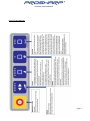
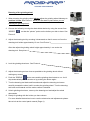
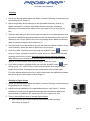
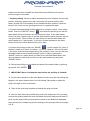
b. Use a flat template to set a correct height on the heel of the blade so that the grinding wheel will not make the heel rounded. Then by pressing the “SHARP” button start the grinding. Push the button again to turn the skate-holder device back just before the toe-picks of the skate. Repeat as many times as needed for the best grinding result. See also instructions of gliding surface profiling from page 11. c. Usage of the points in the skate-holder device. First you need to make sure that you have calibrated the figure skating settings into the machine. The calibration of the figure skating settings can be done by following these instructions: First you have to clamp a skate in place. Then switch off the power of the machine. Now push both arrows down and after that put the power back on and still keep the arrows down. When “beeps” are heard from the machine and the lights starts to flash on arrows let go of the arrow buttons. Make sure that only one light is on in the arrow-section. If not choose it by pushing the arrows. Now push the “DRESS” button and the skate-holder device will drive back and forth several times before it will automatically stop to the home position. Now the machine is calibrated for figure skate sharpening. Follow the next points to sharpen the figure skates. 4. Clamp the skate in place so that the heel is towards the wheel and the toe picks will leave outside the grinding area by using the points in the skate-holder device. See picture 5. Make sure that the grinding wheel will not touch the blade when the skate-holder is turning back from the heel. Flat template is good tool for this, (See point 3 b). You can do it also manually by pushing the “SHARP” button Picture 8. once in the place where you want to turn the skate-holder device back during 1 cycle (one light). 5. Choose from “PROFILE” the desired grinding distance. See pictures 8 & 9 Two pushes one light will go on and the skate-holder will turn back from the “1 Picture 9. point mark”. 3 pushes 2 lights and the skate-holder will turn back from the “2 point mark”. 4 pushes 3 lights and the skate-holder will turn back from the “3 point mark”. 6. Use right hand to turn the handle to the left and make sure that the skate is in the correct position. Do not tighten the handle more than shown in the picture. 7. Choose grinding cycles from “SHARP” Every push (light) is worth of 1 cycle. page 12