1
Targus USB 2.0 Laptop Docking Station with Video
Connecting New Devices
To avoid possible damage when connecting a new device, do not force the
cable connector into the port on the docking station. If the cable connector
does not attach smoothly, turn the connector over and try attaching it again.
Connecting to a Local Area Network
To connect an ethernet cable with RJ-45 connect, attach the cable connector to the ethernet/network port on the docking station. Additional procedures to connect to an actual network depend on the type of network
you are using. Contact your network administrator for detailed instructions.
Connecting a USB Device
To connect a USB device, plug it into a USB port on the docking station
and follow the additional instructions provided with the device. All four USB
ports meet USB hi-speed requirements by providing 480Mbps through-put
and 500mA of power.
The white USB ports are high-speed ports that provide standard 500mA
of power. The black USB power ports are high-speed ports that provide
up to 1Amp.
Connecting and Configuring an Audio Device
1. Plug your headphones or speakers into the green 3.5mm Audio Out
port on the docking station.
2. To connect a microphone, plug it into the mono Audio In port.
3. The sound and mic should come out automatically when you plug the
docking station. Make sure that both speaker and micphone volume
is not set to MUTE.
4. To manually enable your headphones or speakers in case automatic
transfer is not possible
8
Targus USB 2.0 Laptop Docking Station with Video
For Windows XP
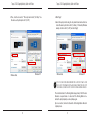
Go to the Control Panel and choose Sound and Audio. Select the
Audio tab. Under Sound Playback, change Preferred Device to USB
Multimedia Audio Device from the drop down list.
• Click Apply, then click OK.
For Windows Vista
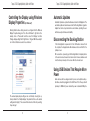
Go to the Control Panel and select Sound. Under the Playback tab,
check that USB Audio Device is set as the default. If it is, click OK. If it
isn’t, select it, click Set Default, then click OK.
For Windows 7
Go to the Control Panel and select Hardware and Sound. and choose
Sound. Under the Playback tab, check that USB Audio Device is set
as the default. If it is, click OK. If it isn’t, select it, click Set Default, then
click OK.
NOTE: AUDIO DEVICES WILL NOT WORK SIMULTANEOUSLY ON THE PORT STATION AND THE HOST
COMPUTER
CAUTION: ALL AUDIO OR MULTIMEDIA APPLICATIONS MUST BE TERMINATED BEFORE SWITCHING
BETWEEN THE PORT STATION AUDIO OUTPUT AND THE HOST COMPUTER AUDIO OUTPUT.
Connecting to a Monitor or LCD
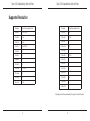
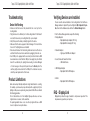
Any monitor or LCD connected to the video port of the docking station will
be limited to a maximum resolution of 2048 x 1152 at 32 bit color
NOTE: THE MAXIMUM RESOLUTION OF 2048 x 1152 IS ONLY SUPPORTED IF THE MONITOR OR LCD
IS PLUGGED INTO THE DOCKING STATION BEFORE CONNECTING THE DOCKING STATION TO THE
NOTEBOOK. IF THE MONITOR OR LCD IS PLUGGED INTO THE DOCKING STATION AFTER THE DOCKING STATION IS CONNECTED TO THE NOTEBOOK, THE RESOLUTION IS SET TO 1024 X 768.
9