1
Standard configuration:
Our standard configuration wants all cooker hood-remote
control systems to use the same identically functioning
transmission code (with reference to dip-switch buttons
6-7-8-9-10 are on ON).
In case two cooker hood-remote control systems are
present in a same room or nearby, the two systems could
influence one another since their transmission codes are
identical. In this case to change one radio control code is
recommended.
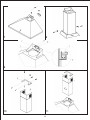
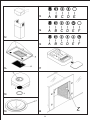
The coal filter can be removed by removing the grease
filter first (Fig.4A-16B), and by pulling its special plastic
tongue until it is unfastened from its slot. Re-insert the
coal filter by operating in the opposite way. The coal filter
needs replacing depending on the use, but however every
six months at least.
* To clean the appliance itself tepid water and neutral
detergent are recommended, while abrasive products
should be avoided. For steel appliances specialized
detergents are recommended (please follow the instructions
indicated o the product itself to obtain the desired results).
Changing the transmission code:
To change the transmission code, please follow these
instructions:
Open the battery-covering panel; select a dip at will choosing
between n. 7-8-9-10 and put it on OFF.
* Before replacing the lamps, disconnect the appliance
from the electric mains. Remove the grease filter and
the carbon filter, if it is inserted (Fig.11). Once the burnt
out bulb is localized, turn it anticlockwisely and replace
it with a bulb of the same type.
Acknowledgement of the new transmission code:
After having changed the transmission code in the radio
control, it has to be acknowledged by the electronic central
unit of the sucking hood in the way that follows:
Press the general off-switch button of the cooker hood
(Fig. 4B-3A) and then re-establish the electronic central
unit feeding: from now on you have 13 seconds to press
and let the central unit tune in to the new selected
code.
* To replace the halogen lamps, remove first the glassblocking ring (Fig.18A), by levering with a screw-driver
and thus removing the opaque glass (Fig.18B) - when
performing this operation hold the opaque glass carefully.
Remove the lamp (Fig.18C) without touching it with
uncovered hands. Replace it with another lamp of the
same kind. After the replacement, re-insert the glassblocking ring and fasten it.
To replace the dichroic lamp, remove the lamp (Fig. 19)
by inserting a screwdriver or another sharp tool between
the lamp and its chrom support and replace it with a
lamp of the same kind.
Emergency button:
In case of radio control misfunctioning, to switch off the
appliance just press the emergency button (Fig. 4B-3A)
placed near the lighting lamp. After fixing reset the
emergency button.
* If the supply cord is damaged, it must be replaced by
the manufacturer or its sevice agent or a similarly
qualified person in order to avoid a hazard.
The luxury products (SL-Module) are endowed with an
electronic device which allows the automatic switching off
after 4 hours working from the last operation.
MAINTENANCE
* An accurate maintenance guarantees good functioning
and long-lasting performance.
* Particular care is due to the grease filter panel. It can be
removed by pushing its special handle toward the backside of the cooker hood and turning the filter downwards
so to unfasten it from its slot (Fig.3B-4A).
To insert the filter just perform the opposite operation.
After 30 hours working (model SL-Module Luxury version),
the push button control panel will signal the saturation of
the grease filter by lighting all the buttons. In the SLTC
models (Touch Control Version) the grease filter saturation
is signalled by the flashing of the two central push buttons
(Fig. 21 C). Press the timer button to reset
.
The grease filter needs cleaning by regular hand-washing
or in dishwashers every two months at least or depending
on its use.
* In case the appliance is used in its filtering version, the
active coal filter (Fig.16-20Z) needs to be periodically
replaced.
10