1
OBJ_BUCH-1529-001.book Page 7 Thursday, July 28, 2011 11:20 AM
English | 7
Planer Blade Selection
Dust/Chip Extraction
When replacing planer blades, always replace both blades;
otherwise an imbalance can generate vibrations, which can
reduce the service life of the power tool.
f Dusts from materials such as lead-containing coatings,
some wood types, minerals and metal can be harmful to
one’s health. Touching or breathing-in the dusts can cause
allergic reactions and/or lead to respiratory infections of
the user or bystanders.
Certain dusts, such as oak or beech dust, are considered
as carcinogenic, especially in connection with wood-treatment additives (chromate, wood preservative). Materials
containing asbestos may only be worked by specialists.
– As far as possible, use a dust extraction system suitable for the material.
– Provide for good ventilation of the working place.
– It is recommended to wear a P2 filter-class respirator.
Observe the relevant regulations in your country for the
materials to be worked.
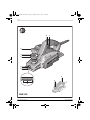
Clean the chip ejector 5 regularly. Use a suitable tool (e.g., a
piece of wood, compressed air, etc.) to clean a clogged chip
ejector.
f Do not reach into the saw dust ejector with your hands.
They could be injured by rotating parts.
Changing HSS Planer Blades
f Be cautious when replacing the planer blades. Do not
grasp the planer blades by the cutting edges. Possible
danger of injury due to the sharp cutting edges of the planer blades.
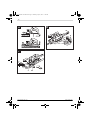
Disassembling the Planer Blade(s) (see figures A–C)
– To reverse the planer blades, rotate the blade drum 13 until the clamping jaw 12 is parallel to the planer base plate 1.
– Unscrew the 3 fastening screws 11 with the t-handle
wrench 10 and remove the clamping jaw 12.
– Slide the planer-blade retainer 16 together with the planer
blade 15 out of the guide groove 14 of the blade drum 13.
– Turn the blade drum by 180° and disassemble the 2nd
planer blade.
Note: Before replacing or resharpening the planer blades, remove the HSS planer-blade retainer 16 by loosening the fastening screws 17.
Resharpening HSS Planer Blades (see figure D)
Worn or dull HSS planer blades can be resharpened with the
sharpening device 18 (accessory) and a commercially available whetstone.
Insert both planer blades into the sharpening device and
clamp them by tightening the wing bolt. Make sure that both
planer blades are completely inserted to the stop.
Move the sharpening device with the inserted planer blades
uniformly and with light pressure across the whetstone.
Note: Never regrind the planer blades by more than 6 mm,
based on a minimum width of 23 mm. Thereafter, both planer
blades must be replaced.
Assembling the Planer Blade(s) (see figures E–F)
Before reinserting new or resharpened planer blades, clean
the blade drum 13 and the planer blades 15, if required, as
well as the HSS planer-blade retainer 16. Clean heavily
gummed planer blades with spirits or petroleum.
Note: Before assembling new or resharpened planer blades,
their correct height setting must be adjusted first.
The setting gauge 19 (accessory) is used for adjusting the
height of the planer blades. Place the planer blade 15 and the
blade retainer 16 on the setting gauge. Make sure that the
blade retainer 16 engages in the groove inteneded for this
purpose. Press the planer blade 15 against the stop and lock
the blade retainer 16 in this position with the fastening
screws 17. This will automatically adjust the correct height.
Each planer blade must be assembled and aligned centered
to the planer base plate 1. Afterwards, tighten the three fastening screws 11 with the t-handle wrench 10.
Note: Before starting operation, check the fastening screws
11 for tight seating. Rotate the blade head 13 manually and
ensure that the planer blades do not graze.
Bosch Power Tools
Operation
Operating Modes
Adjusting the Planing Depth
With the adjustment knob 3, the planing depth can be adjusted variably from 0–2.0 mm using the planing depth scale 4
(scale graduation = 0.25 mm).
Park Rest (see figure G)
The park rest 21 allows the machine to be set down directly
after operation, without danger of damaging the working surface or the planer blade. While planing, the park rest 21 is tilted upwards thus enabling full contact of the rear part of the
planer base plate 1.
Starting Operation
f Observe correct mains voltage! The voltage of the power source must agree with the voltage specified on the
nameplate of the machine. Power tools marked with
230 V can also be operated with 220 V.
Switching On and Off
To start the machine, press the On/Off switch 7 and keep it
pressed.
To lock the pressed On/Off switch 7, press the lock-on button
6.
To switch off the machine, release the On/Off switch 7 or
when it is locked with the lock-on button 6, briefly press the
On/Off switch 7 and then release it.
Working Advice
Planing (see figure G)
Set the required planing depth and place the front part of the
planer base plate 1 against the workpiece.
1 619 929 K00 | (28.7.11)