1
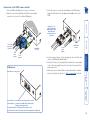
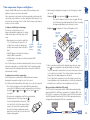
Connections at each CAM (local) unit A range of different connector combinations are made available across the five CAM formats 4 For each cable run, attach the cable connector to the socket of the CAM. The other end of each cable run will attach to the remote X200 module. Green indicator - power present Yellow indicator - signal activity USB keyboard/mouse Sun keyboard/mouse PS/2-style mouse Computer Access Module PS/2-style keyboard Audio contents 1 Where possible ensure that power is disconnected from the system(s) to be connected. For CAMs with PS/2 keyboard and mouse connections, see �Hot plugging PS/2-style connections and mouse restoration. 2 For each CAM, attach its various connectors to the relevant sockets on the computer system. installation & special configuration 3 Lay a suitable length of category 5, 5e or 6 cabling between each computer system/CAM and the location of the remote peripherals - see Cable length advice. Note: CAMs derive power from the computer system via the USB connector. Category 5, 5e or 6 cable to X200 module welcome Video