1
2. Quick Start Installation:
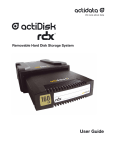
Quantum RDX Removable Hard Disk Storage System
2.1 Installing the RDX Internal (SATA or USB) Docking Station
(Customer Kit)
This section describes how to install the RDX Internal drive.
Before You Begin
The RDX docking station ships ready to install in a standard 5.25-inch half-height drive bay.
Depending on your computer you may need a standard (flat blade) or Philips screwdriver to
remove the computer cover and install the drive in your computer.
Important Information on Electrostatic Damage
To protect your computer and docking station from electrostatic damage (ESD), follow these
guidelines:
NOTE: Your computer must be plugged into a grounded electrical outlet to be properly
grounded.
•
•
•
Before you open your computer or remove the RDX docking station from its antistatic bag,
ground yourself by touching the metal chassis of your computer or some other grounded
object. For optimal protection, use an electrostatic grounding strap.
Do not touch any printed circuit boards or electronic chips on your RDX docking station or in
your computer.
Turn your computer and any peripheral devices off before installing the RDX docking station.
Installation Instructions
1
2
3
4
Carefully unpack the docking station and accessories.
Turn off the computer.
Open the computer cover, using a screwdriver if necessary.
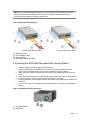
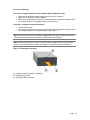
Mount the docking station. Slide the RDX docking station into an unused drive bay until
the bezel is flush with the front of the computer. Secure the docking station using
mounting screws, being careful not to over-tighten the screws (see Figure 4 below).
5 Attach the power cable to the power connector (see Figure 4 below).
6 Connect the data cable (SATA or USB) to the data connector (SATA or USB) - see
Figure 4 below. For USB installation, connect the other end of the cable to the
appropriate USB connector on the motherboard.
7 Check all cables in your computer system. Before you reinstall your computer cover,
ensure that all cables are correctly routed, so that they will not bind or become crimped.
Also, make sure that no cables have loosened during the installation.
8 Replace your computer cover.
9 Turn on the computer.
10 (For SATA units only.) During power-up press the F2 key, or other hot key, to enter BIOS
setup mode. Enable the SATA port connected to your RDX docking station. Save
changes and exit from the BIOS.
11 If running Windows install the RDX software (see Section 2.3 Installing Utility Software for
Windows).
12 If you are using the Linux operating system, see Appendix A: Using the Linux Operating
System.
Page
8