1
7
Setting-up the Miter Gauge
5) Keep repeating this process until the fit is correct.
Remember, you want the plug to just “kiss” the miter bar
slot without exerting any pressure.
6) When the first plug is adjusted correctly, slide the bar
backwards to expose the second adjuster & repeat the
process described above.
7) To adjust the third, fourth and fifth plugs it is easier to slide
the miter gauge forward off the front of the saw. Use the
same adjustment procedure on each of these three plugs
until all of the plugs are properly adjusted.
TIP
To make your bar slide even easier, wax your slot or spray on some
dry lubricant. Don’t use an oil or grease based lubricant, as it will
attract sawdust.
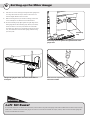
Attach the Auxiliary Fence
Install the two provided 1/4” x 1” hex bolts with the plastic knobs
through the non-threaded holes in the miter gauge and leave them
loose.
DK1313
FT4139
FT4059
Slide the auxiliary fence on so the heads of the bolts fit into the t-slot
on the back of the fence. Tighten the plastic knobs to secure the fence
into place.
Place the 1/4” x 1” hex bolts and plastic knobs through the
unthreaded holes.
Attaching Fence Bumpers
There are 4 small white plastic bumpers (FT4055) included with the
miter gauge. These bumpers are designed to press into the groove
on the bottom of the fence. Once installed, the bumpers reduce
drag and help to glide the fence across the top of the table saw.
NOTE
The following pages in this instructional manual assume that the miter gauge is being
set-up in the left slot of the table saw. Reverse set-up procedures if using the right slot.