1
in a remodel
with
bottom REVEAL
With existing drywall
1.
8.
9.
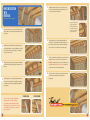
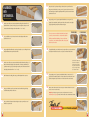
At each corner of the room, measure and mark the ceiling out from the wall 15 ¼”
plus the thickness of your top reveal (e.g. If you used a single 2x4, then you would
measure and mark the ceiling out from the wall 15 ¼” + 1 ½” = 16 ¾”).
Line up the sides of your bottom ledger to the snap line on your wall and use a
nail gun w/ 16d nails (PROs) or screw gun w/ 3” (or greater) deck screws to fasten
the bottom ledger securely through the drywall into your studs around the entire
perimeter of the room.
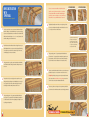
Using a staple gun w/ 1” (or greater) staples/brads (PROs) or screw gun w/ 1” (or
greater) deck screws (DIYers), install your 90° inside and/or outside corners (right
angle) to align with your snap lines and bottom ledgers.
o
2.
3.
4.
5.
6.
The 6 90° corners are reversible to fit both inside and outside
corners. If you have an inside 90° corner, then the top halves
will flare outward like the fletchings of an arrow. If you have
an outside 90° corner, then the top halves will come to a point
like the head of an arrow.
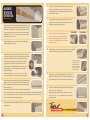
Use your chalk line to snap a line at the marks on the ceiling around the entire
perimeter of the room.
Using a utility knife/wallboard saw, cut along the snap line on your ceiling and remove
the drywall between the snap line and the wall.
10.
90 inside corner
If applicable, install your 45° inside corners by using 4 of the 40 cove pieces that have
already been modified to be used as a cove piece as well as 45° inside corner.
If you have a 45° outside corner,
a template on the side panel
of the box has been provided.
Trace your 45° outside corner on
to a piece of ½” plywood/OSB,
cut it out and then install.
At each corner of the room, measure and mark the wall down from the ceiling 11 ¼”.
Measure and mark the ceiling out from the wall 11 ¼” inches plus the thickness of
your bottom reveal (e.g. If you used a single 2x4, then you would measure and mark
the ceiling out from the wall 11 ¼” + 1 ½” = 12 ¾”).
Block in-between the ceiling, if necessary, to sufficiently attach the cove pieces.
Using your chalk line, snap a line at the marks on the wall and along the ceiling
around the entire perimeter of the room.
o
90 outside corner
11.
12.
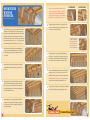
Using a staple gun w/ 1” (or greater) staples/brads (PROs) or Screw Gun w/ 1” (or
greater) deck screws (DIYers), attach a cove piece butted to each side of each corner
(either touching the top of an inside corner or the bottom of an outside corner).
Measure, mark and then attach all other cove pieces in-between the butted cove pieces
on each corner no more than 16” O.C.
Helpful Tip: For help spacing your cove pieces evenly between each corner visit
www.archkit.com/cove-spacing to watch our “How-To” video and see the mathematical formula.
7.
15
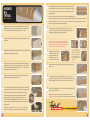
Since you will need to fasten the bottom ledger securely to your wall, use a stud
finder to locate your studs.
16