1
CT235/237.Man.08.00 11/29/00 8:41 PM Page 3
3. OPERATING INSTRUCTIONS
Refer to Fig. 1 for the CT-237 and Fig. 2 for the CT-235 (pages 5 & 6).
3.1 Switch On
When the probe is switched on the red LED will illuminate. If the LED starts
flashing this warns the user that the battery voltage is too low for normal
operation and that it should be changed as described in section 5.
3.2 Zero Adjustment
The output zero offset voltage of the probe may change due to thermal shifts and
other environmental conditions. To adjust the output voltage to zero depress
the thumbwheel and rotate. Ensure that the probe is away from the current
carrying conductor whilst the adjustment is made.
3.3 Current Measurement
Switch on the probe using the On - Off switch and check that the LED is lit.
Select the required current range ( 20 Amp or 200 Amp for the CT-237; 200A
or 1000A for the CT-235).
Connect the output lead to a multimeter. Select AC millivolts to measure
Alternating Current and DC millivolts for Direct Current. Autoranging meters
will automatically select the correct range.
If necessary adjust the probe output voltage to zero as described in section 3.2.
Clamp the jaws of the probe round the conductor ensuring a good contact
between the closing faces of the jaws.
Observe and take measurements as required. Positive output indicates that the
current flow is in the direction shown by the arrow on the probe.
True r.m.s. readings can be obtained by using an appropriate true r.m.s. reading
multimeter.
Core eddy current heating is produced when Irms x f >400,000.
4. SAFETY
This instrument is designed to be safe under the following conditions:
- indoor use
- altitude up to 2000m
- temperature 0°C to +50°C
- maximum relative humidity 80% for temperatures up to 31°C decreasing
linearly to 40% relative humidity at 50°C.
Use of the probe on uninsulated conductors is limited to 300V r.m.s or d.c. and
frequencies below 1kHz.
Safety in its use is the responsibility of the operator who must be a suitably
qualified or authorised person.
Do not use the probe if any part of the probe including the lead and connector(s)
appear to be damaged or if a malfunction of the instrument is suspected.
When using the probe ensure that your fingers are behind the protective barrier
see Fig. 1
Clean the case periodically by wiping it with a damp cloth and detergent. Do
not use abrasive cleaners or solvents. Do not immerse the probe in liquids.
5. BATTERY REPLACEMENT
SAFETY WARNING: Before removing the
battery cover, make sure that the probe is
remote from any live electrical circuit.
The red LED will flash when the minimum operating voltage is approached.
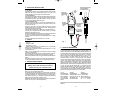
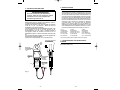
Refer to Fig.1. and use the following procedure.
Unclamp the probe from the conductor, turn it off using the On - Off switch and
disconnect the output leads from external equipment. Loosen the captive screw
which secures the battery cover. Lift the cover through 30° and pull it clear of
the probe body as shown in Fig 1. The battery is then accessible. Replace the
battery and re-fit the battery cover and fasten the screw.
Replacement with other than the specified type of battery will invalidate the
warranty. Fit only Type 9 V PP3, Alkaline (MN 1604 ).
BATTERY COVER SCREW (CAPTIVE)
SCHRAUBE, BATTERIEFACH
VIS, COMPARTIMENT PILE
JAWS
ZANGE
PINCE
BATTERY COVER
BATTERIEFACHDECKEL
COUVERCLE, COMP.
PILE
ZERO ADJUST
NULLABGLEICH
AJUSTAGE DU
ZERO
PROTECTIVE BARRIER
SCHUTZSPERRE
BOUCLIER DE
PROTECTION
ZERO
ADJUST
ON
OFF
20A
200A
CT237
AC/DC CURRENT PROBE
LED
OUTPUT: 10mV/A 1mV/A
MAX CURRENT: 200A RMS
ON/OFF SWITCH
EIN/AUS SCHALTER
BOUTON MARCHE/
ARRET
Fig. 1
6. SERVICE INFORMATION
Read the warranty located at the front of this manual before requesting warranty
or non-warranty repairs. For warranty repairs, any multimeter claimed to be
defective can be returned to any Wavetek Meterman authorized distributor or to
a Wavetek Meterman Service Center for an over-the-counter exchange for the
same or like product. Non-warranty repairs should be sent to a Wavetek
Meterman Service Center. Please call Wavetek Meterman or enquire at your
point of purchase for the nearest location and current repair rates. All
multimeters returned for warranty or non-warranty repair or for calibration
should be accompanied by the following information or items: company name,
customer’s name, address, telephone number, proof of purchase (warranty
repairs), a brief description of the problem or the service requested, and the
appropriate service charge (for non-warranty repairs). Please include the test
leads with the meter. Service charges should be remitted in the form of a check,
a money order, credit card with expiration date, or a purchase order made
payable to Wavetek Meterman or to the specific service center. For minimum
turn-around time on out-of-warranty repairs please phone in advance for
service charge rates. The clamp should be shipped with transportation charges
prepaid to one of the following addresses or to a service center:
in U.S.A.
Wavetek Meterman
1420 75th Street SW
Everett, WA 98203
Tel: 877-596-2680
Fax: 425-446-6390
482409
in Canada
Wavetek Meterman
400 Britannia Rd. E.Unit #1
Mississauga, ON L4Z 1X9
Tel: (905) 890-7600
Fax: (905) 890-6866
in Europe
Wavetek Meterman
52 Hurricane Way
Norwich, NR6 6JB, U.K.
Tel: int + 44-1603-404824
Fax: int + 44-1603-
The instrument will be returned with the transportation charges paid by Wavetek
Meterman.
–3–
–4–