1
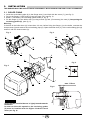
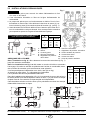
4.3 MAINTENANCE POSITION
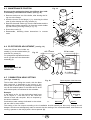
Fig. 14
2
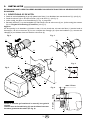
Access to the combustion head, the diffuser disc-holder assembly, electrodes and nozzle, (see fig. 14).
➤ Remove the burner out of the boiler, after loosing the fix➤
➤
➤
➤
3
ing nut to the flange.
Hook the burner to the flange (1), by removing the blast
tube (2) after loosing the fixing screws (3).
Remove the small cables (4) from the electrodes and the
diffuser disc-holder assembly (6) from the nozzle-holder
(5) after loosing its fixing screw (3, fig. 15).
Screw the nozzle (7).
Reassemble, following these instructions in reverse
order.
6
7
4
5
1
E9063
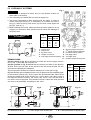
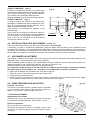
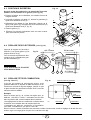
4.4 ELECTRODES ADJUSTMENT, (see fig. 15)
Lean the diffuser disc-holder assembly (1) on the nozzle-holder (2)
and lock it by screw (3).
For prospective adjustments loosen
screw (4) and move the electrodes
assembly (5).
0
4.5 – 0.5 mm
Fig. 15
5.5 ± 0.3 mm
4
5
WARNING
MEASURES MUST BE
RESPECTED
D6049
3
2
1
2 – 2.5 mm
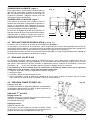
4.5 COMBUSTION HEAD SETTING
(see figs. 16 and 17)
Fig. 16
Terminal plane of the blast tube
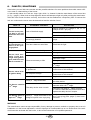
This is done when fitting the nozzle, with the blast
tube removed. It depends on the output of the
burner and is carried out by rotating the regulating
rod, till the terminal plane of the blast tube is level
with the set-point, as indicated in the schedule.
35
Example
In the sketch on fig. 16, the combustion head is set
for an output of 1.50 GPH at 14 bar, while the
shutter is level with set-point 2.5, as required by
the above schedule.
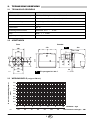
Combustion head settings indicated in the schedule are valid for most cases.
0246
D6081
Blast tube
Regulating
rod
Shutter
The setting of the fan output according to the installation should normally be done only through the air
damper. Should one subsequently want to retouch also the setting of the combustionhead, with the burner
running, operate on the rod (1) with a 6 mm spanner (2).
2900
7
GB