1
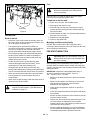
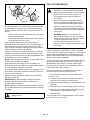
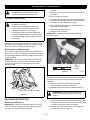
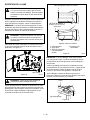
2. Loosen the 1/2-13" hex nut (1). If the blade height is
lower than the height of cut knob, loosen the 1/2-13 x
1.75" (2) bolt which runs through the height of cut
rotation adjustment weldment (3). If the blade height is
higher than the height of cut knob, tighten the 1/2-13 x
1.75" bolt which runs through the height of cut rotation
adjustment weldment.
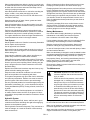
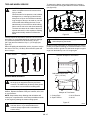
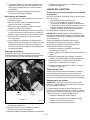
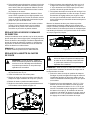
5. Set both of the outside blades to be perpendicular to
the mower as shown in figure 18.
2
1
Figure 18
OE3302
3
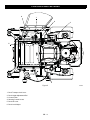
6. Measure the height of the blade tips on both 1 and 2
and adjust the front adjustment bolts (see figure 17,
item 14) and the rear U-bolts to ensure the deck is
level from left to right.
2
1
Figure 20
7. Rotate the mower blades 90° so they are parallel to the
mower deck. Use the rear adjustment bolts to adjust
the deck so that the rear blade tip is 1/8” higher than
the front blade tip on the same blade.
3. Tighten the 1/2-13" hex nut back down to lock it into
position.
4. Raise the deck back to the transport height and
remove the blocks from below the deck. Measure the
blade height again to ensure it now matches the height
on the dial. If not, repeat until the two heights are
synchronized.
Measure the blade heights to make sure they match what is
shown on the height of cut dial. The height is measured as
the distance between the ground and the bottom of the
blade. If the blade height does not match the dial height, see
Synchronizing Height Of Cut (Figure 20) below.
DRIVE ADJUSTMENTS
CAUTION: Stop the engine, put the steering
control levers in the park position and remove
the key from the ignition before performing any
maintenance or repairs on this unit.
Figure 19
OE3306
Synchronizing Height Of Cut (Figure 20)
CAUTION: Stop the engine, put the steering
control levers in the park position and remove
the key from the ignition before performing any
maintenance or repairs on this unit.
Steering and motion controls should be uniform during
forward and reverse motions. The steering control levers
should always return to neutral when released from the
reverse position.
AIR CLEANER SERVICE (FIGURE 21)
CAUTION: Touching hot surfaces can burn
skin. The engine and components will be hot
after the unit has been running. Allow the
engine and components to cool before
servicing the unit.
NOTE: Make sure the deck is level before synchronizing the
height of cut dial with the deck blade height.
1. Raise the mower deck to the transport position. Take
the weight off of the deck lift linkage by inserting wood
blocks under each corner of the deck and slowly
lowering it until it is resting on the blocks.
IMPORTANT: To prevent excessive engine wear, do not run
the engine without the air cleaner installed.
IMPORTANT: The engine is air cooled and requires a large
amount of air intake when running. Reduced air intake can
cause overheating. Always keep air intake screen and
cooling fins clean. Always keep the covers and screens in
place.
GB - 24