1
Semi-automatic / Automatic mode
In Semi automatic / Automatic mode the change to multiple vital
signs parameter can be pre-defined as “trends”. These trends can
then be activated one-by-one directly or multiple activated via
the “event handler” function. Trends allow the instructor to
introduce physiologic situations into the simulation. A brief overview
is shown below, for more information refer to the help files.
To create a new scenario:
1. Choose “Start Scenario Editor” from the Edit dropdown menu.
2. Click the new scenario () button
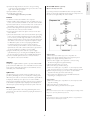
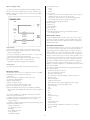
The scenario is constructed from a set of frames. Each frame represents a state of the patient. The scenario can only operate in a single
frame at any given time. The scenario moves to other frames as
events specified in the “Events field” occur. To control which frame
the scenario moves to, connection lines are drawn from each event
box to the desired frame. When the specified event occurs, the
scenario moves to the corresponding frame. For a more detailed
description, refer to the software help files.
To use pre-programmed or saved trends:
1. Select the “Start/Stop…” button located in the Trends box
in the main window.
2. Select the desired trend.
3. Click the start button.
Saving Scenarios
To save a new scenario:
1. Select “File” from the dropdown menu.
2. Select "Save".
3. Enter the name of the scenario.
4. Click the “Save” button.
To build and save new trends:
1. Select “Start Trend Editor” from the Edit dropdown menu.
2. Select the parameter to be included in the physiologic model
of the trend you wish to design.
3. Click “ok”.
To retrieve the file at a later time:
1. Click the “Start Scenario” button on the GUI.
2. Select your saved scenario.
Automatic mode, creating and using scenarios
In automatic mode, scenarios which includes multiple
alternative and consecutive changes to the vital signs can be
pre-defined. The scenarios can be constructed so that the change
from one condition to the next may have multiple outcomes.
The various outcome alternatives have been defined in the scenario
and triggered by pre-defined events. These events may be either
automatically registered events such as “time” or a defibrillator
shock, or by manually entered events such as administration of drugs.
Debriefing during or after a scenario
The debriefing function is available both during and after scenarios.
To activate the debrief view, click on the “Debrief” button. If you
are currently running a scenario, this action will automatically pause
your running scenario and take you to the debrief screen. After you
have reviewed the log, you can choose to save the debrief or return
to the scenario without saving. To exit, select “Exit” from the file
dropdown menu and follow the prompts to save or exit without
saving as desired. If you paused a running scenario, click on the play
( ) button from the main SimMan GUI to resume the simulation.
For more information on the Debrief viewer, refer to the help files.
SimMan is delivered with a set of pre-programmed scenarios.
Pre-programmed or saved scenarios can be started, paused, halted
or debriefed from the “Scenario Control Center” found in the lower
left quadrant of the GUI.
Halting the scenario
When a scenario is running, clicking the halt ( ) symbol will put
the scenario is manual mode. The software will confirm that you
want to stop the scenario. After a “yes” response the word
“Halted” will appear on the screen. The scenario continues to run
but all operations must be carried out manually by the instructor.
To fully stop and save a scenario, click the debrief button. When the
debrief viewer appears, choose “Save As” from the “File” dropdown
menu.
To start a scenario:
1. Click “Start Scenario”.
2. Select a simulation case to run.
To temporarily halt the scenario, click on the pause (II) symbol.
To resume a simulation that has been paused, click on the play ( )
symbol.
To halt a scenario, click on the halt (
) symbol.
Instructor Monitor Control Centre
The instructor can manipulate the values of the monitor parameters
from the Instructor Monitor Control Centre which can be found in
the upper right quadrant of the main GUI. Adjustments can be
made to any of the physiologic values by pointing the mouse over
the desired area and clicking. Windows will open allowing the
instructor to select and apply the desired changes and functions.
Before creating a new scenario, it is important to understand the
difference between Events and Actions.
Events
Things that happen outside of a scenario, usually caused by students,
are called “Events.” The ABC/Miscellaneous/Medication events in the
main window are also called “Scenario Events.” There are also
“Time Events” caused by either of the two timers reaching a predetermined limit
Configuring the Patient Monitor and Simulator and
Creating Profiles
General configurations for both the simulator manikin and patient
monitor can be controlled via the GUI. To configure:
1. Select “Configure” from the “Edit” dropdown menu.
2. Select either the “General” or “Patient Monitor” tab.
3. Double click on the appropriate icon to enter submenus.
4. Make desired changes.
5. Select “ok” to initiate the change.
If you have changed the configuration, the software will ask you
whether or not you wish to save the changed configuration, try it
without saving or cancel the operation. If you choose “yes,” you will
Actions
In a scenario, “Actions” are performed by the scenario.
For example, changing a parameter value, creating an airway
complication and making vocal sounds are “Actions” performed
by scenarios.
10