1
Changing Entire Fan Board
The entire fan board can be changed by
3. Loosen the bolt, located in the center of
the fan wheel, which fastens the fan wheel
competing following steps:
and motor shaft together.
4. Remove all screws that fasten the fan
1. Turn off the electrical power source and
allow the rotating fan wheel to stop. Then
disconnect the power source wires from
the terminal strip.
2. Disconnect the ground wire.
3. Due to the dimensions, weights and tight
clearance, we suggest following the
“Removing Plenun Box” procedures to
remove the return plenum, if applicable,
first before changing the entire fan board.
4. Remove the screws fastened at four
corners of the fan board, as shown on
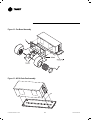
Figure 12-F.
5. The fan board can be separated from the
discharge panel on the unit casing when
all screws are removed.
CAUTION: Due to the dimensions and
weights of the fan board, at least two
installers are recommended to do this
step for safely.
6. Follow the opposite procedures to reinstall the fan board.
Clean up debris on the coil and the inside of
housing and fan inlet cone together, as
shown on Figure 12-M.
5. Pull out the fan inlet cone from the fan
housing, and then remove the fan wheel
from the motor shaft and fan housing.
6. Follow the “Changing Entire Fan Board”
procedures to remove the fan board for
changing the fan housing.
7. Remove all screws that fasten the fan
housing and fan board together. Then the
fan housing can be separated from fan
board.
NOTE: lf the entire fan must be changed,
the step 4 and 5 can be omitted.
8. After replacing the fan housing or fan
wheel, follow the opposite procedures to
re-install.
When reassembling the fan housing, make
sure the fan wheel is balanced and centered
in the fan housing and not rubbing on either
side. Clean up debris on the fan wheel
before start-up.
3a. For size 10, one of the entire fan wheel
and housing must be removed first before
changing the motor. Follow the “Changing
Fan Housing and Fan Wheel” procedures
to remove one fan housing and fan wheel
from the fan coil unit.
3b. For size 14 to 24, one of the fan wheel
must be removed before changing the
motor. Follow the “Changing Fan Housing
and Fan Wheel” procedures to remove
one fan wheel out of the fan housing and
motor shaft.
4. Lossen the bolt, on the other fan wheel,
from the motor shaft.
5. Remove four screws which fasten the
motor and motor seat together, as shown
on Figure 12-H. Hold the motor with one
hand, when removing the last screw, to
prevent the motor from falling off.
6. Take the motor and shaft out of the fan
wheel which is still in the fan housing.
7. lf the motor seat must be changed,
remove four screws which fasten the
motor seat and fan board together, as
shown on Figure 12-G. Then the motor
seat be can separated.
8. Follow the opposite procedures to reinstall the new motor. Make sure that all
unit casing before re-installing the fan board.
Also check for debris on the fan wheel
Changing Motor
The Fan Coil Unit will not operate properly
wire connections are correct before power
on. All wire connections must be color
before start-up.
without a functionally normal motor. lf the
motor fails, order a replacement from the
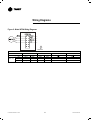
matched, as shown on Figure 9.
Changing Fan Housing and Fan Wheel
The fan housing and fan wheel can be
replaced by completing the following steps:
1. Turn off the electrical power source and
allow the rotating fan wheel to stop. Then
disconnect the power source wires from
the terminal strip to ensure safety.
2. Follow the necessary procedures to
remove the filter and return plenum from
the unit, if applicable.
Trane Company. The motor should be
replaced by completing the following steps:
After replacing the motor, make sure the fan
wheel is balanced and centered in the fan
housing and not rubbing on either side.
1. Turn off the electrical power source and
allow the rotating fan wheel to stop. Then
disconnect the motor wires from the
terminal strip.
2. Follow the necessary procedures to
remove the debris and return plenum from
the unit, if applicable.
17
HCCA-SVX01A-EN