1
656—AIR CONDITIONING
CHRYSLER SERVICE MANUAL
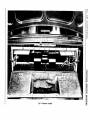
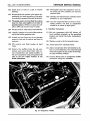
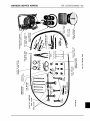
41. BLOWER AND MOTOR (See Fig. 2)
b. Assembly and Installation
a. Removal and Disassembly
(1) Place motor mounting brackets on motor
and install the four lockwashers and nuts,
and tighten securely. Install motor. (Make
sure the motor rotates in right direction,
clockwise as viewed from left side of car.)
(1) Remove fresh air control lever from shafts
on either side of evaporator cover.
(2) Remove the evaporator housing rear cover
mounting screws and lockwashers and remove cover.
(2) Inspect the six blower mounting grommets
for deterioration and hardness and replace
if necessary.
(3) Disconnect main lead wire to blower motor
and the thermal switch leads at the terminal block mounting located at side of evaporator assembly.
(.3) Place the two motor mounting plates into
position on brackets and install the six
screws and lockwashers; tighten securely.
(4) Remove the rubber grommet and pull wires
through compartment. Disconnect ground
wire from compartment.
(4) Make sure spacers are inserted in the grommets before assembly. Make sure motor is
installed with wire leads and drain wick
located towards bottom of motor.
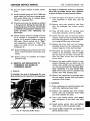
(5) Remove the six blower assembly mounting
screws and lift assembly out of compartment.
(6) Remove the eight blower housing mounting
nuts and lockwashers, and remove base
plate from housing.
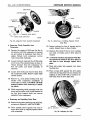
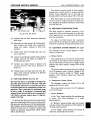
(5) Install the blower fans on shaft so that air
will be forced out of outlet duct. Vanes at
bottom fan should point up and towards
rear. (Refer to Fig. 5.)
CAUTION
(7) Remove the eight blower motor mounting
plate screws and lockwashers.
Make sure blotver fans are installed correctly,
othervnse car cooling will be affected.
(8) Remove blower housings and note the difference between right and left housing for
correct installation procedure.
(6) Place right and left blower housings over
fans and install the eight mounting screws
and lockwashers. Tighten securely.
(9) Use an Allen wrench to loosen the two
blower fan set screws and remove the blower
fans from shaft.
(7) Place base plate into position on blower
housing and install the eight blower housing mounting nuts and lockwashers; tighten securely.
CAUTION
Blower fans function as right and left and should
be installed accordingly. Always mark for identification before removal.
(10) Remove the six blower motor mounting
screws and lockwashers and remove the
two motor mounting plates. Do not lose
the grommets or spacers from the motor
brackets as they are essential in maintaining vibration-free blower operation.
(11) Remove the four blower mounting bracket nuts and lockwashers and separate
brackets from motor. Motor location
should be marked when removed so the
motor can be reinstalled to rotate in the
right direction.
(8) Position the blower fans as near as possible to outside portion of housing.
(9) Check position of set screws in relation to
flat on the shaft and tighten securely. Rotate fans by hand to make sure there is no
interference between fan and housing at
any point when fans are rotated.
(10) Place blower assembly into position in
evaporator compartment. Install the
mounting screws and tighten securely.
(11) Make sure ground wire terminal surface
is clean, install wire and tighten.
(12) Push blower motor lead wire and thermal
switch leads through opening in compartment and install rubber grommet.