1
M167-E650U-001
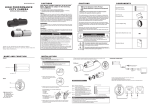
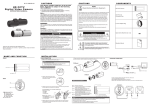
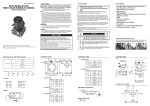
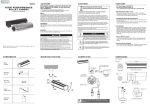
HIGH PERFORMANCE
CCTV CAMERA
O P E R AT I O N M A N U AL
C AU TI O N S
C AU T IO N S
This device complies with Part 15 of the FCC
Rules. Operation is subject to the following
two conditions;
Correct Disposal of This Product
(Waste Electrical & Electronic Equipment)
1. This device may not cause harmful interference.
2. This device must accept any interference received, including
interference that may cause undesired operation.
This equipment has been tested and found to comply with the limits for a
Class A digital device, pursuant to part 15 of the FCC Rules. These limits are
designed to provide reasonable protection against harmful interference when
the equipment is operated in a commercial environment. This equipment
generates, uses, and can radiate radio frequency energy and, if not installed
and used in accordance with the instruction manual, may cause harmful
interference to radio communications. Operation of this equipment in a
residential area is likely to cause harmful interference in which case the user
will be required to correct the interference at his own expense.”
This marking shown on the product or its literature, indicate that
it should not be disposed with other household wastes at the end
of its working life. To prevent possible harm to the environment or
human health from uncontrolled waste disposal, please separate
this from other types of wastes and recycle it responsibly to
promote the sustainable reuse of material resources.
This product should not be mixed with other commercial wastes
purchased this product, or their local government office, for details
of where and how they can take item for environmentally safe
recycling.
WARNING This is a class A product. In a domestic environment this product may cause
radio interference in which case the user may be required to take adequate
measures.
Any changes or modifications in construction of this devies which are not
expressly approved by the party responsible for compliance could void the
user's authority to operate the equipment.
CAUTION
1. A regulated DC12V 300mA power supply is recommended for use with
this camera for the best picture and the most stable operation.
An unregulated power supply can cause damage to the camera.
When unregulated power supply is applied, product warranty will be
out of subject.
2. It is recommended that the camera is used with a monitor that has a
CCTV quality 75 video impedance level. If your monitor is switched to
high impedance then please adjust accordingly.
3. Do not attempt to disassemble the camera to gain access to the
internal componets. Refer servicing to your dealer.
4. Never face the camera towards the sun or any bright or reflective light,
which may cause smear on the picture and possible damage to the CCD.
5. Do not remove the serial sticker for the warranty service.
RISK OF ELECTRIC SHOCK DO NOT OPEN
CAUTION : TO REDUCE THE RISK OF ELECTRIC SHOCK, DO
NOT REMOVE COVER(OR BACK). NO USER. SERVICING TO
QUALIFED SERVICE PERSONNEL.
This symbol is intended to alert the user to the presence
of uninsulated "dangerous voltage" within the product's
enclosure that may be of sufficient mangnitude to constitute
a risk of electric shock to persons.
Operation Manual
This symbol is intended to alert the user to the presence of
important operating and maintenance(servicing) instruction in
the literature accompanying the appliance.
I N STA LLATIO N
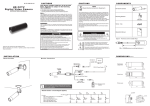
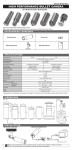
• LENS CONNECTION
Lenses are sold separatele. Lenses such as an auto iris lens,
CS-Mount lens and C-Mount lens can be used.
NOTE
• Please keep the lens clean.
• Any foreign objects and fingermarks on the lens can cause
inferior image quality in low light level conditions.
5. Please insert the connection plug that is connected to the auto iris lens cable into the
auto lens connector, which is located on the back of the camera
• MONITOR CONNECTION
CS-Mount
DC12V REGULATED
POWER SUPPLY
Wh e n u s i n g a n a u t o i ri s le ns
1.Please peel off about 8mm of the
outer skin of the auto iris lens cable.
Lens Cover
C-mount Adaptor Ring
Spare Screw (Machine 2x2) - 2ea
CAUTION
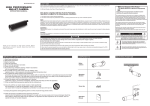
NA ME A N D FUNCTI ON
Auto Iris Lens
Connection Plug
Business users should contact their supplier and check the terms
and conditions of the purchase contract.
Household users should contact either the retailer where they for
disposal.
Caution -
FRONT
High Performance
DSP Color Camera
(Applicable in the European Union and other European
countries with separate collection systems)
Note -
Thank you for choosing our high quality camera.
Before attempting to connect or operate, please read and
follow these instructions.
CO MP O N E N T S
BNC FEMALE
VIDEO
C/CS RING
C-Mount
2. Please peel off about 2mm of the
outer skin of the insulated conductor
inside the lens cable.
BACK
* As the connecting method varies with instruments, refer to the
manual supplied with the instrument.
* Only connect the cable when the power is turned off.
* Set the 75Ω / Hi-Z selection switch as shown below if you have an intermediate device.
B a c k Foc us Pr oc e dur e
②
AUTO
IRIS
OSD
CONTROL
①
3. Please remove the cover of the auto iris lens connection plug and solder
the lens cable ti the connector pin in the plug.
*PIN ASSIGNMENT OF THE LENS CONNECTOR
①. ■
▲
▼
◀
▶
MENU BUTTON
UP BUTTON
DOWON BUTTON
LEFT BUTTON
RIGHT BUTTON
②. Auto IRIS Jack
VIDEO IN
Signal for DC + iris lens
Pin 1: DAMPPin 2: DAMP+
Pin 3: DRV+
Pin 4: DRV-(GND)
Signal for Video + iris lens
Pin 1: Power source: +9 DC,50mA MAX
Pin 2: N.C(Not used)
Pin 3: Video Signal:0.7Vp-p/10K ohms.
Pin 4: Shield, ground
4. Please replace the auto iris lens connection plug cover and take off the
CCD protection cap and than attach the auto iris lens to the camera by
screwing it in clockwise.
Step 1 - Remove Lens Cover.
Step 2 - If using a C-Mount lenses it can be applied
to the camera at this time.
Step 3 - Most current lenses are CS-Mount and
require removal of the C/CS ring.
Step 4 - To remove the C/CS ring loosen but do not
remove completely the two set screws and
than remove the C/CS ring.
Step 5 - Screw on the CS-Mount lens until a good
picture is obtained and tighten the set screws.
Step 6 - Use the focus ring on the lens to obtain
a finer focusing
Lens Cover
Set Screw(Left Side)
CS-MOUNT ADAPTOR RING
N OTE
- if a C-Mount lens was applied and focus could not be obtained, please try the following :
• Ensure that the lens is in face a C-Mount and not a CS-Mount.
•Check the focus adjust on the lens.
• if need be loosen the set screws and adjust the position of the lens
and C/CS ring as one unit until a good focus is obtained.
OSD MANUA L
MAIN MENU
1st Sub MENU
2nd Sub MENU
3rd Sub MENU
4th Sub MENU
MAIN MENU
1st Sub MENU
2nd Sub MENU
LE NS
AUTO
TYPE
DC / VIDED
M O DE
AUTO,OPEN,CLOSE
SPEED
000 ~ 255
AR EA SEL
PR IVAC Y
RETURN
HI G H LUM I NANC E
AUTO
LO W LUM I NANC E
MODE
S H U T ,AU TO IR IS, SH U T+AU TO IR IS
BRIGHTNESS
000 ~ 255
MODE
A G C ,OFF
BRIGHTNESS
x 0 . 2 5,x0 .5 0 ,x0 .7 5 ,x1 .0 0
M O DE
MANU AL
SHUTTER
AG C
ATW
AU TO
1/50(PAL),1/100(NTSC)
1/60(NTSC),1/120(PAL)
1/250,1/500,1/1000
1/2000,1/4000,1/10000
D AY/N IGH T
000 ~ 255
DELAY CNT
000 ~ 255
ATW FRAM E
x0.50,x1.00,x1.50,x2.00
ENVI RO NM ENT
INDOOR,OUTDOOR
NT SC:000 ~ 244 / PAL: 000 ~ 288
LEF T
NT SC:000 ~ 474 / PAL: 000 ~ 468
RIGHT
NT SC:000 ~ 474 / PAL: 000 ~ 468
C OL OR
1 ~ 8
TR AN SP
0.00, 0.50, 0.75, 1.00
M OSAIC
OF F ,ON
BU R ST
OF F ,ON
D EL AY C N T
0 ~ 255
D AY > N IGH T
0 ~ 255
N IGH T > D AY
0 ~ 255
R ETU R N
BW
NR
N R M OD E
OFF,Y,C ,Y/C
C L EVEL
000 ~ 015
Y L EVEL
000 ~ 015
R ETU R N
ON
ED IT M OD E
R ETU R N
C AM ER A ID
OFF
PUSH
L AN GU AGE
B- G AI N
000 ~ 255
C AM ER A R ESET
R- G AI N
000 ~ 255
BAC K
RETURN
USER2
NT SC:000 ~ 244 / PAL: 000 ~ 288
BOT T OM
C OL OR
6,12,18,24,30,36,42,44.8
SPEED
T OP
R ETU R N
S H U T +A G C
RETURN
USER1
4th Sub MENU
OFF
RETURN
WHITE
BAL
ON
RETURN
S HU T TER
/ AGC
3rd Sub MENU
1/4, 2/4, 3/4, 4/4
MANUAL
EN GL ISH , 日本語, D EU TSC H , FR AN C AIS, Русский, PORT UGUÊS, ESPAÑOL, 中文
EXIT
B- G AI N
000 ~ 255
R- G AI N
000 ~ 255
SAVE AL L
* Im por t a nt N ot e : - An y ch a n g e s m a d e to th e ca m e r a se tti n g s m ust be saved prior to exiting the OSD menu. Else all changes will be discarded.
- By ch a n g i n g th e l e n s o p ti o n i n th e OSD fr o m M AN U AL to AU TO will automatically change the
SH U TTER /AGC se tti n g fr o m AU TO IR IS to SH U T+AU TO IR IS.( D e fault:AUT O IRIS)
RETURN
ANTI CR
MANU AL
LEVEL
NTSC: 30 ~ 115
PAL: 28 ~ 134
S P E C IF IC AT IO N
RETURN
Signal Format
Image Device
Scanning System
PUSH LO CK
BACK LIGHT
PIC
A DJU ST
OFF,B LC, HLC
MIRROR
O FF, O N
BRIGH TNESS
000 ~ 255
CONTRAST
000 ~ 255
SHARP NESS
000 ~ 255
HUE
000 ~ 255
GAIN
000 ~ 255
Scanning Frequency
Total Pixels
Effective Pixels
Electronic Shutter
H.Resolution
S/N Ratio
RETURN
ATR
ON
LUM I NANCE
L O W, M I D , H I G H
CO NTRAST
L O W, M I D L O W, M I D , M I D H I G H , H I G H
Min.Illumination
Sync System
Gamma
Video Output Level
OSD
BLC
2DNR
ATR
RETURN
OFF
MOT ION
DET
DETECT SENSE
000 ~ 255
BLO CK DI SP
OFF,ON,ENABLE (CONTROLER)
M O NI TO R AREA
ON,OFF
1/4, 2/4, 3/4, 4/4
ON
AREA SEL
TOP
N T S C :0 0 0 ~ 2 4 4 / PAL : 0 0 0 ~ 2 8 8
BOTTOM
N T S C :0 0 0 ~ 2 4 4 / PAL : 0 0 0 ~ 2 8 8
LEFT
N T S C :0 0 0 ~ 4 7 4 / PAL : 0 0 0 ~ 4 6 8
RIGHT
N T S C :0 0 0 ~ 4 7 4 / PAL : 0 0 0 ~ 4 6 8
RETURN
Function
White Balance
Privacy Masking
Motion Detection
Day & Night
OFF
NEXT
E X IT
S A V E ALL
*SH UT+ I RI S : Both the Shutter and the Mechanical Iris are automatically adjusted according to brightness.
*Auto Iris(Default): The Shutter stays at the manually selected value and only the Mechanical Iris adjusts to brightness.
Language
Operating
Temperature
Weight
NTSC
PAL
1/3˝ SONY Super HAD CCD II
2 : 1 Interlace
15.734KHz(H),
15.625KHz(H),
59.94Hz(V)
50Hz(V)
1020(H) X 508(V)
1020(H) X 596(V)
976(H) X 494(V)
976(H) X 582(V)
1/60 ~1/100,000sec
1/50 ~1/100,000sec
700TV Lines
More than 50dB(AGC OFF)
0.08Lux (30IRE@F1.4)
Internal
r= 0.45
1.0 Vp-p Composite(75Ω)
Built in
OFF / BLC / HLC
OFF / ON (Level adjustable)
OFF / ON (Level adjustable)
MIRROR / BRIGHTNESS / CONTRAST /
SHARPNESS / HUE / GAIN
ATW / PUSH / USER1 / USER2 /
ANTI CR / MANUAL / PUSH-LOCK
4 Zones
4 Zones
AUTO / COLOR / BW
ENGLISH / JAPANESE / GERMAN /
FRENCH / RUSSIAN / PORTUGUESE /
SPANISH / CHINESE
14°F~122°F(-10°C~+50°C)
113g
Storage Temperature
Humidity
Dimension
Power
DC12V
Consumption
Lens
-4°F~140°F(-20°C~+60°C)
Less than 80%
30.5(W) x 30.5(H) x 55(D)
DC12V(±10%), Max. 110mA
MANUAL / DC / VIDEO
Specifications and designs are subject to change for
improving the functionality of this product without notice.
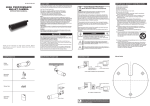
DI ME N S I O N S Unit(mm)
CS-Mount
C-Mount