1
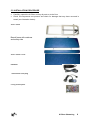
STOP! It is strongly recommended that two people carry out the installation due to the weight of the product Store the wall frame cover and backing board (if ordered) safely until required Offer up the wall frame into the desired position to mark and drill the holes for the fixings; adjust the two leveling bolts as required. Where a backing board is to be used, it should be drilled to take fixing screws (minimum 8) – check the screws do not interfere with the wall frame when mounted. Fit the fixing bolts and loosely fit the frame to the wall or backing board, being careful not to trap the electrical cable Before tightening fixings, check frame is vertical in all directions, and if necessary fit packing to achieve The bench frame can now be fixed to the wall frame; the two hinge bolts that are loosely fitted to the wall frame should be removed, and a small amount of Loctite applied to the first 5mm. Offer up the bench and insert the two bolts previously prepared but do not over-tighten. The bolts must not protrude more than approx 1mm. The bench should now be raised into the vertical position and locked in position Fit the support link arms using the screws, nuts and washers that have been loosely fitted. Do not over tighten; make sure the links can rotate freely. The two side trims may now be fitted using the plastic push fit retainers supplied Connect the electrical supply and test the bench by raising and lowering to each of the limits of travel to ensure there are no obstructions The 24V transformer can now be fixed to the wall in a suitable position, or on a bracket/shelf Hi Riser Showering 7