1
Chapter 2: Installation
Fuse information
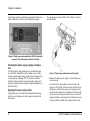
The power entry module accommodates two fusing arrangements, as illustrated in Figure 6.
100/120 VAC operation
The 100/120 VAC fusing arrangement uses a single
type 3AG (0.25" x 1.25") slo-blo fuse. Audio Precision recommends only the following replacement fuse:
• 1 each Littelfuse 313 Series, 600 mA 3AG 250 V sloblo glass fuse.
230/240 VAC operation
The 230/240 VAC fusing arrangement uses two 5 x 20 mm
IEC-approved type T fuses. Audio Precision recommends
only the following replacement fuses:
• 2 each Littelfuse 213 Series, 315 mA 250 V 5 x 20 mm
Time Lag (slo-blo) glass fuses
or
• 2 each Littelfuse 218 Series, 315 mA 250 V 5 x 20 mm
Time Lag (slo-blo) glass fuses.
Refer to the label on the instrument rear panel for fuse current ratings.
To replace a fuse or change the fusing arrangement, proceed as follows:
• Remove the mains power cord from the power cord
connector and open the Power Entry Module as
described above.
• Using narrow pliers, pull the fuse assembly out of the
housing.
• Change or add the correct fuses as necessary, referring
to Figure 6. Refer to the instrument rear panel for the
correct fuse electrical current rating.
• Insert the fuse assembly in the housing, with the side of
the assembly that carries the fuse(s) for your desired
fusing arrangement facing into the housing. Press the
fuse assembly firmly into the housing.
• Confirm that the line voltage selection is correct for
your mains voltage and your fusing arrangement.
Once you have verified that the line voltage selection is correct, connect the power cord from a mains power outlet to
the power cord connector on the instrument rear panel.
Changing the fusing arrangement
Figure 6. Fuse block orientation for 100/120 VAC
and 230/240 VAC operation.
10
APx515 Installation and Specifications