1
INSTALLATION INSTRUCTIONS
A.Window Mounting
Preliminar y Instructions
1 Remove Chassis
3. Check your storm windows-- if your storm
window frame does not allow the clearance
required, correct by adding a piece of wood as
shown in Fig. E,or by removing storm window
while room air conditioner is being installed.
4 .Check for anything that could block airflow-check area outside of window for things such as
shrubs, trees, or awnings. Inside, be sure
furniture, drapes, or blinds will not stop proper
airflow.
5.Check the available electrical service- Power
supply must be the same as that shown on the
unit serial nameplate. Power cord is 48 inches
long. Be sure you have an outlet near.
6.Carefully unpack air conditioner- Remove all
packing material. Protect floor or carpet from
damage. Two people should be used to move
and install unit.
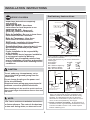
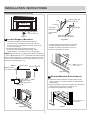
1. Pull down front grille and remove filter.
(See Fig.1).
2. Lift front grille upwards and place to one side.
3. Locate the four front screws and remove.
These screws will be needed to re-install
the front panel (see Fig.2).
Front Panel
Front Grille
Fig.1
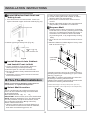
4. Push metal cabinet side to release plastic tabs
on each side of front panel (see Fig.3).
5. Gently lift front panel off unit(see Fig.3A).
6. Disconnect the connector plug of the display
panel from the unit and place front panel to one
side(see Fig.4).
Hardware(Packed with the unit)
7/16 inch Locking
screw and Flat
washer for window
panels
Fig.2
2 ea.
3 / 4 or 1/2)inch
Long Hex-head
Screw
4
Safety Lock
1
1 / 2 inch Long
screw and Locknut
4ea.
3 / 4 inch Long
Flat Head Bolt
and Locknut
Sill Angle
Bracket
2ea.
Long hex-head
locking screw
for top angle,
side retainer
5 /16 inch Long
Foam insert
Window sash
seal foam
Fig.3
Fig.4
Fig.3A
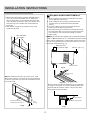
7. Remove shipping screws from top of unit and
also on the side by the base if installed
(see Fig.5).
8. Hold the cabinet while pulling on the base pan
handle, and carefully remove the unit.
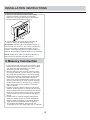
9. Add two foam inserts to holes in top of cabinet
where shipping screws were removed from
(see Fig.6).
shipping
screws
2
10
2
1
Tools Required
A large flat blade screwdriver;Tape measure
Adjustable wrench or pliers;Pencil;Level
Socket wrenches;Phillips Screwdriver
Fig.5
5
Fig.6