1
3.5
DC Wiring Connections
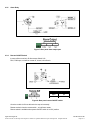
Connect the cables to the power input terminals on the rear panel of the unit.
【+】is positive, and【-】is negative. Insert the cables into the terminals and tighten the nut to securely clamp
the wires.
DC +
DC -
Figure 2–DC input terminals
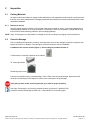
WARNING
Before proceeding, confirm that DC input cable connect correctly.
Make sure that all DC connections are tight (torque to 9-10 foot pounds). Loose connections will
overheat and could result in a potential hazard.
Follow this procedure to connect the battery cables to the DC input terminals on the unit.
The cables should be as short as possible (ideally, less than 10 feet / 3 meters) and large enough to handle the
required current in accordance with the electrical codes or regulations applicable to your installation. Cables that
are not an adequate gauge (too narrow) or are too long will cause decreased inverter performance such as poor
surge capability and frequent low input voltage warnings and shutdowns. These low input voltage warnings are
due to DC voltage drip across the cables from the inverter to the batteries. The longer and narrower these cables,
the greater the voltage drop.
CAUTION – Increasing your DC cable size will help improve the situation.
NOTE: We recommend #6 AWG 40A cables (48Vdc input) for optimum inverter performance (applies to both 110V and
220V series). Use only high quality copper wiring and keep cable length short (from 3-6 feet).
Argus Technologies Ltd.
Printed in Canada. © 2009 Argus Technologies Ltd. ARGUS is a registered trademark of Argus Technologies Ltd. All Rights Reserved.
014-129-C0 Rev A WC
Page 4 of 17