1
SWITCHABLE RGB INPUTS
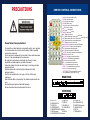
Use the “CCD/PC1/PC2” button to switch between CCD and different RGB signals. Each time
the “CCD/PC1/PC2” button is pressed, it provides seamless transitions among different sources
such as Camera (CCD), COMPUTER(IN) and RGB (IN). Notes: COMPUTER OUT always outputs
COMPUTER IN signals.
FOCUSING
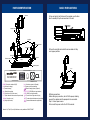
When the visualiser is turned on the focus automatically adjusts to the stage, it is not
necessary to readjust the focus if you are only working with flat materials (text, photos, etc.).
Only 3D object require a focus adjustment. Press the “AUTO” button to auto focus. Press the
“FAR” or “NEAR” button once to focus manually.
PROJECTOR ON/STANDBY
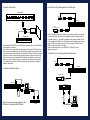
Press the “POWER” button to turn on the visualiser’s power and press the “Ppw” button to
turn the projector power on. To turn the projector standby after use, press the “Ppw” button
more than 2 seconds, and then the projector enters to the stand-by mode. (On the remote
control, press the “PROJECTOR POWER” button) Note: Please connect the projector RS232
cable between the projector and the visualiser first. If you cannot switch projector inputs by
pressing this button, you need to manually program the RS232 code into the visualiser. See
the section “Controlling Projector with Visualiser” for detailed instruction.
FREEZING IMAGE
Press the “Frz” button to freeze the image. When the output signal is RGB, in order to show
a still image on the screen, press the “Frz” button. The frozen image can’t be adjusted (Zoom
in/out, color adjustment, etc.). Note: This function is not available on S-Video and Video
output.
PROJECTOR INPUTS SELECTION
When the projector is connected to several input sources, use the “Pin” button to switch signal
inputs of the projector. (On the remote control, press the “PROJECTOR INPUT” button)
Note: Please connect the projector RS232 cable between the projector and the visualiser first.
If you cannot switch projector inputs by pressing this button, you need to manually program
the RS232 code into the visualiser. See the section “Controlling Projector with Visualiser” for
detailed instruction.
IMAGE REVERSION
Press the “Mir” button once to V-reverse the image and the vertically mirrored image will
be displayed. Press the “Mir” button again to exit. (On the remote control, please press the
“MIRROR” button)
IMAGE SPLIT
Press “SPLIT”, the image will be split into two images. One is the current captured image the
other is a frozen image of the last image, Press the “SPLIT” button again to exit. Note: This
function is not available on S-Video and Video output.
DYNAMIC/STATIC MODE SWITCH
To display dynamic images, Press the “D./S.” button to switch to the Dynamic mode, the image
will be clear and has no choppy strobe effect. To display still images, press the “D. / S.” button
switch to the Static mode.
BRIGHTNESS ADJUSTMENT
If the image effect is not satisfactory, you can adjust the brightness to get a better image
effect. Use the “BRIGHT +” or “BRIGHT -” button to adjust the brightness. To increase the
brightness, press the “BRIGHT +” button. To decrease it, press the “BRIGHT -” button. To go
back to the initial brightness press the “AUTO” button.
WHITE BALANCE ADJUSTMENT
Each time the lighting condition changes, the user should adjust the white balance of the
CCD. Press the “AUTO” button to adjust the white balance automatically.
AUTO ADJUSTMENT
One of the visualiser’s special functions is auto adjustment. Press the “AUTO” button to auto
adjust the white balance and the focus. The whole process takes about 10 seconds.
TEXT/IMAGE MODE
Press the “TEXT” button to switch between image/text modes. Todisplay a text file, switch to
the text mode to get a clearer text effect. (On the remote control)
COLOR AND B&W MODE SWITCH
Press “B&W” once to enter the Black & White mode; Press again to return to the Color mode.
SWITCHABLE VIDEO INPUTS
Press the “VIDEO” button to switch among S-Video and Video signals.
SWITCHABLE RGB INPUTS
Use the “CCD/PC1/PC2” button to switch between CCD and different RGB signals. Each
time the “CCD/PC1/PC2” button is pressed, it provides seamless transitions among different
sources such as Camera (CCD), COMPUTER(IN) and RGB (IN). Notes: COMPUTER OUT
always outputs COMPUTER IN signals.
PROJECTOR ON/STANDBY
Press the “POWER” button to turn on the visualiser’s power and press the “Ppw” button to
turn the projector power on. To turn the projector standby after use, press the “Ppw”
button more than 2 seconds, and then the projector enters to the stand-by mode. (On the
remote control, press the “PROJECTOR POWER” button)Note: Please connect the projector
RS232 cable between the projector and the visualiser first. If you cannot switch projector
inputs by pressing thisbutton, you need to manually program the RS232 code into the
visualiser. See the section “Controlling Projector with Visualiser” for detailed instruction.