1
7.Speaker volume adjustment
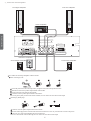
Press the noise test button to listen to the test sound from each speaker. Press this button again to turn off the test sound.
If wanting to balance the front left and right speakers, press the balance button on the remote controller to make proper adjustment.
To change the volume level of surround speakers, press the MENU button on the remote controller , select the SUR mode, and then press
MULTI button to make adjustment.
To adjust the volume level of the center-channel speaker, press the MENU button on the remote controller , Select the CEN mode, and
then press MULTI to make adjustment.
To adjust the volume level of the subwoofer, press the MENU button on the remote controller , Select the SW mode, and then press
MULTI to make adjustment.
8. Press the remote controller's volume button or rotate the MASTER VOL knob on the panel to perform simultaneous volume adjustment of
all channels.
9.AM/FM tuning
Press the remote controller's INPUT button and select the TUNER input mode, and then press the AM/FM on the remote controller to
perform FM or AM radio program scanning and selection.
Under the FM mode, press the MONO button on the remote controller to select stereo or single-track mode (only valid for FM wave band).
Press the MEMORY button on the remote controller to save radio programs.
Press the SCAN button to automatically scan radio programs, i.e. SCAN+ searches programs upward and SCAN- downward.
Press the STEP button on the remote controller to set the step length, i.e. STEP+ increases the step length and STEP- reduces the length.
10. MUTE operation
Press the MUTE button to disable the output to all speakers, and the MUTE symbol will be displayed.
Press the MUTE button again will enable the output to all speakers, and the MUTE symbol will disappear.
11. Bass setup
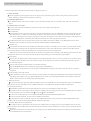
If you use a small sound box or satellite speaker, you can only select the SP CONFIG1 mode. You can directly press the CONFIG button
on the panel to display SP CONFIG1 or SP CONFIG2. Where the SP CONFIG2 status is displayed, Press the CONFIG knob to switch to
Application of Functions
The SP CONFIG1 status. Then you may make proper configuration for your sound box.
If you use a big sound box or a set of family cinema configurations, you'd better select the SP CONFIG2 mode. You can directly press the
CONFIG button on the panel to display SP CONFIG1 or SP CONFIG2. Where the SP CONFIG1 status is displayed, Press the CONFIG
Knob to switch to the SP CONFIG2 status. Then you may make proper configuration for your sound box.
12. Antenna connection of receiver
. Antenna connection
Connect the AM loop antenna to the AM antenna ramp on the receiver's rear board;
Connect the FM parallel antenna to the FM antenna ramp on the receiver's rear board;
. Instructions for connection
To prevent the receiver from picking up noise, the AM antenna must be kept away from such interference sources as the CD player (video
player) and fluorescent lamps.
The FM antenna must be fully extended and kept horizontally as much as possible.
If the FM antenna does not offer a satisfying effect, please use an additional cable (not supplied) to connect the receiver to an outdoor FM
antenna.
13.Sleep time set up
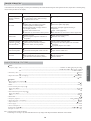
Press the SLEEP button on the remote controller to set up appropriate automatic shutdown time according to your personal demand.
Options include 30, 60, 90 and 120 minutes. When the preset sleep time option is met, the equipment will be automatically turned off.
Warning: if an outdoor FM antenna is used, a lightening arrester must be installed.
9