1
BATTERY INSTALLATION/ REPLACEMENT
(Battery not included)
POOLGUARD “Safety Buoy” is powered by a standard 9 volt
alkaline battery. POOLGUARD recommends Energizer
Brand No. 522 standard 9 volt battery. Follow these
steps to install or replace the battery:
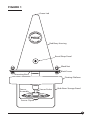
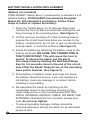
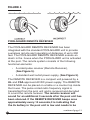
1. Place the ‘Safety Buoy” on its Storage Stand and
remove the four (4) black screws/nuts holding the red
buoy housing to the mounting base. (See Figure 1)
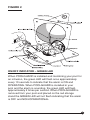
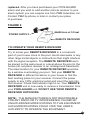
2. Lift the red buoy housing off of the mounting base to
expose the circuit board and allow you access to the
battery compartment, do not pull or jerk on the internal
hookup cable, or bend the antenna. (See Figure 2)
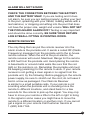
3. Install the battery by attaching the battery snap to the
battery terminals (BE SURE THE CONNECTION IS
TIGHT) IMPORTANT: This will cause the horn to
sound. To silence the alarm, put the alarm
into sleep mode by holding the Red Reset/Sleep
Key for 3-4 seconds close to the end of the circuit
board that the Reset/ Sleep Arrow on the mounting
base points towards. (See Figure 2).
4. Place battery in battery holder and snap into place,
the battery should be secure. If you are replacing a
old battery, clean any leakage or corrosion before
installing a new battery.
5. Re-assemble the alarm by matching up the
reset/sleep decal on the red buoy housing to the
reset/ sleep arrow on the mounting base (DO NOT
PINCH INTERNAL HOOKUP CABLE, OR BEND THE
ANTENNA). Reinstall the four (4) black screws and
nuts, do not over tigthen.
6
• To prevent possible damage, battery should be
removed whenever storing the alarm for an extended
period of time.