1
English
5
Initial Configuration
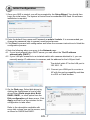
1.Once your NVR is started, you will be prompted by the Setup Wizard. You should then
begin the initial setup. The system is booted from an embedded IDE flash. No software
installation is required.
2.Enter the default User name and Password as admin & admin. It is recommended you
change the password later to prevent unauthorized access.
3.Click Next to proceed with configuration and follow the onscreen instructions to finish the
configuration process.
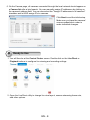
4.Note the following when you move to the Network page:
4-1. If your local network has a DHCP server, you can select the "Get IP address
automatically (DHCP)."
4-2. If your LAN port connects to an isolated switch with cameras attached to it, you can
manually assign IP addresses to cameras, and the address for the LAN port itself.
The default static IP for the LAN port is
192.168.1.10.
4-3. Connect your WAN port to a router or
AP with the routing capability and then
to a DSL or Cable modem.
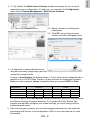
5.On the Disk page, Select disk drives by
clicking the checkboxes in front of disk
drives.Select Build single disk, Build
RAID0, RAID1, or other option from the
Disk configuration pull-down menu. Click
Apply and wait for a few minutes for the
configuration to take effect.
Refer to the description available with
every disk volume type on the screen, such
as those for RAID0 and RAID1.
EN - 7