1
MODEL POR783 & POR883
PROGRAMMABLE CONTROLLER
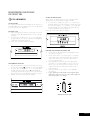
4. Set the cooking duration you want by using – or +.
5 seconds after the last change, the “cook time”
indicator I will stop flashing, and the time of day will
be displayed.
Note: Do not forget to add preheating time if necessary.
Setting the cooking end time
1. Check the clock displays the correct time of day.
2. Select the desired oven function and temperature.
The oven indicator light will glow and the heating
source will come on.
3. Press “mode“ until the “end time” indicator I
begins flashing.
4. Enter the time of day you want to finish cooking
by pressing – or +. 5 seconds after the last change,
the “end time” indicator I will stop flashing and the
current time of day will be displayed.
Setting the delayed start cooking time
1. Program the “cook time“ and “end time“ as described
in the relevant sections. Once both the “cook time“ and
“end time“ have been set, the “cook time“ and “end
time” indicators will stop flashing and the current time
of day will be displayed.
To check or cancel settings
1. To check your settings, press “mode” until the setting
you want is displayed. A red light will flash next to the
mode (cook time, end time etc) that is currently on display.
2. To cancel “delayed start” press “mode” until a light
flashes next to “cook time”. Press and hold “–” until
the clock no longer reverses (“0:00” and you will hear
a beep). If you have left the temperature and function
knobs at a setting the oven will start once the “end
time” light stops flashing.
3. To cancel “auto off” press “mode” until a light flashes
next to “cook time”. Press and hold “–” until the clock
no longer reverses (“0:00” and you will hear a beep).
This automatically cancels “delayed start”. If you
have left the temperature and function knobs at a setting,
the oven will start once the “cook time” light stops
flashing. Because you have cancelled “auto off” the
oven will continue to heat until you manually turn it off.
On completion of cooking
The oven will turn off, the timer will beep and the “end time”
and/or “cook time” indicators will flash.
1. Turn the function and temperature controls to the off position.
2. Press “+” or “–” or “mode” to stop the timer from beeping.
Touch Control
Setting the time of day
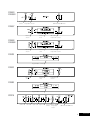
After the appliance has been electrically connected the
will flash on the clock display.
“set clock” symbol
1. To set the time of day in hours and minutes press the
– or +. 5 seconds after the last change the “timer arrow”
will disappear, confirming the time has been set.
NOTE: The clock has a 24-hour display.
Change the time of day (Daylight saving)
1. Switch off the appliance by pressing “On / Off”.
2. Press “Timer” as many times as necessary until the
and “timer arrow flash on
“set clock” symbol
the clock display.
3. Press “+” or “–” to change the time. 5 seconds after the
and “timer arrow
last change the “set clock” symbol
will disappear, confirming the time has been set.
Setting the oven function
1. Switch on the appliance by pressing the “On / Off”.
The oven lights will light.
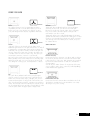
2. Press the “Function” as many times as necessary until
the desired function appears. The suggested cooking
temperature appears in the display and the degrees
symbol “°” flashes. If the suggested temperature is not
changed within approximately 5 seconds the degrees
symbol “°” stops flashing and the oven begins to heat.
The suggested temperature display is replaced with
the oven centre temperature and a thermometer icon.
The thermometer icon rises slowly, indicating the
degree to which the oven is currently being heated.
Changing the oven temperature
1. Press the – or +, to decrease or increase the temperature.
NOTE: The temperature can only be adjusted when
the degrees symbol “°” is flashing. The temperature
setting changes in increments of 5°C. To change the
temperature after the degrees symbol “°” stops flashing,
press the “Function” and then press the – or + to
change the temperature.
17
OPERATION